
HP-UX 11i Version 1 Installation and Update Guide, December 2003

Cold Installing HP-UX 11i v1
Installing HP-UX 11i v1
Chapter 5 105
How to Cold-Install HP-UX 11i v1
Required media Have the following media ready from the HP-UX 11i v1 media kit:
• HP-UX 11i v1 OE CDs or DVD December 2003 or later (also
includes bundles for hardware enablement and diagnostics).
• Support Plus CD, December 2003 or later (for hardware
enablement, quality pack, and diagnostics).
Typical install time Cold-installing HP-UX 11i v1 typically takes from 2-3 hours, depending
upon the system and whether you are installing only the OS or also
installing an OE.
Begin Cold
Installation
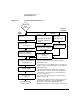
Use the following steps to cold install HP-UX 11i v1 on your system:
Step 1. Insert the HP-UX 11i v1 CD1 or DVD into the drive.
Make sure any external devices connected to the target system are
turned ON and operational. Then turn the system ON or cycle power.
For more information about starting the autoboot process, see Appendix
A, “Booting HP Servers and Workstations,” on page 159.
Step 2. Stop the autoboot:
• On workstations, press and hold down the Esc key.
• On servers, press any key.
You will see the boot console menu. Boot procedures vary somewhat
between computers. For more information, see Appendix A, “Booting HP
Servers and Workstations,” on page 159. If you need help, enter:
HELP
Step 3. Ensure that Fast Boot is enabled (the full memory check run when Fast
Boot is OFF may take several hours on a large system):
1. Select the Configuration Menu: CO
2. If the Fast Boot selection is available, switch Fast Boot ON:
FB ON