
HP System Management Homepage Installation Guide, May 2005

●
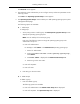
Trust All
a. Select Trust All.
b. Click Next. The IP Binding dialog box appears.
Note: The Trust All option leaves your system vulnerable to security attacks and sets
up the System Management Homepage to accept certain requests from any server.
For example, you might want to use Trust All if you have a secure network, and
everyone in the network is trusted.
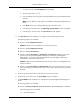
8. Select IP Binding to enable the Subnet IP Address and NetMask.
The IP Binding dialog box enables you to bind to specific IP addresses that match a specific
Subnet IP Address or NetMask. It restricts the subnet you want to manage.
a. Enter the Subnet IP Address in the designated field.
b. Enter the NetMask in the designated field.
c. Click Add. The Subnet IP Address/NetMask is displayed in the dialog box. To delete a
Subnet IP Address/Netmask, select a Subnet IP Address/NetMask, and click Delete.
The Subnet IP Address/Netmask is deleted from the dialog box.
Note: You can add up to five Subnet IP Address/NetMask pairs.
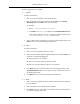
9. Click Next. The IP Restricted Logins dialog box appears. The IP Restricted Logins dialog
box enables you to select specific IP addresses or IP address ranges to include or exclude from
gaining login access. Although optional, the System Management Homepage can restrict
login access based on the IP addresses of the machine attempting to gain access.
10. Select IP Restricted Logins.
a. Enter the IP address or IP address range.
b. Select to Include or Exclude.
c. Click Add. The IP address or IP address range is displayed under the Inclusion or
Exclusion list. To delete an IP address or IP address range, click the X located next to
the IP address or IP address range. The IP address or IP address range is removed from
the list.
Note: You can add as many IP addresses or IP address ranges as you want.
Note: If you enter an invalid IP address or IP address range, an error message is displayed
indicating the IP address is invalid.
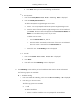
11. Click Finish to save the configurations for the component.
You can install this pre-configured component to target systems without the need to configure settings
in the System Management Homepage after installation. For more information regarding using the
ProLiant Remote Deployment Utility, refer to the HP ProLiant Support Pack and Deployment Utilities
User Guide.
32
Using the ProLiant Remote Deployment Utility