
HP System Management Homepage Installation Guide, May 2005
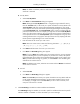

3. To add System Management Homepage groups:
1. In the Group Name field, enter a name for the group. For example, you might want to
use vcAdmin for a Version Control Administrator group.
Note: It is necessary to assign an account to an operating system user group with
administrator privileges to access the Version Control Repository Manager from the Version
Control Agent. Do not use the Administrator account to connect from the Version Control
Agent to the Version Control Repository Manager as it could potentially lock the
Administrator account out. Using the Administrator account, add another account with
administrator privileges to be used for Version Control Repository Manager access.
2. Select an Operating Level from the dropdown list. This level determines the privileges
assigned to this group.
3. Click Add. The group name is added. A maximum of five entries can be added for each
group level.
After a group name is added, you can delete it by clicking the X located next to the group
name.
4. Click Next. The User Access dialog box appears.
5. The User Access dialog box enables you to configure the System Management Homepage
from the following access types:
●
Select Anonymous Access to enable anonymous access to unsecured pages.
●
Select Local Access Anonymous or Local Access Administrator to set up the System
Management Homepage to automatically grant local IP addresses at the selected access
level.
Caution: Selecting Local Access with Administrator privileges provides any users with
access to the local console full access without prompting them for a user name or password.
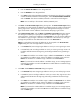
6. Click Next. The Trust Mode dialog box appears.
7. Select the level of security you want to provide from one of the following trust modes:
●
Trust By Certificate
a. Select Trust By Certificate.
b. Click Next. The Trusted Certificates dialog box appears. The Trusted Certificates
dialog box allows trusted certificate files to be added to the Trusted Certificate List.
c. Click Browse to select the certificate file. After the certificate file is selected, the
certificate data is displayed on the screen.
d. Click Add. The certificate is displayed under Certificate File. To delete a certificate
file from the screen, click the X located next to the certificate file.
e. Click Add File to browse and select any certificates to be included in the Trusted
Certificate List. The Add File dialog box appears. If an invalid file name is entered
in the file name field, an error message appears, indicating the file does not exist.
30
Using the ProLiant Remote Deployment Utility