
HP Instant Support Enterprise Edition Client Installation and Upgrade Guide


Installing HP ISEE on Windows Clients
Pre-configuring and Installing Windows Clients
Appendix C
81
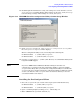
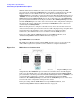
14. Read through the information to verify your settings are correct when the Confirm
Setup Information window displays. If the settings are incorrect, click [Back] to go
back and change settings. If the settings are correct, click [Next].
Figure C-14 HP ISEE Client Pre-configuration Utility Confirm Setup Window
15. Click [Finish] to close the HP ISEE Client Pre-configuration Utility when
the Configuration Complete window displays.
The Pre-configuration Utility saves your settings in the following file:
On Windows 2000: C:\WINNT\TEMP\setupInfo
On Windows 2003: C:\WINDOWS\TEMP\setupInfo
16. Copy the setupInfo file to c:\WINNT\TEMP directory on each Windows 2000 system
targeted for ISEE support.
NOTE If you have ISEE monitored Windows Clients running in more than one
country/region, you must use the Pre-configuration Utility to generate multiple
setupInfo files. Every time you run the Pre-configuration Utility it overwrites the
setupInfo file. You can either run the Pre-configuration Utility on different systems,
or store each instance of the setupInfo file in an alternate directory so it is not
overwritten with the new instance.
Installing the Pre-Configured Client
1. Place the setupInfo file you created on the target system under the directory:
On Windows 2000: C:\WINNT\TEMP\setupInfo
On Windows 2003: C:\WINDOWS\TEMP\setupInfo
2. Open a command prompt by clicking [Start] and selecting Run.
3. Enter command in the Open field and click [OK].