
HP Instant Support Enterprise Edition Client Installation and Upgrade Guide


Configuring ISEE Clients
Completing the ISEE Configuration after using the Pre-configuration Utility
Chapter 2
29
Completing the ISEE Configuration after using the
Pre-configuration Utility
With the use of the pre-configuration utility, most of the required configuration
information is recorded and applied to each client during the installation. However,
entitlement information, which is specific to each supported device, must be entered for
each Monitored Client. To finish the configuration of clients that were pre-configured,
complete the following steps on each client system:
NOTE If configuring HP ISEE in a Tru64 UNIX clustered environment, the following steps
must be performed on each node in the cluster.
If configuring on an OpenVMS cluster, the following steps must be performed on tall
nodes in a Multi-server installation or each OpenVMS server in a Stand Alone
configuration. For more information see “Understanding the OpenVMS Installation
Options” on page 86.
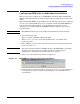
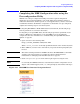
1. Open a browser to the following URL:
http://<client_hostname>:5060/start.html
Where <client_hostname> is the fully qualified hostname of the monitored system.
2. Enter admin for your user name and isee for your password when prompted by the
browser.
CAUTION This is the default password for all ISEE customers. HP STRONGLY recommends
changing your password after you complete the Client configuration. For
instructions see “Changing Your Default Password” on page 43.
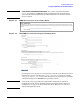
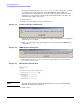
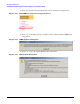
3. Click configuration options in the left navigation panel (see Figure 2-12).
NOTE Occasionally, the ISEE User Interface automatically loads the configuration screen
(Figure 2-14). If this happens, click [OK] when prompted, and continue with step 7.
Figure 2-12 HP ISEE User Interface Navigation Panel