
HP-UX System Administrator's Guide: Security Management HP-UX 11i v3 (B3921-90020, September 2010)


Table Of Contents
- HP-UX System Administrator's Guide: Security Management
- Table of Contents
- About this Document
- Part I Protecting Systems
- 1 Installing the HP-UX Operating Environment Securely
- 1.1 Installation Security Considerations
- 1.2 Preventing Security Breaches During the Boot Process
- 1.3 Enable Login Security for root
- 1.4 Using Boot Authentication to Prevent Unauthorized Access
- 1.5 Setting Install-Time Security Options
- 1.6 Installing Security Patches
- 1.7 Postinstallation Security Tips for Backup and Recovery
- 2 Administering User and System Security
- 2.1 Managing User Access
- 2.2 Authenticating Users During Login
- 2.3 Authenticating Users with PAM
- 2.4 Managing Passwords
- 2.4.1 System Administrator Responsibilities
- 2.4.2 User Responsibilities
- 2.4.3 Criteria of a Good Password
- 2.4.4 Changing the /etc/passwd Password File
- 2.4.5 The /etc/shadow Shadow Password File
- 2.4.6 Eliminating Pseudo-Accounts and Protecting Key Subsystems in /etc/passwd
- 2.4.7 Secure Login with HP-UX Secure Shell
- 2.4.8 Securing Passwords Stored in NIS
- 2.4.9 Securing Passwords Stored in LDAP Directory Server
- 2.5 Defining System Security Attributes
- 2.6 Handling setuid and setgid Programs
- 2.7 Preventing Stack Buffer Overflow Attacks
- 2.8 Protecting Unattended Terminals and Workstations
- 2.9 Protecting Against System Access by Remote Devices
- 2.10 Securing Login Banners
- 2.11 Protecting the root Account
- 3 HP-UX Standard Mode Security Extensions
- 4 Remote Access Security Administration
- 4.1 Overview of Internet Services and Remote Access Services
- 4.2 The inetd Daemon
- 4.3 Protection Against Spoofing with TCP Wrappers
- 4.4 Secure Internet Services
- 4.5 Controlling an Administrative Domain
- 4.6 Securing Remote Sessions Using HP-UX Secure Shell (SSH)
- 4.6.1 Key Security Features of HP-UX Secure Shell
- 4.6.2 Software Components of HP-UX Secure Shell
- 4.6.3 Running HP-UX Secure Shell
- 4.6.4 HP-UX Secure Shell Privilege Separation
- 4.6.5 HP-UX Secure Shell Authentication
- 4.6.6 Communication Protocols
- 4.6.7 HP-UX Secure Shell and the HP-UX System
- 4.6.8 Associated Technologies
- 4.6.9 Strong Random Number Generator Requirement
- 4.6.10 TCP Wrappers Support
- 4.6.11 chroot Directory Jail
- 1 Installing the HP-UX Operating Environment Securely
- Part II Protecting Data
- 5 File System Security
- 5.1 Controlling File Access
- 5.2 Setting Access Control Lists
- 5.3 Using HFS ACLs
- 5.4 Using JFS ACLs
- 5.4.1 Definition of a JFS ACL
- 5.4.2 How the System Generates a JFS ACL
- 5.4.3 Minimal JFS ACL
- 5.4.4 Additional JFS ACL user and group Entries
- 5.4.5 JFS ACL group and class Entries
- 5.4.6 Using the setacl and getacl Commands
- 5.4.7 Effect of chmod on class Entries
- 5.4.8 Example of Changing a Minimal JFS ACL
- 5.4.9 Default JFS ACLs
- 5.4.10 Changing JFS ACL with the setacl Command
- 5.5 Comparison of JFS and HFS ACLs
- 5.6 ACLs and NFS
- 5.7 Security Considerations for /dev Device Special Files
- 5.8 Protecting Disk Partitions and Logical Volumes
- 5.9 Security Guidelines for Mounting and Unmounting File Systems
- 5.10 Controlling File Security on a Network
- 6 Compartments
- 7 Fine-Grained Privileges
- 5 File System Security
- Part III Protecting Identity
- 8 HP-UX Role-Based Access Control
- 8.1 Overview
- 8.2 Access Control Basics
- 8.3 HP-UX RBAC Components
- 8.4 Planning the HP-UX RBAC Deployment
- 8.5 Configuring HP-UX RBAC
- 8.6 Using HP-UX RBAC
- 8.7 Troubleshooting HP-UX RBAC
- 9 Audit Administration
- 8 HP-UX Role-Based Access Control
- A Trusted Systems
- B Other Security Products
- B.1 HP-UX AAA Server (RADIUS)
- B.2 HP-UX Bastille
- B.3 HP-UX Directory Server
- B.4 HP-UX Encrypted Volume and File System (EVFS)
- B.5 HP-UX HIDS
- B.6 HP-UX IPFilter
- B.7 HP-UX IPSec
- B.8 HP-UX LDAP-UX Integration
- B.9 HP-UX Secure Resource Partitions (SRP)
- B.10 HP-UX Secure Shell
- B.11 HP-UX Trusted Computing Services
- B.12 Security Patches
- Glossary
- Index
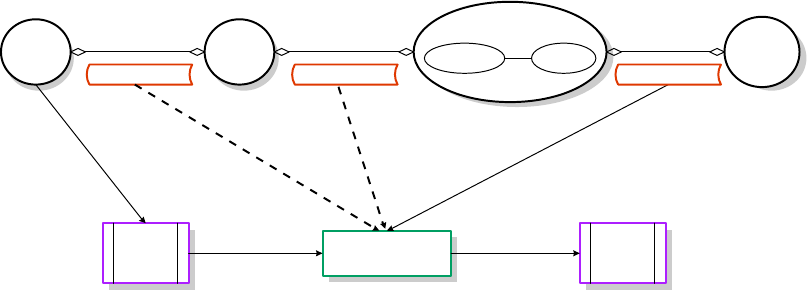
Figure 8-2 Example Operation After Invoking privrun
( )
/
,
Users Roles
Authorizations
Operations Objects
1:1
Cmd
Privs
MANY:MANY MANY:MANY MANY:MANY
/etc/rbac/user_role /etc/rbac/role_auth /etc/rbac/cmd_priv
3
4
via ACPS
via ACPS
Privrun
Process
shell
Command
w
Privileges
Drop all but
defined privs
1
2 5
cmd, args, UID
1. A process, specifically a shell, associated with the user executes privrun with the
goal of executing a target command with elevated privilege.
2. The target command line (command and arguments) is explicitly passed to
privrun, and the UID of the invoking user is implicitly passed by the process
context.
3. privrun attempts to find a match (or set of matches) within the
/etc/rbac/cmd_priv database for the specified command line. Each matching
entry also specifies a required authorization (operation, object pair) and the
resulting privileges if the user has the specified authorization.
4. privrun makes a call (for each matching /etc/rbac/cmd_priv entry) to the
ACPS. The HP-UX RBAC back end of the ACPS consults the
/etc/rbac/user_role and /etc/rbac/role_auth databases to determine
whether the user has the specified authorization, and passes this result back to
privrun.
5. Assuming that the user associated with the process has the required authorization
specified in the /etc/rbac/cmd_priv database for the requested command,
privrun will drop all privileges except those specified in the
/etc/rbac/cmd_priv entry and execute the requested command. The privrun
command is set to UID=0 and starts with all necessary privileges.
8.4 Planning the HP-UX RBAC Deployment
Follow these planning steps before deploying HP-UX RBAC:
1. Plan roles for users.
2. Plan authorizations for the roles.
3. Plan the authorization-to-command mappings.
The following sections describe these steps in more detail.
8.4 Planning the HP-UX RBAC Deployment 145