HP TFT7600 Rackmount Keyboard and Monitor User Guide November 2005 (First Edition) Part Number 365378-001
© Copyright 2005 Hewlett-Packard Development Company, L.P. The information contained herein is subject to change without notice. The only warranties for HP products and services are set forth in the express warranty statements accompanying such products and services. Nothing herein should be construed as constituting an additional warranty. HP shall not be liable for technical or editorial errors or omissions contained herein.
Contents Introduction .................................................................................................................................. 5 Introduction .............................................................................................................................................. 5 TFT7600 RKM features............................................................................................................................... 5 Components ......................................
Disposal of waste equipment by users in private households in the European Union ......................................... 26 Power cord requirement ........................................................................................................................... 26 Power cord statement for Japan................................................................................................................. 26 Electrostatic discharge ................................................................
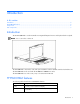
Introduction In this section Introduction ............................................................................................................................................. 5 TFT7600 RKM features ............................................................................................................................. 5 Components ............................................................................................................................................ 6 Rear components........
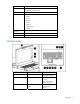
Feature Description Monitor input Plugs into a standard VGA connector; does not require a special graphics adapter card Plug and Play Plug-and-Play capability if supported by your system OSD Available in seven languages: • English • French • German • Italian • Japanese • Simple Chinese • Spanish Keyboard with touchpad Three button touchpad with scroll bar Power supply 12v DC/30 Watt Scroll keys Four scroll keys (inverted T) Components Reference number Component Function 1 Dis
Reference number Component Function 4 OSD activation button • Launches OSD menus • Selects • Exits menus and OSD 5 Scroll lock LED 6 Cap lock LED 7 Number lock LED 8 Touchpad 9 Left pick button 10 Middle pick button 11 Right pick button 12 Scroll bar 13 USB pass thru Pass thru to the rear USB port (callout 1 in the following figure) Rear components Reference number Component Function 1 USB pass thru Connects to a KVM switch virtual media port 2 USB Keyboard/Mouse connec
Installation In this section Installing the TFT7600 RKM....................................................................................................................... 8 Kit contents.............................................................................................................................................. 8 Installing the HP TFT7600 RKM.................................................................................................................. 8 Accessing the TFT7600 RKM ......
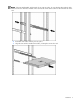
NOTE: If the HP 1U Adjustable Toolless Rails do not snap into place, be sure that they align with the holes marked on the rack. The holes marked on the rack must be in the same location for the front and rear of the rack. 2. Extend the inner slides until they lock into place. 3. Align the unit with the extended inner slides, inserting the unit into the rack.
4. Slide the brace rail assembly in between the HP 1U Adjustable Toolless Rails from the rear of the rack. 5. Align the screw holes on the brace rail with the screw holes on the HP 1U Adjustable Toolless Rails. 6. Secure the brace rail to the HP 1U Adjustable Toolless Rails with two 6-32 screws.
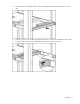
7. Remove the two shipping screws from the rear of the HP TFT7600 and discard the screws. 8. Attach the cable management arm to the rear of the unit with two 6-32 screws, supplied in the kit.
9. Connect and route the cables through the cable management arm and unit opening. Installation is complete. Accessing the TFT7600 RKM 1. Gently extend the TFT7600 RKM until the slides lock. 2. Push the display release latch then lift the display. Removing the HP TFT7600 RKM To remove the TFT7600 RKM, reverse the order of the steps listed in the Installing the HP TFT7600 RKM (on page 8) section.
Removing the HP 1U Adjustable Toolless Rails 1. Locate the spring release. 2. Place your hand on the outside of the HP 1U Adjustable Toolless Rails so that you can move the spring release. 3. Gently move the spring release toward the inside of the rack (1) while moving the HP 1U Adjustable Toolless Rails out toward you and away from the rack (2).
2. Slide it back to release the locking mechanism and gently pull to remove the cable.
Operational overview In this section On-screen display .................................................................................................................................. 15 Launching OSD menu ............................................................................................................................. 15 Navigating OSD .................................................................................................................................... 16 OSD menu ...............
3. Press the OSD activation button again to select your choice. A second level will expand menu items. Navigating OSD To navigate through the OSD menus and functions: • Use the Up (+) or Down (-) button to scroll through the OSD menu or an OSD sub-menu. The Up (+) and Down (-) button are also used to adjust or change a function setting. • Use the OSD activation button to select a sub-menu or a function. Example: To exit the OSD menu: 1. Press the Down (-) button to scroll to the Exit function. 2.
The center of the bar is obtained from the factory-preset value for Horizontal Position. At value=MIN, the selection of + positioning response might vary between XGA and SXGA panels. This is caused by physical limitations at MIN OSD placement. Vertical position The V position option displays a slider bar to enable the adjustment of the screen's vertical position. The center of the bar is obtained from the factory-preset value for Vertical Position.
Auto Configuration The Auto Configuration option performs four functions automatically: • Auto Level—Automatically adjusts the black and white levels of the screen • Auto Position—Automatically adjusts the position of the screen • Auto Phase—Automatically adjusts the phase • Auto Clock—Automatically adjusts the output clock per line to match the input Factory settings The Factory settings option enables the user to set the HP TFT7600 back to its original factory settings.
Maintenance In this section Maintenance and shipping guidelines ...................................................................................................... 19 Shipping the TFT7600 RKM..................................................................................................................... 20 Moving a rack with the TFT7600 RKM installed .........................................................................................
CAUTION: Do not use benzene, thinner, ammonia, or any volatile substance to clean the monitor screen or cabinet. These chemicals might damage the monitor. Never use water to clean an LCD screen. Shipping the TFT7600 RKM Keep the original packing box in a storage area in case you must move or ship your RKM. Moving a rack with the TFT7600 RKM installed When moving the TFT7600 RKM installed in a rack, HP recommends that you install the lock plates, included in your kit, on each side of the unit and rack.
Specifications In this section TFT7600 RKM specifications ................................................................................................................... 21 TFT7600 RKM specifications Item Specifications Display size 43.18 cm (17 in) Display type Flat panel, active matrix-TFT LCD Viewable image size 43.18 cm (17 in) diagonal Maximum weight (unpacked) 4.54 kg (10 lb) Maximum height 4.23 cm (1.68 in) Maximum depth 42.31 cm (16.66 in) Maximum width 43.2 cm (16.
Regulatory compliance notices In this section Regulatory compliance identification numbers............................................................................................ 22 Federal Communications Commission notice ............................................................................................. 22 Canadian notice (Avis Canadien) ............................................................................................................ 24 European Union regulatory notice ...........
uses, and can radiate radio frequency energy and, if not installed and used in accordance with the instructions, may cause harmful interference to radio communications. Operation of this equipment in a residential area is likely to cause harmful interference, in which case the user will be required to correct the interference at personal expense. Class B equipment This equipment has been tested and found to comply with the limits for a Class B digital device, pursuant to Part 15 of the FCC Rules.
Canadian notice (Avis Canadien) Class A equipment This Class A digital apparatus meets all requirements of the Canadian Interference-Causing Equipment Regulations. Cet appareil numérique de la classe A respecte toutes les exigences du Règlement sur le matériel brouilleur du Canada. Class B equipment This Class B digital apparatus meets all requirements of the Canadian Interference-Causing Equipment Regulations.
Japanese notice BSMI notice Korean notice Class A equipment Class B equipment Regulatory compliance notices 25
Disposal of waste equipment by users in private households in the European Union This symbol on the product or on its packaging indicates that this product must not be disposed of with your other household waste. Instead, it is your responsibility to dispose of your waste equipment by handing it over to a designated collection point for the recycling of waste electrical and electronic equipment.
Electrostatic discharge In this section Preventing electrostatic discharge............................................................................................................. 27 Grounding methods to prevent electrostatic discharge ................................................................................ 27 Preventing electrostatic discharge To prevent damaging the system, be aware of the precautions you need to follow when setting up the system or handling parts.
Technical support In this section HP Technical Support.............................................................................................................................. 28 HP Technical Support You can reach HP automated support services 24 hours a day, seven days a week, at no charge. The services contain the most current information about HP networking products. North America 1-800-652-6672 Worldwide HP has technical support centers worldwide.
Acronyms and abbreviations LCD liquid crystal display OSD on-screen display RETMA Radio Electronics Television Manufactures Association (rack spacing) RKM rackmount keyboard monitor TFT thin film transistor USB universal serial bus Acronyms and abbreviations 29
Index A L accessing the unit 12 Advanced 17 authorized reseller 28 auto-configuration process 18 Languages 18 C cable connectors 13 Canadian notice 24 Clock Adjust 17 component identification 5 D Declaration of Conformity 23 default 17 E electrostatic discharge 27 F factory default settings 18 Federal Communications Commission (FCC) notice 22, 23 G M maintenance 19 moving a rack with the unit installed 20 O operational overview 13, 15 OSD lockout 17 OSD menu 16 OSD position 17 OSD settings 17 OSD,