
HP Systems Insight Manager 7.2 Technical Reference Guide


2. Under Report Name, select the report you want to view.
3. Under Format for generated report, select CSV.
4. Click Run Report. If the browser system has no application associated with .CSV files, then
the .CSV file appears in the browser window. If you have an application associated with
.CSV files, then the .CSV file appears in the specified application.
If you are using Internet Explorer and an application such as Excel is installed on the browser
system and the .CSV file extension is associated with that application, the Save As dialog
box appears. Click Save.
5. Name the file, and in the Save as type field, select a format in which to save the file from the
dropdown list. Click Save. The report is saved.
Selecting the sort order
The Reporting feature enables you to sort the data after it appears in the Report Results page.
• Ascending Order.
Click the column heading you want to sort by once. The data queries in ascending alphabetical
order.
• Descending Order.
Click the column heading you want to sort by twice. The data queries in descending
alphabetical order.
Printing an existing report
From the Report Results page, select File→[Print] from your browser.
Related information
Copying managed reports
Procedure 194 Copying a report configuration
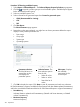
1. Select Reports→Manage Reports. The Manage Reports window appears.
2. Select the report to copy, and then click Copy. The Copy report section appears.
3. In the Report Name field, enter a name for the new report configuration.
NOTE: Report names cannot contain any of the following characters: < > ' & \ ` , # + | %
; / \\ ! ~ @ $ ^ * = { } [ ] " : and ?
4. Click OK.
The Copy report section closes, and the copied report configuration appears in the Manage
Reports section.
Related information
Editing managed reports
Procedure 195 Editing an existing report
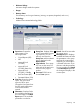
1. Select Reports→Manage Reports. The Manage Reports window appears.
2. Select the report to edit, and then click Edit. The Edit Report page displays.
3. Select the desired Target Systems. For more information, see Creating a task
The Step 1: Verify Target Systems page appears.
4. If you want additional targets, click Add Targets....
If a device is not needed, select the targeted device, and then click Remove Target.
Click Next to verify the selected targets.
316 Operations