
HP Systems Insight Manager 5.2 Update 2 Technical Reference Guide
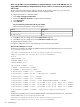
*filter
:INPUT ACCEPT [0:0]
:FORWARD ACCEPT [0:0]
:OUTPUT ACCEPT [0:0]
:RH-Firewall-1-INPUT - [0:0]
-A INPUT -j RH-Firewall-1-INPUT
-A FORWARD -j RH-Firewall-1-INPUT
-A RH-Firewall-1-INPUT -i lo -j ACCEPT
-A RH-Firewall-1-INPUT -p icmp --icmp-type any -j ACCEPT
-A RH-Firewall-1-INPUT -p 50 -j ACCEPT
-A RH-Firewall-1-INPUT -p 51 -j ACCEPT
-A RH-Firewall-1-INPUT -m state --state ESTABLISHED,RELATED -j ACCEPT
-A RH-Firewall-1-INPUT -m state --state NEW -m tcp -p tcp --dport 80 -j ACCEPT
-A RH-Firewall-1-INPUT -m state --state NEW -m tcp -p tcp --dport 21 -j ACCEPT
-A RH-Firewall-1-INPUT -m state --state NEW -m tcp -p tcp --dport 22 -j ACCEPT
-A RH-Firewall-1-INPUT -m state --state NEW -m tcp -p tcp --dport 2301 -j
ACCEPT
-A RH-Firewall-1-INPUT -m state --state NEW -m tcp -p tcp --dport 2381 -j
ACCEPT
-A RH-Firewall-1-INPUT -j REJECT --reject-with icmp-host-prohibited
COMMIT
SuSE Linux Enterprise Server
SuSE Linux Enterprise Server 8 and 9 firewalls are configured using the YAST2 utility.
To configure the firewall:
1. Using the YAST2 utility, select Security & Users→Firewall. The Firewall Configuration (Step 1 of
4): Basic Settings window appears.
2. Click Next. The Firewall Configuration (Step 2 of 4): Services window appears.
3. In the Additional Services field, enter 2301:2381 and click Next. The Firewall Configuration (Step
3 of 4): Features window appears.
4. Click Next. The Firewall Configuration (Step 4 of 4): Logging Options window appears.
5. Click Next. A dialog box displays asking you to confirm your intention to save settings and active
firewall.
6. Click Continue. The firewall is configured and your settings are saved.
I cannot see a newly booted blade in HP SIM.
Solution:
Be sure the blade has the CMS configured as an SNMP trap destination.
To configure the SNMP trap destination on Windows 2000:
1. Select Start→Settings→Control Panel→Network→Services→SNMP Service.
The SNMP Service Properties dialog box appears.
2. Click Traps.
3. Enter a community name, such as public.
4. Click Add to list.
5. At the bottom of the dialog box, click Add.
The SNMP Service Configuration dialog box appears.
6. Enter the host name or IP address of the enterprise management station, and then click Add.
The SNMP trap destination is added.
7. Click OK to save the changes and close the dialog box.
Blade 613