
Deploying HP SIM 5.x on MSCS clusters on Windows 2008 with SQL Server 2008 536993-001, 02/2009
39
instance being referenced here (HP
-
SIM
-
SQLSVR
\
HP_SIM_INSTANCE in this paper).
Otherwise, this step might hang.
12.
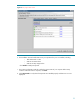
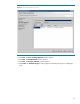
In the
Select Installation Type window
, se
lect
Custom
, and then click
Next
.
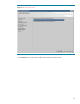
13.
Click
Custom
. The
Custom Install
-
Software Selection
window appears.
Note:
The
Custom Install
option enables you to specify installing on the desired shared disks (F:
and I: in this paper).
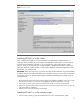
14.
Click
Next
. The
Service Account C
redentials
window appears.
a.
The
Username
field displays the user name that is logged in.
b.
Enter the password in the
Password
field.
c.
The
Domain
field displays the user domain used to log into the system.
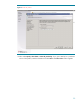
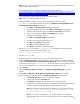
15.
Click
Next
. The
Custom Install
-
Summary
window appears.
16.
Click
Install
. The installation of HP SIM 5.x and its dependent services is initiated.
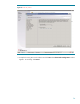
a.
A new
Welcome to the OpenSSH Services for HP Systems Insight Manager Setup
Wizard
window appears.
Note:
Read the welcome message, which reminds you to close other applic
ations.
i.
Click
Next
. The
Select
Destination Location
window appears.
ii.
Specify the desired directory to be on the local drive of the current system. In
this paper, the default
C:
\
Program Files
\
OpenSSH
.
iii.
Click
Next
. The
OpenSSH Service Log on as User
window app
ears.
1.
The
Username
field displays the user name that is logged in.
2.
Enter the password in the
Password
field.
3.
The
Domain
field displays the user domain used to log into the
system.
iv.
Click
Next
. The
Ready to Install
window appears.
v.
Click
Install
. The
Installi
ng
window appears.
Note:
A progress bar indicating files are being coped appears during the
installation of this service. At the end, the
Completing the OpenSSH Services
Manager Setup Wizard
window appears.
vi.
Click
Finish
to close the
Setup
–
OpenSSH Service
s for HP Systems Insight
Manager
wizard window.
b.
A new
Welcome to the Pegasus WMI Mapper V2.4 Setup Wizard
window appears.
i.
Click
Next
. The
End
-
User License Agreement
window appears.
ii.
Select
I accept the terms in the License Agreement
.
iii.
Click
Next
. The
Choose
Setup Type
window appears.
iv.
Select
Typical
. The
Ready to Install
window appears.
v.
Click
Install
to continue to the
Installing Pegasus WMI Mapper v2.4
window.
Note:
A progress bar indicating files are being copied appears during the
installation of this servi
ce. WMI Mapper is installed in
c:
\
Program
Files
\
The Open Group
\
WMI Mapper
. At the end the
Completing the
Pegasus WMI Mapper v2.4 Setup Wizard
window appears.
vi.
Click
Finish
to exit the WMI Mapper setup wizard.
c.
A new
Welcome to the HP Systems Insight Manager
Setup Wizard
window appears.