
HP Systems Insight Manager 7.2 Technical Reference Guide

The Step 2: Specify Parameters page appears.
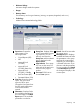
5. In the Select items to show in report: section, select all categories or items to include in the
report. You can click the icon to expand a category, and then select specific items or click
the icon to collapse a category.
6. Under Layout for generated or saved report: chose either of the following options.
• Show all systems in the same table.
This option displays all categories and items selected in the Select items to show in report
section. The selected categories appear as tables, and the selected data items appear
as column headers in the report. All systems appear in the same table.
• Show each system in a separate table.
This option displays all categories and items selected in the Select items to show in report
section. The selected categories appear as tables, and all the selected data items appear
as column headers. Each system appears in an individual table.
7. Under Format for current run of generated report (format not saved with report), select from
the following options:
• HTML (Recommended for viewing)
• XML
• CSV
8. To save over the existing report configuration, click Save Report.
Note: To save an existing report as a report with a new name, enter a new report name in
the Report Name field, and then click Save Report. The new report is saved and added to the
report list on the Manage Reports page.
A dialog box appears, asking you to confirm your intention to save the report. Click OK to
save, or click Cancel to abort. If the report already exists, the overwrite report message
appears. Click Cancel if you do not want to overwrite the existing report.
9. To view the report, click Run Report. You can click Previous to return to the target selection
page. You can click Cancel to abort the report creation process.
Related information
Deleting managed reports
Procedure 196 Deleting a report configuration
1. Select Reports→Manage Reports. The Manage Reports page appears.
2. Select the report configuration to be deleted.
3. Click Delete. A dialog box displays asking you to confirm your intention to delete the selected
report.
4. Click OK to permanently delete the report configuration. You can click Cancel to abort the
delete operation.
Related information
Running predefined reports
NOTE: Crystal Reports does not support Adobe Flash Player version 11. HP recommends you
use the supported flash version on the browsing machine to avoid issues. You can obtain the
supported version from the HP SIM installation by accessing:
https://<CMS_IP_ADDRESS>:50000/flash_install/flashInstall.jsp.
Reporting 317