
HP Systems Insight Manager 7.2 Technical Reference Guide
Procedure 85 Configuring SNMP community strings for a specific systems
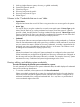
1. To set SNMP community strings, click the Configure SNMP checkbox. Here the second and
third read only community strings and Trap community strings are applicable only for iLO4.
2. Select from:
• Replace each selected system's SNMP community string with the following
Use this option to replace sign-in credentials for selected systems.
a. Enter the Read community string.
b. To use other credentials if the assigned credentials fail, select If these credentials fail,
try other credentials that may apply. Click the Learn more link for additional
information. By default this box is not selected, unless you have upgraded Systems
Insight Manager.
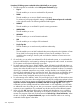
• Replace the selected system's SNMP community string) individually as follows
Use this option to specify sign-in credentials individually for selected systems.
a. Enter the Read community string for the individual systems.
b. To use other credentials if the assigned credentials fail, check Try others.
To delete SNMP credentials, you must leave the read community string blank.
3. To enable the write community string, select Enable write and enter the Write community string.
This is disabled by default.
This option is not available from the New Discovery Task page.
4. To save changes and start identification in the background, click OK. To cancel changes, click
Cancel.
Related information
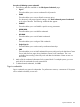
SNMPv3 credentials
The SNMPv3 tab enables you to configure SNMPv3 protocol support. HP SIM must collect certain
SNMPv3 protocol specific properties and save them, so that HP SIM can identify the target systems
using these new fields.
SNMPv3 adds security and configuration enhancements to SNMP. It provides encryption mechanism
as compared to plain text transmission in SNMPv1 and authentication to validate the source versus
community string.
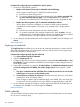
Procedure 86 Configuring SNMPv3 credentials
1. Enter the Engine ID (Optional).
2. Enter the Context Engine ID (Optional).
3. Enter the Context Name (Optional).
4. Enter the Security Name.
5. Select the Security Level from the dropdown list.
• NOAUTH-NOPRIV
If this security level is selected, the remaining fields are not configurable.
• AUTH_NOPRIV
If this security level is selected, you can configure the following fields:
a. Select the Authentication Protocol from the dropdown list.
b. Enter and confirm the Authentication Passphrase.
• AUTH_PRIV
If this security level is selected, you can configure the following fields:
System credentials 235