
HP Systems Insight Manager 7.2 Technical Reference Guide

For information about accessing the manpage, see the HP Systems Insight Manager Command
Line Interface Guide, at http://www.hp.com/go/insightmanagement/sim/docs.
Users and authorizations related information
Creating new user groups
User groups must exist in the operating system.Members of user groups in the operating system
can sign-in to HP SIM and inherit the group's attributes for configuration rights, sign in IP address
restrictions, and authorizations. When a group's configuration rights, sign in IP address restrictions,
or authorizations are changed, this change is immediately reflected for all current members of the
group.
With configuration rights, the user inherits the highest setting. With sign-in IP address restrictions,
the user inherits all entries. With authorizations, the user inherits all authorizations.
NOTE: A user's group membership is determined at sign-in. If a user's group membership changes
in the operating system, it is not reflected in HP SIM until the next time the user signs in to HP SIM.
By using nesting, you can add a group as a member of another group. Groups are nested together
to consolidate member accounts and reduce replication traffic. Refer to the HP Systems Insight
Manager User Guide, at http://www.hp.com/go/insightmanagement/sim/docs, for more detailed
information.
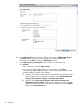
Procedure 68 Creating a new user group
1. In the Group name (on central management server) field, enter the operating system group
name to be used for signing in to HP SIM. This field is required.
2. In the Full name field, enter the full name for the group. This name appears in the table under
the Users tab.
3. In the Copy all authorizations of this user or [template] field, select a template or sign in that
already has the predefined authorizations that you want to assign to the group you are creating.
For more information about default user templates, see the HP Systems Insight Manager User
Guide, at http://www.hp.com/go/insightmanagement/sim/docs.
4. For user accounts that must be able to create, modify, or delete other accounts in the Central
management server security configuration right Section, select User can configure CMS security
access such as creating, modifying or removing other users. If you selected an existing user
with administrative rights or the administrator template in the previous step, this option is
automatically selected.
5. Under the Sign-In IP Address Restrictions Section, in the Inclusion ranges field, enter the IP
addresses of the systems you want this user to be able to use as a client browsing this CMS.
If you list multiple IP addresses, separate them with a semicolon (;). Each range is a single IP
address or two IP addresses separated by a dash (-). The IP addresses must be entered in the
standard dotted decimal notation, for example, 15.1.54.133. Any spaces surrounding the
semicolons or dashes are ignored. Spaces are not allowed within a single IP address in the
dotted decimal notation. Enter 0.0.0.0 to prevent a user from logging in through a remote
system.
IMPORTANT: If browsing from the CMS, ensure all IP addresses of the CMS are properly
included. If browsing to localhost, ensure the loopback address 127.0.0.1 is also included.
6. In the Exclusion ranges field, enter the IP address of the systems that should be excluded from
management by this user or user group. Use the same format as in the previous step for
Inclusion ranges. Enter 0.0.0.0 to prevent a user from logging in through a remote system.
7. To save and close the New User Group Section, click OK. To save and keep the New User
Group Section open, click Apply, or to cancel to close the New User Group Section without
saving the new group, click Cancel .
220 Operations