HP Systems Insight Manager 5.3 Installation and Configuration Guide for Linux *418811-004* Printed in the US HP Part Number: 418811-004 Published: January 2009 Edition: 5.
© Copyright 2003-2009 Hewlett-Packard Development Company, L.P. Legal notices The information in this document is subject to change without notice. Hewlett-Packard makes no warranty of any kind with regard to this manual, including, but not limited to, the implied warranties of merchantability and fitness for a particular purpose.
Term Defined use of an important word or phrase. UserInput Commands and other text that you type. Variable Name of a variable that you can replace in a command or function or information in a display that represents several possible values. [] Contents are optional in formats and command descriptions. If the contents are a list separated by |, you must choose one of the items. {} Contents are required in formats and command descriptions.
Table of Contents 1 Product overview........................................................................................8 Product architecture.................................................................................................................................8 Central management server.................................................................................................................8 Managed systems................................................................................
First Time Wizard summary ...................................................................................................................37 Finishing the First Time Wizard ..............................................................................................................37 Operating-system-specific collections, reports, and tools ............................................................................37 Operating-system-specific collections.................................................
Configuring task results manually.......................................................................................................66 13 Troubleshooting......................................................................................67 Browser issues......................................................................................................................................67 GUI issues........................................................................................................
List of Tables 2-1 Linux language support....................................................................................................................
1 Product overview HP SIM is the foundation for the HP unified server-storage management strategy. HP SIM is a hardware-level management product that supports multiple operating systems on HP ProLiant, Integrity and HP 9000 servers, HP StorageWorks MSA, EVA, XP arrays, and third-party arrays.
enables the user to run the associated set of tools on that system or systems that are members of the system group. IMPORTANT: Authorization for a toolbox can enable users with non-privileged access (for example, non-root users or users that are not members of the Windows Administrators group) to run tools as root/administrator or as another specified user. Be careful when granting users permission to run tools as root or administrator.
X Window tools X Window tools require that an X server is running. These tools can reside on the CMS or on a managed system. When accessing HP SIM from a network client, you must have X server software running on the network client to execute an X Window tool. From the CLI or GUI, HP SIM invokes the X Window application using the command line and passes the location of the X server by requesting the device for display from the user.
NOTE: For more information on installing Oracle, see “After installing HP Systems Insight Manager” and Chapter 3 “Installing HP SIM on the CMS for the first time”. NOTE: The Oracle database must be created with Unicode character set of AL32UTF8 and national character set of AL16UTF16 before installing HP SIM. The NLS Length must be set to BYTE. You must also specify the thin client .jar file location.
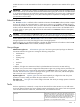
Central Management Server Network Client HTTPS Web Browser Tomcat Web Server HP-UX Managed System SSH HP Systems Insight Manager SSH SSH Client SSH DMI DMI SNMP SNMP HTTPS WBEM SNMP Windows Managed System SSH WBEM WBEM LINUX Managed System SSH SSH SNMP SNMP WMI WBEM ProLiant Support Pack ProLiant Support Pack Secure data transmission The security of the transaction depends on your networking environment and the management protocol that each tool is using.
environments. It provides access to both software data and hardware data that is readable by WBEM-compliant applications. HP SIM keeps a database of passwords for managed systems running WBEM. The database contains the user names and passwords for each managed system, which are required to provide user authentication for tools using this protocol. These accounts do not need to have other access capabilities, such as login rights. They are only used for WBEM access by HP SIM.
Managing servers behind a firewall HP SIM supports managing servers that are located behind a firewall when using the SSH, HTTPS, and WBEM protocols. HP does not recommend the SNMP and DMI protocols for this purpose because they are not secure protocols. The firewall must be configured to allow this traffic through the firewall.
2 Installation overview and requirements This chapter provides an overview of the HP SIM installation process, and it identifies the system requirements for a Linux CMS, a managed system, and a network client. First time install process overview Perform these steps for a first time install of HP SIM on your CMS: 1. Install and configure the CMS. The procedure to complete this step is in the installation chapters of this guide. Follow the appropriate chapter based on the operating system of your CMS.
Operating system Hardware • Red Hat Enterprise Linux 4 Update 7 x86 free disk space • • 2 MB for CMS (/) Red Hat Enterprise Linux 4 Update 7 AMD64/x86-64 • • 400 MB for the CMS and DTF agent (/opt) Red Hat Enterprise Linux 4 Update 6 x86 • • Red Hat Enterprise Linux 5 Update 6 AMD64/x86-64 500 MB minimum recommended for data (/var/opt) • • swap space SUSE Linux Enterprise Server ▲ 3 GB minimum total swap 10 SP2 x86 space for Itanium-based SUSE Linux Enterprise Server systems 10 SP2 AMD64/x
• Windows Server 2003, Standard Edition • Windows Server 2003, Standard Edition SP1 • Windows Server 2003, Standard Edition SP2 • Windows Server 2003, Standard x64 Edition • Windows Server 2003, Standard x64 Edition SP2 (32-bit mode) • Windows Server 2003, Enterprise Edition • Windows Server 2003, Enterprise Edition SP1 • Windows Server 2003, Enterprise Edition SP2 • Windows Server 2003, Enterprise x64 Edition (32-bit mode) • Windows Server 2003, Enterprise x64 Edition SP1 (32-bit mode)
• Windows 2000 Datacenter, SP2 or later • Windows NT4 Service Pack 6 • Windows Small Business Server 2003, Standard Edition • Windows Small Business Server 2003, Standard Edition SP1 • Windows Small Business Server 2003, Standard Edition SP2 • Windows Small Business Server 2003, Premium Edition • Windows Small Business Server 2003, Premium Edition SP1 • Windows Small Business Server 2003, Premium Edition SP2 • Windows Vista Business, 32-bit • Windows Vista Business, 64-bit • Windows Vis
• Red Hat Enterprise Linux 5.2 for AMD64 and Intel x86-64 • Red Hat Enterprise Linux 5.1 for Intel Itanium • Red Hat Enterprise Linux 5.2 for Intel Itanium • Red Hat 7.
• HP Integrity Virtual Machine for HP-UX 11i v3 running guest on HP-UX host • Citrix XenServer Enterprise Novell managed systems • Netware 6.5 • Netware 6.
NOTE: For optimum performance, the minimum resolution for the browser should be 1024 x 768. For HP-UX: ▲ Firefox 2.0.0.12 For Linux: • Firefox 2.0.0.16 • Firefox 3.0.1 NOTE: For all Internet Explorer browsers, you must have the SSL 3.0 or TLS 1.0 browser security options enabled for HP SIM to work properly.
3 Installing HP SIM on the CMS for the first time Preparing the system Perform step 1 for a first time install of HP SIM on your CMS. 1. Install and configure the CMS. The procedure to complete this step is in this chapter. 2. Install and configure the required management software on the systems that will be managed by the CMS. For more information on this step, see Chapter 4 “Setting up managed systems” for details. 3. Configure HP SIM for your environment.
If SSH is not installed, the previous command does not return any results. Install SSH from your Linux operating system CD before continuing with the HP Systems Insight Manager installation. b. Verify that SNMP is installed by executing the following command: rpm -qa | grep snmp If SNMP is not installed, the previous command does not return any results. Install SNMP from your Linux operating system CD before continuing with the HP Systems Insight Manager installation. c.
# cp /etc/krb5.conf.bak /etc/krb5.conf to install krb5. 6. (Optional) If you are planning to run the Firefox browser on the CMS, verify that Firefox 2.0 or later is installed. To verify which version is installed, open the Firefox browser, and select Help→About Firefox. NOTE: Firefox is not required on the CMS. It can be used to access HP Systems Insight Manager from any network client. Install Firefox 2.0 on the Linux managed node. To upgrade your version of Firefox: a.
NOTE: If you are using hpsmd as your database, continue with Step 3 through Step 5. If you are using Oracle as your database, skip to Step 6. 3. Install the hpsmdb database, using the appropriate .rpm files in the following order. NOTE: • The rpm -i hpsmdb-*.rpm command installs hpsmdb on your system. For 32-bit and 64-bit Red Hat Enterprise Linux 5 Update 1 AS/ES rpm -ivh hpsmdb-rhel5-*.rpm postgresql-7.4.1-1PGDG.i386.rpm \ • Red Hat Enterprise Linux 4 U3 AS/ES rpm -ivh hpsmdb-rhe14-*.i386.
/etc/init.d/hpsmdb start • For SUSE Linux Enterprise Server 9 with Service Pack 3 and SUSE Linux Enterprise Server 10 with Service Pack 1: a. View the status by executing the following command: /etc/init.d/postgresql status b. Configure hpsmdb to run during startup by executing the following command: chkconfig hpsmdb 345 c.
Or You can use the mxoracleconfig command with all parameters as shown below: mxoracleconfig –h hostname [-n port number] –d database name –u username – p password [–j driver jar file location] [-f ] –h Hostname Full DNS name or IP address of the Oracle server. -n Port number Port number to be used to connect to the oracle instance. Default port is 1521. –d Database name Name of database instance. –u Username Database user name. –p Password Database password for the corresponding user name.
/opt/mx/bin/mxstart 6. Configure the system to send SNMP traps. NOTE: These steps might vary slightly, depending on your version of Linux. Refer to your Linux provider for details if these file paths and file names do not exist on your system. a. Verify that SNMP is installed by executing the following command: rpm -qa | grep snmp If SNMP is not installed, the previous command does not return a components list. Refer to your Linux provider for information on installing SNMP. b.
e. Edit the snmpd.conf file using any text editor. For Red Hat Linux, run the following command for opening this file in the vi editor: vi /etc/snmp/snmpd.conf For SUSE Linux Enterprise Server 9 Service Pack 3, run the following command for opening this file in the vi editor: vi /etc/snmpd.conf For SUSE Linux Enterprise Server 10 with Service Pack 1, run the following command for opening this file in the vi editor: vi /etc/snmp/snmpd.conf i.
to the HP SIM application that it is registered and to discontinue the registration prompt. The First Time Wizard configures only the basic settings of an initial setup for HP SIM. Refer to the HP Systems Insight Manager 5.3 User Guide at http://h18013.www1.hp.com/products/servers/management/hpsim/ infolibrary.html for more information.
4 Setting up managed systems Perform step 2 to install and configure the required management software. 1. Install and configure the CMS. The procedure to complete this step is in Chapter 3 “Installing HP SIM on the CMS for the first time”. 2. Install and configure the required management software on the systems that will be managed by the CMS. The procedure to complete this step is in this chapter. 3. Configure HP SIM for your environment.
For example, if two CIMOMs exist on the same host, you must configure them to use different ports to communicate with the CMS. Configuring HP SIM to discover storage systems After verifying that each storage system’s SMI-S provider is installed and configured, configure HP SIM to discover the storage systems by performing the following steps: 1. Enter the user name and password for each provider’s SMI CIMOM in the Default WBEM settings section on the Setting Global Protocols page. 2.
5 Configuring HP SIM using the First Time Wizard Perform step 3 to configure HP SIM for your environment by using First Time Wizard or proceed to Chapter 6 “Configuring HP SIM using the Options menu”. 1. Install and configure the CMS. The procedure to complete this step is in Chapter 3 “Installing HP SIM on the CMS for the first time”. 2. Install and configure the required management software on the systems that will be managed by the CMS.
• WMI Mapper Proxy To retrieve managed system information on Windows systems, enter the mapper proxy system host name and port number. NOTE: This page does not appear if you are not managing Windows systems. • Privilege Elevation Enable privilege elevation if, on HP-UX, Linux, and ESX managed systems, you are required to sign in as a non-root user and then request privilege elevation to run root-level tools. • E-mail Enter the e-mail settings that the CMS will use to send e-mail notifications.
range of host names. To use an existing hosts file, enter the hosts file name in the following format: $HostsFileName . Alternatively, you can create a separate discovery task for your SMI CIMOMs. See the HP Systems Insight Manager 5.3 Technical Reference Guide at http://h18013.www1.hp.com/products/servers/ management/hpsim/infolibrary.html for more information. 5. To go to the next First Time Wizard step, click Next, or to return to the previous step, click Previous.
5. 6. 7. Under Configure secure shell (SSH) access, select from the following: • Host based authentication system. • Each user has to be authenticated on the managed system the managed system. All users from this instance of HP SIM are authenticated on the managed Each user must be authenticated on Select Set trust relationship to "Trust by Certificate" to set a trust relationship between managed systems and the CMS.
NOTE: If the Server Requires Authentication option is selected, and you enter incorrect account information, e-mail event notifications do not reach the intended recipients. First Time Wizard summary When you are finished entering information in the HP SIM First Time Wizard, review your selections on the Summary Page, and then click Finish to save them. If you selected HP-UX on the Managed Environment page, all selected menu items appear.
Windows Linux HP-UX Other HP Serviceguard (under Clusters by Type) All HP Integrity Virtual Machines* * Located under All VSE Resources. Operating-system-specific reports The following reports are specific to HP-UX and are added or removed depending on whether HP-UX is selected or not. Windows or Linux do not have specific reports.
• Deploy→RPM Package Manager • Tools→Command Line Tools→Unix/Linux • Configure→HP-UX Configuration • Deploy→Ignite-UX • Deploy→Software Distributor • Diagnose→Event Monitoring Service • Optimize→Process Resource Manager • Optimize→Workload Manager • Tasks & Logs→View SAM Log • Tasks & Logs→View Software Distributor Agent Log • Tasks & Logs→View Software Distributor Daemon Log • Tools→Command Line Tools→Unix/Linux • Configure→Management Processor→HP Integrity or HP 9000 iLO • Tools
6 Configuring HP SIM using the Options menu Perform step 3 to configure HP SIM for your environment or you can use First Time Wizard in Chapter 5 “Configuring HP SIM using the First Time Wizard”. 1. Install and configure the CMS. The procedure to complete this step is in Chapter 3 “Installing HP SIM on the CMS for the first time”. 2. Install and configure the required management software on the systems that will be managed by the CMS.
3. 4. Set the Default timeout and the Default retries. If some systems are managed over a WAN or satellite link, use a longer time-out (for example, five seconds) with at least one retry. For a LAN, you can use a shorter time-out. You can configure this setting on a single-system basis. In the WBEM settings section, verify that Enable WBEM (the default) is selected to allow WBEM requests to be sent.
6. 7. 8. In the Copy all authorizations of this user or [template] field, select a template (administrator-template, operator-template, or user-template) or sign-in account that already has the predefined authorizations that you want to assign to the sign-in account you are creating.
7. 8. In the Exclusion ranges field, enter the IP address of the systems that should be excluded from management by this user or user group. Use the same format as in the previous step for Inclusion ranges. Enter 0.0.0.0 to prevent a user from logging in through a remote system. To save and close the New User Group section, click OK. To save and keep the New User Group section open, click Apply, or to cancel to close the New User Group section without saving the new group, click Cancel .
b. c. In the Select Systems list box, the two default system groups (All Managed Systems and CMS) appear. Select one of these groups, or to select systems for the authorization, click Add to display the Add Systems section. In the Add systems by selecting from section, select one of the following: i. Collection Select a collection and click View contents. If you want to use the entire collection as your selection, select Select "collection name" itself.
not track changes. If this collection changes, the authorization will not change is preselected. c. If you want to select all individual systems from the collection, select the checkbox at the top of the table view in the column heading to select all systems. Note: This action creates a separate authorization for each selected system. d. To save system selections, click Apply, or to return to the New Authorizations section without saving changes, click Cancel.
To set up automatic event handling: 1. Select Options→Events→Automatic Event Handling→New Task. The Automatic Event Handling - New Task page appears. 2. Enter a name in the Task name field, or accept the default, and then click Next. The Select event collection page appears. 3. Select one of the following: a. Use this event collection i. Select an event collection from the dropdown list. Note: Select an event collection. The event collection is a collection that is defined by event attributes.
configured. You can add the user to the list, but pager messages are not sent to this user until the pager information is provided. Note: If you select a user that does not have pager information set, the Pager Information section expands where you can enter the information. 2. 3. • Enter the paging information. • Phone number Enter the pager phone number of the user associated with this user account if you are using a Windows operating system.
• Forward as SNMP trap Enter a system name or IP address in the Name or IP field, and then click >> to add it to the Trap recipients box. Click Delete if you want to delete a recipient after selecting the name in the Trap recipients box. Use the up and down arrows to scroll to the recipient to delete. • Write to system log On Windows NT and Windows XP systems, the event details are written to the Application Log, and the Source column of the Event Log is listed as HP SIM for the logged event.
uses the discovery filters and IP address exclusion ranges for additional filtering of these events. This option is not selected by default. • Automatically discover a server when its Integrated Lights Out management processor is identified. This option adds servers indirectly discovered through the server's management processor, which are discovered when the server's iLO is discovered. The discovered servers are identified as Disabled on the system table view page.
Configuring a discovery task To configure and execute a discovery, you must create a Discovery task. HP SIM ships includes one default discovery task (System Automatic Discovery). However, you can create a new discovery task to discover specific systems. For example, if you want to discover systems in a specific IP address range. You can set the task to run at scheduled times using specific ping inclusion ranges, templates, or hosts files. To create a discovery task: 1. Select Options→Discovery.
3. 4. 5. Click on the New button. The Add WMI Mapper Proxy page appears. Enter the IP address or the host name in the Host: field where OpenPegasus WMI Mapper is installed, and enter the port number where the WMI Mapper is installed in the Port number field. After identification is complete, be sure the Properties Page link on the System Page for the WMI Mapper node is there, and click on the link to bring up the Properties page.
7 Configuring managed systems Perform step 4 to configure the protocols for the managed systems 1. Install and configure the CMS. The procedure to complete this step is in Chapter 3 “Installing HP SIM on the CMS for the first time”. 2. Install and configure the required management software on the systems that will be managed by the CMS. For more information on this step, see Chapter 4 “Setting up managed systems” for details. 3. Configure HP SIM for your environment.
NOTE: If the HP Server Management Drivers and Agents daemon is not installed, omit this step and step F. c. Stop the SNMP daemon: /etc/init.d/snmpd stop d. Edit the snmpd.conf file using any text editor. For Red Hat Linux, run the following command for opening this file in the vi editor: vi /etc/snmp/snmpd.conf For SUSE Linux Enterprise Server 9 Service Pack 3, run the following command for opening this file in the vi editor: vi /etc/snmpd.
8 Upgrading from HP Systems Insight Manager This chapter provides the steps to upgrade HP SIM 5.x. NOTE: line. The "\" at the end of each command line indicates that the rest of the command is on the next Upgrading HP SIM 5.x in Linux NOTE: Migration from SCM 3.0 to HP SIM 5.x on a Linux CMS is not supported. HP SIM can be upgraded automatically or manually. Automatic install executes the .bin file, upgrades HP SIM checking for the prerequisites and completes upgrade.
NOTE: Use the ntsysv command instead of serviceconfif you are running from a CLI prompt. b. c. d. Scroll down to the hpsmdb entry. Select the checkbox, save the changes, and start the service. To start hpsmdb by using the command line, execute the following command: /etc/rc.d/init.d/hpsmdb start Or /etc/init.d/hpsmdb start • For SUSE Linux Enterprise Server 9 with Service Pack 3 and SUSE Linux Enterprise Server 10 with Service Pack 1: a. View the status by executing the following command: /etc/init.
c. d. 7. Download the new driver, version 10.1.0.2.0 or newer, from the Oracle website at http://www.oracle.com/technology/software/tech/java/sqlj_jdbc/index.html. Copy the JDBC driver file (ojdbc14.jar) to the /opt/mx/lib and /opt/mx/jboss/server/hpsim/lib directories. Complete the upgrade by restarting the HP Systems Insight Manager daemons using mxstop and mxstart. HP SIM is now installed and initialized on the CMS.
9 Uninstalling HP Systems Insight Manager Uninstalling HP Systems Insight Manager from a Linux system CAUTION: Removing HP Systems Insight Manager permanently deletes the information in the database unless you back it up before removing the software. 1. Stop the HP Systems Insight Manager daemons: /opt/mx/bin/mxstop 2.
10 Using the graphical user interface HP Systems Insight Manager provides a browser-based GUI. Accessing the GUI The graphical user interface (GUI) can be accessed from http://localhost:280/ with any network client that is running a supported web browser. ▲ Required web browsers • For Linux: • Firefox 2.0 or later To download, refer to http://www.hp.com/go/firefox. • For HP-UX: • • Firefox 2.0 or later For Windows: • Microsoft Internet Explorer 6 with Service Pack 2 or later • Firefox 2.
Graphical user interface features The GUI includes the following six regions: 1. Banner The banner provides a link to the Home page, a link to Sign Out of HP SIM, and displays the user that is currently signed in. Click the minimize icon in the top right corner to minimize the banner. To maximize the banner, click the maximize icon. 2. System Status panel This panel provides uncleared event status, system health status information, and an alarm to notify you about certain events or statuses.
NOTE: To maximize the workspace, click the Maximize link next to the Help icon ( the workspace to its original size, click Restore Size. ). To restore The four default sections on the introductory page include the following: • Do this now to finish the installation: met: This section appears only if the following conditions are • The user has administrative rights. • The user has not disabled this section from the Home Page Settings page.
Customizing the System Status Panel Customize the System Status panel to display the following status information: • Uncleared Event Status A count that indicates the number of uncleared event statuses that are Critical, Major, Minor, and Normal for any given system collection. Each number is a hyperlink to a detailed list of events with that particular status. When you click the number, an event collection appears with those particular events and their corresponding systems.
11 Using the command line interface HP Systems Insight Manager provides a command line interface (CLI) in addition to the graphical user interface (GUI). Many functions available in the GUI are also available through the CLI. Logging in to the CLI Access the HP Systems Insight Manager CLI directly on the CMS or from any network client using SSH client software. NOTE: Only administrators have command line access to HP Systems Insight Manager on a Windows CMS.
12 Configuration options Several configurable parameters in HP SIM that are not available from the GUI. These parameters can only be configured by editing a configuration file on the CMS. NOTE: All HP SIM parameters have been set to predefined values that are appropriate for most situations. These parameters should only be changed if you are experiencing issues with the default values. There are two main default locations where configuration files are stored.
session alive. The user is timed-out either by inactivity, closing the browser, or navigating to another site. The default time-out period is 20 minutes. Implementation • To configure the time-out policy, edit the globalsettings.props file. You can switch between these modes or change the time-out period. The default time-out policy is the monitor policy. The monitor policy is enabled when: EnableSessionKeepAlive=true To enable the active time-out policy, change this value to false.
A roll-over will not occur until a task running is completed. However, after one hour of exceeding the maximum file size, if the task is not finished, then the audit log file will roll over to another file. To configure the location of the Audit Log: 1. Create a file named path.properties under /etc/opt/mx/config. 2. Restart the HP SIM daemons (mxstop and mxstart). After restarting the service, a new log file named mx.log resides in the directory specified in path.properties file.
3. To set a schedule removing run now tasks, enter: • Number of results The default maximum number of task results retained for run now tasks is 300. • Number of hours The default maximum number of hours task results are retained for run now tasks is 24. 4. 5. 6. To run cleanup immediately, select Run cleanup now. Click OK. A dialog box appears stating that the settings have been saved. Click OK.
13 Troubleshooting Browser issues Accessing some of the menu items on a Linux CMS causes the page to go blank. Solution: If using Firefox and this happens, click back on the displayed page, and the menus will be refreshed. GUI issues Parts of the GUI do not show up on my Linux system, such as the devices in the system list, or the System and Events Lists area on the left. Solution: Remove everything and re-install.
The postmaster and PostgreSQL start. 4. Run mxinitconfig -a. Initial configuration completes successfully and service starts. Sign in issues I cannot sign in to HP SIM on my 64-bit Red Hat Linux 4 with Update 4 installed. I installed the operating system supplied 64-bit PostgreSQL separately as described, but after the service started, I could not sign in to HP SIM as root.
directly to a managed system, it is considered a first-party site. When navigating to a managed system through HP SIM, the system is considered a third-party site. • Customize the handling of cookies by clicking Advanced and enabling Override automatic cookie handling. Then select the appropriate radio buttons for first-party and third-party cookies to Accept or Prompt. If you select Prompt, the browser prompts you on how to handle a cookie each time a cookie is received.
glossary A administrative rights user A user who is authorized for the All Tools toolbox on all systems, including the Central Management Server. This type of user has been given special privileges to administer the HP SIM software. agent A program that regularly gathers information or performs some other service without the user's immediate presence. HP SIM agents provide in-depth hardware and software information and subsystem status to HP SIM and numerous third-party management applications.
certificate authority (CA) A trusted third-party organization or company that issues digital certificates used to create digital signatures and public-private key pairs. The role of the CA in this process is to guarantee that the individual who has been granted the unique certificate is the individual they claim to be. certificate key A value used alone or with an encryption decoder (corresponding public or private key) for cryptography.
custom tools Custom tools are tools that can be created by the user to run on the Central Management Server or on target systems. For example: • Remote tool A tool that runs on selected target systems. It might copy files to the target systems or run specific X-Window applications on the target systems. You can schedule this tool. • CMS tool A tool that runs on the CMS. It is usually a script or batch file and can pass in environment variables.
enclosure A physical container for a set of server blades. It consists of a backplane that routes power and communication signals and additional hardware for cabling and thermal issues. It also hosts the CPU or server power supplies. event Information sent to certain users that something in the managed environment has changed. Events are generated from SNMP traps. HP SIM receives a trap when an important event occurs. Events are defined as: • Warning. • Informational. information. • Normal.
HP Systems Insight Manager System management software that is capable of managing a wide variety of systems, including HP systems, clusters, desktops, workstations, and portables. HP SIM combines the strengths of Insight Manager 7, HP Toptools, and HP Servicecontrol Manager to deliver a single tool for managing HP ProLiant, Integrity, and HP 9000 systems running Windows, Linux, and HP-UX. The core HP SIM software delivers the essential capabilities required to manage all HP server platforms.
managed systems Any system managed by HP SIM, such as servers, desktops, storage systems, and Remote Insight Boards (RIBs). management agent A daemon or process running on a managed system. It receives and executes requests from the Central Management Server on the managed system. management domain A collection of resources called managed systems that have been placed under the control of HP SIM. Each Central Management Server is responsible for a management domain.
O Onboard Administrator The Onboard Administrator is the central point for controlling an entire c-Class rack. It offers configuration, power, and administrative control over the rack, and its associated blades (Compute Servers), blade management processors (iLOs), network switches (depending on the models of switches used) and storage components (such as SAN or SATA). The Onboard Administrator is a single management processor, with shared resources to an optional backup twin processor for failover.
Replicate Agent Settings A tool that can be used to copy web-based agent settings to a group of systems. repository A directory containing HP ProLiant Support Pack or Integrity Support Packs and Smart Components. Resource Partition A subset of the resources owned by an operating system instance. The use of those resources is controlled through technologies such as the Fair Share Scheduler, pSets, and Memory Resource Groups.
server blade visual locator A feature designed to provide visual representation of ProLiant BL e-Class, p-Class and c-Class servers within their respective enclosures and racks. See also enclosure. Service Advertising Protocol (SAP) A NetWare protocol used to identify the services and addresses of servers attached to the network. set disk thresholds A task provided by HP SIM to set a disk threshold for systems in an associated collection. This threshold is set on all disk volumes on the target systems.
standard output (stdout) The default place to which a program writes its output. The default is the terminal display. status message list A list created by Cluster Management Resources to collect entries found in the bottom left area of the Cluster Monitor page to bring your attention to cluster attributes that are in an abnormal state.
system information Information that is provided on the System Page under the System tab. The system information includes: • Network address • Network name • Description • Contact • Location • System links system information using DMI Agents that conform to the DMI V2 standard and have passed testing. The list of compliant DMI V2 agents can be found on http://www.dmtf.org. system information using SNMP Agents that conform to SNMP MIB-2 standards.
tool An application, command, or script that can be executed by HP SIM on one or more systems to perform a task. toolbox A defined set of tools that a user might need for a particular task, such as database administration or software management. Each HP SIM toolbox is associated with a set of tools and authorizations. trap An unsolicited message generated by a management agent that indicates that an event has occurred. For example, a monitored item has exceeded a set threshold or changed status.
Virtual Server Environment (VSE) An integrated server virtualization offering for HP-UX, Linux, and Windows servers that provides a flexible computing environment maximizing usage of server resources. VSE consists of a pool of dynamically sizeable virtual servers; each can grow and shrink based on service level objectives and business priorities. For more information, see http://hp.com/go/vse.
Index A accessing the graphical user interface, 58 active time-out, 63 add authorizations, 43 add toolboxes, 43 add users, 41 administrative rights user, 9 All Tools toolbox, 9 audit log, 10 configure, 64 authorizations, 8 add, 43 automatic discovery, 34, 48 automatic event handling, 33, 37, 45 e-mail settings, 36 B banner customize, 60 C Central Management Server Linux system preparation, 22 central management server installing HP Systems Insight Manager on Linux, 24 overview, 8 requirements, 15 certific
G getting started, 31, 40 graphical user interface customize, 60 logging in, 58 overview, 59 security, 11 GUI (see graphical user interface) H health status section, 59 Home page customize, 60 overview, 59 HP Systems Insight Manager commands, 62 HP Systems Insight Manager database, 10 HTTPS, 12, 13 I initial setup, 31, 40 add authorizations, 43 add toolboxes, 43 add users, 41 automatic discovery, 48 automatic event handling, 45 configuring email settings, 45 discovery, 48 managed systems, 31 manual discov
central management server, 15 managed system, 16 S search, 59 Secure HTTP, 13 Secure Shell , 12 security access, 11 certificate authority, 13 command line interface, 11 firewalls, 14 graphical user interface, 11 ports, 14 self-signed certificates, 13 Web server, 13 X applications, 13 self-signed certificates, 13 Servicecontrol Manager 3.