
HP SVA V2.0 Software Installation Guide


You can also view the full set of online documentation directly from the SVA CD using a Windows
or Linux system. The main navigation page for the Documentation Library is located on the CD
at the following location:
sva/index.htm
Because all the documentation is contained in a tree of Web-compatible files, you can also copy
the tree to any Web server root directory (Windows, UNIX®, or Linux). It can then be viewed
from its URL by anyone with access to that Web server.
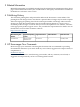
The SVA Documentation Library is a set of files bundled into a single compressed tar file for
convenience. You can install the tar file manually at any time on an existing Linux or Windows
machine; for example, before you set up all the cluster hardware and complete the installation
of the cluster software.
1. Mount the SVA CD in the CD-ROM drive on an existing Windows machine or Linux machine
(not part of the SVA).
2. Locate the sva_docs.tar.gz file, which contains the Documentation Library files in the
root level of the CD.
3. Follow the instructions for the target system:
• Linux
The /var/www/html directory is where Apache stores HTML files on Red Hat systems.
You can install the files in /var/www/html/sva. If you install the Documentation
Library files on a system which has Apache running, you can access the documentation
from that system at https://localhost/sva. Use the tar utility to extract and
install the Documentation Library.
• Windows
Use WinZip to extract the entire tree for the Documentation Library to a local file system
on disk, or a Web server root directory for viewing from a URL address.
4. In either case, open index.htm to view the main navigation window. It lists all the online
books, including the SVA Software Installation Guide.
1.2 Hardware Preparation
Refer to the HP XC Hardware Preparation Guide for these and any other hardware preparation
requirements.
If your cluster has xw8400 systems with SATA drives, you need to make changes to the BIOS
setttings before starting the HP XC installation.
1. Bring up the BIOS Setup by pressing F10 when booting the system.
2. Select Storage: Storage Options from the available menu items.
3. Under SATA Emulation, change the entry to Separate IDE Controller. Make sure
that the Primary and Secondary SATA Controllers are enabled.
4. Enter F10 to Accept.
5. Save and Exit.
If your cluster has DL 140 G3 systems, you need to make one change to the BIOS settings before
starting the HP XC installation.
1. Bring up the BIOS Setup by pressing F10 when booting the system.
2. Select Advanced from the available menu options.
3. Disable the 8042 Emulation Support item.
4. Save and Exit.
10 Installing Software Components