
HP Scalable Visualization Array Version 1.1 System Administration Guide

1
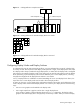
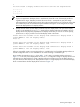
You have chosen a display surface that will look like the diagram below:
+----+----+
| 1 | 2 |
+----+----+
Note
If you're an application developer, bear in mind that the lower left corner of the Display Surface is
regarded as the origin. Therefore, the lower left corner of tile 1 corresponds to (0,0). The image
subcomponents are ordered from that point, left to right and then bottom to top. The launch scripts that
are included as part of the Visualization System Software manage the correct assignment of image
data to the display blocks of a Display Surface.
4. Specify the host names of each display node that outputs a display block to be part of the Display
Surface. In this example for display_b , specify the two display nodes that are cabled to the two
display devices that physically represent the two display blocks that you want to use. At the prompt,
press the Enter key to provide a list of all the display nodes in the cluster.
Please enter the hostname of the display node connected to display block 1
(press ENTER to list all display nodes):
vis[1-8]
Please enter the hostname of the display node connected to display block 1
(press ENTER to list all display nodes): vis1
Please enter the hostname of the display node connected to display block 2
(press ENTER to list all display nodes): vis2
After you successfully create a new Display Surface, it is added to the list of available Display Surfaces in
the Site Configuration File. It is now available for use when launching a visualization job.
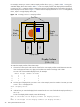
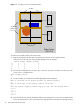
Now consider the example display_d from Table 1-9 of a 2W x 2 H Display Surface as shown in
Figure 1-5. In this case, each display block has a 2 W x 1 H configuration using two display devices. This
example uses two display blocks to create a Display Surface that contains two pairs of display devices —
one pair above the other. Each pair of display devices maps to a single display block. The second display
block is oriented above the first display block as shown in Figure 1-5.
Working with Displays 29