Hardware Operator's Guide
Manuals
Brands
HP Manuals
Storage
HP Surestore Tape Library Model 6/100
31
32
33
34
35
36
37
38
39
40
Hardware Operator
’
s Guide
3–2
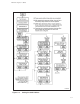
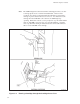
Figure 3–1.
DL
T Handle Position
1
...
...
34
35
36
37
38
...
...
74