
HP CPCI Interface Kit With LVD SCSI Adapter Card Installation Instructions

16
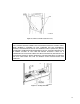
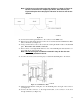
17. Press the top and bottom slide-rail buttons, and use the handle to gently push the drawer
into the frame (see Figure 24).
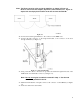
Figure 24. Slide-Rail Button
18. Replace the 13 screws (8 on the front and 5 along the left side) securing the EM drawer to
the frame assembly. Refer to Figure 16.
CAUTION:
Possible esd damage: FOLLOW ESD PRECAUTIONS.
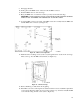
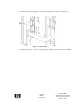
19. Obtain the MPW card. The MPW card is inserted into the CPCI card cage as described in
the next step.
20. Hold the card so that the card connector aligns with the MPV card connector (circuit side
out, components facing the MPC card).
21. Slide the MPW card onto the guide rail and gently push it until it mates with the MPV card
connector (see Figure 25).
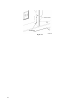
Figure 25. MPW Card Install
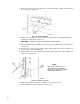
22. Make sure the card latch engages (see Figure 21 for Steps 22 and 23).
23. Using a Phillips screwdriver, tighten the captive screw.
NOTE:
ONLY THE LOWER SLOT IS
SUPPORTED AT THIS TIME.
BE SURE TO INSERT THE MPW
CARD INTO THAT SLOT.