
HP CPCI Interface Kit With LVD SCSI Adapter Card Installation Instructions

15
9. Disengage the latch.
10. Gently pull on the MPW card to release it from the MPV connector.
11. Slide the MPW card out of the card cage.
12. Place the MPW card on a static-free surface (you may use the anti-static bag).
CAUTION:
Possible equipment damage: PUSH THE MPV CARD STRAIGHT IN, BEING
CAREFUL NOT TO DAMAGE THE CONNECTOR TO THE MPC CARD.
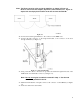
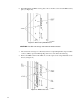
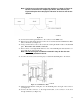
13. Locate the MPV connector provided on the MPC card at J211. Gently mate the MPV card
with the MPC card connectors (see Figure 22).
Figure 22. MPC Card Components
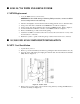
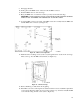
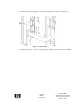
14. Install the three mounting screws (4-40 x 3/8) through the three cutouts in the card cage.
These screws go into the MPC card standoffs (see Figure 23).
Figure 23. CPCI Card Cage
15. Remove ESD bag or cardboard from the grating.
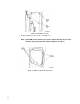
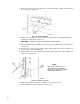
16. If the EM cover removed in Step D5 was attached with six screws, install the replacement
cover from the kit using eight 6-32 screws (refer to Figure 17), otherwise reinstall the EM
cover with tabs using six 6-32 screws (refer to Figure 18).