
Expansion Frame Installation Guide


62108 3
4. Slide cover up and set aside.
5. Using a T30 Torx driver, remove the mushrooms from the tape library frame (6 places) in
the area where the cover was removed (see Figure 1).
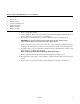
6. Position the robotic hand at the top of the Z-column and point it toward the drives.
CAUTION: Be careful not to hit your head on the theta lock down bracket
mounted to the top inside surface of the tape library frame.
7. Using a T15 Torx driver, remove the twelve No. 6-32 x 3/8-in. Torx Pan Head screws
holding the front left plate to the drive tower (see Figure 2). Set the screws and plate aside.
8. If required, remove any customer data cartridges from the cells in Panel 2, Column 3 and
4. Be careful not to damage the cartridges.
Note: The array labels appear directly above the arrays.
9. Remove the array retainer clip and the arrays from Panel 2, Column 3 and 4.
10. Reposition the robotic hand to point to Panel 2, Column 4 (where arrays were removed in
Step 7).
11. Remove theta stop closest to the drives using a flat blade screwdriver (see Figure 2).
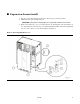
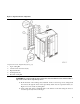
Removing Right Rear Cover (a5605a_01)
1. Rear Cover
2. Mushroom (6x)
3. Lock-Down Latch Tool
4. Lock-Down Latch
5. Mushroom (Ref)
6. Mushroom (Ref)
Figure 1. Removing Right Rear Cover (Continued)