
Cartridge Access Port Installation Instructions

62104 3
4. Reinstall CAP A EMI SHIELD removed in step 2 using a T15 Torx driver and five No. 6-
32 x 3/8 Torx Pan Head screws. Please note that some older models of 20/700 require only
three screws. Check CAP A for rotation by manually rotating the cylindrical door. If the
CAP cannot rotate freely, realign the CAP EMI SHIELD.
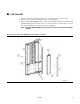
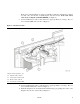
5. Remove CAP assembly from packaging.
6. Install CAP into CAP B location on the tape library cartridge area door. Align upper door
locating pin to hole on top CAP mounting bracket and lower door locating pin to slot on
bottom CAP mounting bracket. Hold CAP in place (see Figure 2). Install the CAP with
the motor facing up.
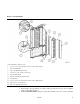
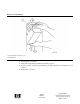
Removing CAP A EMI SHIELD and Window Assembly (a5601a_01)
1. CAP B Mounting Location
2. Tape Library CAP Door
3. CAP A EMI Shield
4. 6-32 x 3/8-in. Torx Pan Head Screws (10x)
5. Window Assembly
Figure 1. Removing CAP A EMI Shield and Window Assembly (Continued)