
34 Cartridge Array Installation Instructions


62215 3
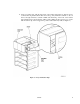
7. Remove the array from Panel 2, Column 0, and set aside for later use.
Note: Array labels, designating the location, appear directly above the
arrays.
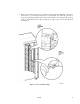
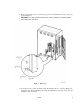
CAUTION: Before beginning the installation procedure please note the bracket on
the ceiling of the library so you do not hit your head.
8. Install the arrays from the bottom to the top of each column; start with Panel 1, Column 4
and finish at Panel 2, Column 0. Remember to reinstall the array that was removed so that
there are two arrays in Panel 2, Column 0. Move the robotic hand down to the bottom of
the tape library before installing the final array in Column 4.
9. Reinstall the retainer clip, previously removed in Step 6, above the top array in Panel 2,
Column 0.
10. Apply a clip label to the face of the retainer clip.