
34 Cartridge Array Installation Instructions


62215 1
HP Surestore Tape Library 10/180
34 Cartridge Array Installation Instruction
(for HP field service only)
CAUTION: Remote resolution must be attempted prior to authorization of on-site service.
Note to Customer Engineer: This installation may add new technology to the library
that older user’s guides do not address. Please remind the customer that the latest user
documentation is available from the HP Customer Care website: http://www.hp.com/go/
support.
■ Materials Included
■ Installation Notes
• Confirm with the customer System Administrator that the tape library can be powered
off.
• Observe proper power down and power on procedures, as described in the
Installation or Service Manual.
• If you install or replace a Cartridge Array, you must check the appropriate box on the
Drive Location Label. The Drive Location Label is located on the inside of the rear
library door, just below the UL label.
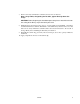
■ Cartridge Array Install
1. Have the operator take the tape library and all drives off-line.
2. Go to the back of the machine and power OFF the tape library.
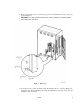
3. Open the front door using the tape library key.
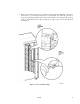
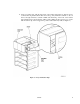
4. Move the robotic hand to the top of the tape library, and rotate it towards the cartridge
access port.
5. Remove any cartridges from the array labeled Panel 2, Column 0.
Table 1. Materials List
Part Quantity
Cartridge Array Installation Guide 1
Cartridge Unit 1
6-cell Array 6
Retainer Clips 1
Retainer Labels 1