
HP SureStore Tape Autoloader Model 1/9 Upgrade and Parts Replacement Guide


Replacing Autoloader Parts
Returning the Autoloader
Chapter 3 3-11
To remove the autoloader from a rack, do the following:
1. Extend the rack’s anti-tip foot.
2. Loosen the screws that secure the autoloader in place. The screws are
located in front of the trim bracket and filler panel on the front of the
autoloader.
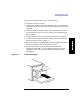
3. Using two people or an appropriately rated mechanical lift, remove
the autoloader from the rack tray by sliding it out and supporting it
from the bottom.
4. Place the autoloader on a solid surface to prepare it for packaging.
5. To remove the trim bracket and filler panel see “Removing the Trim
Bracket and Filler Panel” on page 1-7.
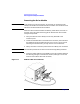
6. Re-install the internal packaging behind the autoloader front door to
prevent the magazine from moving (see Figure 3-5).
7. Place the autoloader into the packaging received with your
replacement autoloader or in the original packaging. If you need
packaging, contact your service representative to purchase the
packaging kit.
Figure 3-5 Internal Packaging