
HP SureStore Tape Autoloader Model 1/9 Upgrade and Parts Replacement Guide


Replacing Autoloader Parts
Removing and Installing Drive Modules
Chapter 3 3-7
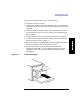
3. Tighten the top and bottom thumbscrews by hand, securing the drive
module into the autoloader.
4. Plug the ribbon connector into the back of the drive module (see
Figure 3-1 on page 3-4).
5. Gently fold the ribbon cable that is attached to the connector plate
into the back of the drive module.
6. Holding the connector plate in place, tighten the thumbscrews by
hand.
Bringing the Drive Online
1. To bring the new drive online, enter the Administration then the Online
Drive Repair
menus.
2. Select
[Put drive online] to bring the drive back online.
The autoloader will automatically run a self-test when the drive has
been brought online.
NOTE Youmayneedtousethehostbackupsoftwaretorecognizethenewdrive
when bringing it online. If the software does not have the capability to
automatically detect the new drive, you may need to reboot the host.
3. Download new firmware. See Chapter 4, “Upgrading Firmware” for
more information.