
HP SureStore Tape Autoloader Model 1/9 Upgrade and Parts Replacement Guide


Replacing Autoloader Parts
Removing and Installing Drive Modules
Chapter 33-4
Removing the Drive Module
NOTE To preserve SCSI communications, do not loosen or remove the SCSI
cable(s) connected to the outsideofthedrive module.The connection to be
removed is located inside the drive module.
When the drive module has been successfully taken offline, the LED on
the back of the drive will be flashing yellow. Remove the drive module
using the steps below:
1. Verify the external SCSI cable(s) are securely fastened to the
connector plate.
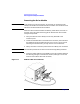
2. Loosen the thumbscrews on each side of the connector plate located in
themiddleofthedrivemodule(Figure3-1).Ifthisisyourfirsttime
loosening the thumbscrews, you may want to use a screwdriver.
3. Gently remove the connector plate with SCSI cable(s) still connected.
CAUTION Use standard precautions for electro-static discharge (ESD) protection.
4. Grasp the ribbon cable that is plugged into the drive module. Remove
the cable by pulling the connector to the left. (See Figure 3-1 for the
location of the ribbon cable and connector.)
Figure 3-1 Ribbon Cable and Connector