
HP SureStore Tape Autoloader Model 1/9 Upgrade and Parts Replacement Guide


Upgrading the Autoloader
Web Monitoring
Chapter 2 2-5
Installing the Remote Management Card (RMC)
CAUTION Use proper procedures to prevent electrostatic discharge (ESD) Use
wrist-grounding straps and anti-static mats.
1. Power-off the autoloader and disconnect the power cord.
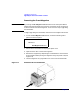
2. Remove the panel that covers the slot for the remote management
card (see Figure 2-1).
Figure 2-1 Installing a Remote Management Card
3. Align the sides of the new RMC with the recessed guide tracks inside
the autoloader. The card fits between the top and bottom tracks (see
Figure 2-1).
4. Gently slide the RMC in, ensuring that it remains aligned with the
recessed guide tracks. There may be some resistance as the RMC
connector engages with the connector on the autoloader.
5. Tighten the two thumbscrews on the RMC to secure it to the
autoloader.
6. Reconnect the power cord and power-on the autoloader.
7. Download new firmware (see “Upgrading Firmware” on page 4-3).