
HP SureStore E Tape Library Models 2/20, 4/40, and 6/60 - (English) User's Guide

Library Operations
Drive and Tape Operations
Chapter 22-18
1. From the
Drive and Tape Operations menu, select Clean Drive.
2. From
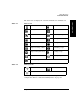
Choose Cleaning Slot, use the [-] or [+] key to select the slot
location of the cleaning tape. Refer to the label inside the library door,
the front panel display, or “Front Panel Overview” on page 2-3 for a
list of the slot numbers.
Select
[OK].
3. Using the
[-] or [+] keys, select the number of the drive to be cleaned.
Select
[Clean].
When the cleaning process is complete, the cleaning tape will be
returned to the original slot location. If the cycle failed, the screen
will display the appropriate status information. See “Troubleshooting
Common Problems” on page 4-27 for possible cleaning problems.
NOTE Drives can also be cleaned from remote access. See “Using the Remote
Management Card” on page 3-9.
Moving Tapes Between Slots
1. From the Drive and Tape Operations menu, select Move Tape Slot-to-Slot.
2. Select the slot where you want to move the tape from using the
[-] or
[+] keys, and press [OK].
3. Select the slot where you want to move the tape to using the
[-] or [+]
keys, and press
[OK]. A message will display if the destination slot
chosen is reserved or is the original “home” slot for a tape in the drive.
A status screen indicates the tape is being moved.
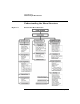
Main Menu ->
Operations ->
Drive and Tape Operations