
HP SureStore E Tape Library Models 2/20, 4/40, and 6/60 - (English) User's Guide

Library Operations
Drive and Tape Operations
Chapter 22-16
Drive and Tape Operations
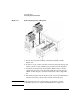
Look at the product information labels on the back of the library and the
labels inside each tape door for more information about drive and slot
numbering. The numbering scheme is also illustrated in “Front Panel
Overview” on page 2-3 and “Library Back Panel” on page 1-24.
NOTE The “Home” and “Map” front panel screens illustrate the drive, slot, and
mailslot numbering schemes. Slot numbers displayed in reverse video
indicate those reserved for the mailslot.
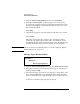
Loading a Tape Into a Drive
1. From the Drive and Tape Operations menu, select Load Tape from Drive.
2. Use the
[-] or [+] key to select any slot. Only full slots are available for
selection.
Select
[OK].
3. Use the
[-] or [+] key to select the desired drive. You can only select
empty drives that match the tape type.
4. Select
[Load] to move the tape from a slot to a drive.
A confirmation screen indicates that the tape is loaded.
NOTE You can also load tapes into drives from remote access. See “Using the
Remote Management Card” on page 3-9.
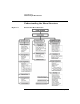
Main Menu ->
Operations ->
Drive and Tape Operations