HP SureStore E Tape Library 20-Slot, 40-Slot, and 60-Slot Models User’s Guide Edition 3 Manufacturing Part Number: C9521-90051 December 2000 Printed in USA © Copyright 2000 Hewlett-Packard Company © Copyright 2000 by Crossroads Systems, Inc. All rights reserved.
Notice This document contains information that is protected by copyright. All rights are reserved. No part of this document may be photocopied, reproduced, or translated into another language. The information contained in this document is subject to change without notice. Hewlett-Packard makes no warranty of any kind with regard to this printed material, including, but not limited to, the implied warranties of merchantability and fitness for a particular purpose.
. HP does not warrant that the operation of HP products will be uninterrupted or error free. If HP is unable, within a reasonable time, to repair or replace any product to a condition as warranted, customer will be entitled to a refund of the purchase price upon prompt return of the product. 4. HP products may contain remanufactured parts equivalent to new in performance or may have been subject to incidental use. 5.
Printing History New editions of this manual incorporate all material updated since the previous edition. The manual printing date and part number indicate the current edition. The printing date changes when a new edition is printed. (Minor corrections and updates incorporated at reprint do not change this date.) Edition 1: June 1999: C7200-90050 Initial Printing. Edition 2: April 2000: C7200-90051 Updated Fibre Channel, remote management card, and front panel information.
Typographical Conventions and Terms Keycap: Menu choices and screens on the library. [Soft Key]: Soft keys to press on the library. Indicates the menus you need to enter on the library front panel: Main Menu -> Operations -> Drive and Tape Operations WARNING Warnings call attention to a procedure or practice that could result in personal injury if not correctly performed. Do not proceed until you fully understand and meet the required conditions.
In This Manual Chapter 1 Library Installation: Describes how to install, rackmount, connect, and power on the library. Chapter 2 Library Operations: Describes the front panel menu structure, menu trees, and drive and tape operations. Chapter 3 Library Administration: Describes configuration options, diagnostic tests, and retrieving information about the library.
Contents 1. Library Installation Chapter Overview . . . . . . . . . . . . . . . . . . . . . . . . . . . . . . . . . . . . . . . . . . . . . . . . . . . . . . 1-2 Identifying Product Components . . . . . . . . . . . . . . . . . . . . . . . . . . . . . . . . . . . . . . . . . . 1-3 Choosing a Location . . . . . . . . . . . . . . . . . . . . . . . . . . . . . . . . . . . . . . . . . . . . . . . . . . . . . 1-5 Installing a Stand-Alone Library in a Rack . . . . . . . . . . . . . . . . . . . . . . . . . . . . .
Contents Labeling Tape Cartridges . . . . . . . . . . . . . . . . . . . . . . . . . . . . . . . . . . . . . . . . . . . . . . 2-11 Maintaining Tape Cartridges. . . . . . . . . . . . . . . . . . . . . . . . . . . . . . . . . . . . . . . . . . . 2-12 Accessing Tapes in the Library . . . . . . . . . . . . . . . . . . . . . . . . . . . . . . . . . . . . . . . . . . . 2-13 Magazine Access . . . . . . . . . . . . . . . . . . . . . . . . . . . . . . . . . . . . . . . . . . . . . . . . . . . . .
Contents Troubleshooting Overview. . . . . . . . . . . . . . . . . . . . . . . . . . . . . . . . . . . . . . . . . . . . . . . . 4-3 Understanding Error Types . . . . . . . . . . . . . . . . . . . . . . . . . . . . . . . . . . . . . . . . . . . . . 4-4 Understanding Error States . . . . . . . . . . . . . . . . . . . . . . . . . . . . . . . . . . . . . . . . . . . . . . 4-5 Soft (Recovered) Errors . . . . . . . . . . . . . . . . . . . . . . . . . . . . . . . . . . . . . . . . . . . . . . . .
Contents Using a Firmware Upgrade Tape (drive firmware only). . . . . . . . . . . . . . . . . . . . . . 4-64 A. Technical Specifications Appendix Overview . . . . . . . . . . . . . . . . . . . . . . . . . . . . . . . . . . . . . . . . . . . . . . . . . . . . .A-2 Environmental Specifications . . . . . . . . . . . . . . . . . . . . . . . . . . . . . . . . . . . . . . . . . . . . .A-3 Library Specifications . . . . . . . . . . . . . . . . . . . . . . . . . . . . . . . . . . . . . . . . . . . . . . . . . . .
Contents Addressing . . . . . . . . . . . . . . . . . . . . . . . . . . . . . . . . . . . . . . . . . . . . . . . . . . . . . . . .C-13 Common Problems with Fibre Channel . . . . . . . . . . . . . . . . . . . . . . . . . . . . . . . . . .C-14 Physical Connections . . . . . . . . . . . . . . . . . . . . . . . . . . . . . . . . . . . . . . . . . . . . . . .C-14 Laser Power Control Systems. . . . . . . . . . . . . . . . . . . . . . . . . . . . . . . . . . . . . . . . .C-15 Error Recovery. . . . . . . . . . . .
Contents xiii
Figures Figure 1-1. Removing the Cover . . . . . . . . . . . . . . . . . . . . . . . . . . . . . . . . . . . . . . . . . 1-7 Figure 1-2. Removing the Feet . . . . . . . . . . . . . . . . . . . . . . . . . . . . . . . . . . . . . . . . . . 1-8 Figure 1-3. Clip Nuts (20-Slot Library). . . . . . . . . . . . . . . . . . . . . . . . . . . . . . . . . . . 1-12 Figure 1-4. Clip Nuts (40-Slot Library). . . . . . . . . . . . . . . . . . . . . . . . . . . . . . . . . . . 1-13 Figure 1-5. Clip Nuts (60-Slot Library).
Figures Figure 4-1. Using the Soft Error Log . . . . . . . . . . . . . . . . . . . . . . . . . . . . . . . . . . . . . 4-7 Figure 4-2. Front Panel LEDs . . . . . . . . . . . . . . . . . . . . . . . . . . . . . . . . . . . . . . . . . . 4-17 Figure 4-3. Back View of the Library (60-Slot). . . . . . . . . . . . . . . . . . . . . . . . . . . . . 4-18 Figure 4-4. Library Card Positions . . . . . . . . . . . . . . . . . . . . . . . . . . . . . . . . . . . . . . 4-53 Figure 4-5. Ribbon Cable and Connector . . . .
Tables Table 1-1. Supplied Components . . . . . . . . . . . . . . . . . . . . . . . . . . . . . . . . . . . . . . . . . 1-3 Table 1-2. Location Criteria . . . . . . . . . . . . . . . . . . . . . . . . . . . . . . . . . . . . . . . . . . . . . 1-5 Table 1-3. Rack Kit Parts . . . . . . . . . . . . . . . . . . . . . . . . . . . . . . . . . . . . . . . . . . . . . . 1-10 Table 1-4. Drivers Needed . . . . . . . . . . . . . . . . . . . . . . . . . . . . . . . . . . . . . . . . . . . . . 1-41 Table 1-5.
Tables Table A-5. Fibre Channel Cable Specifications . . . . . . . . . . . . . . . . . . . . . . . . . . . . .A-6 Table B-1. Hardware Service Contracts . . . . . . . . . . . . . . . . . . . . . . . . . . . . . . . . . . .B-3 Table C-1. Fibre Channel Topologies. . . . . . . . . . . . . . . . . . . . . . . . . . . . . . . . . . . . . .C-8 Table D-1. Drive Format Compatibility . . . . . . . . . . . . . . . . . . . . . . . . . . . . . . . . . . .D-3 Table D-2. Data Cartridge Compatibility (Unformatted) . . . .
Getting Started 1 Library Installation Chapter 1 1-1
Library Installation Chapter Overview Chapter Overview This chapter describes the following: • Identifying Product Components • Choosing a Location • Installing the Library into a Rack • Preparing the Host for Installation • Connecting and Powering on the Library • Configuring the Host System • Identifying the Post-Installation Tasks • Moving or Shipping the Library 1-2 Chapter 1
Identifying Product Components The components listed in Table 1-1 may be supplied with the library, depending on the library configuration. Table 1-1 Supplied Components Component Description SCSI interface cable Four-meter SCSI cable(s) with 68-pin connectors. SCSI terminator 68-pin SCSI terminator (HVDS or LVDS) to terminate the SCSI chain. SCSI jumper cable 68-pin cable that connects the library controller or Fibre Channel interface to a drive.
Library Installation Identifying Product Components Table 1-1 NOTE Supplied Components Component Description Miscellaneous information May include data sheets, upgrade information, product information, and additional promotions. For information on additional accessories and upgrade kits, visit the HP Customer Care website at www.hp.com/go/support.
Choosing a Location Choose a location that meets the criteria listed in Table 1-2. For additional specifications, refer to Appendix A or the product information labels located on the back of the library. Table 1-2 Location Criteria Room temperature 10-35º C (50-95º F) Power source • AC power voltage: 100-127 V or 200-240 V Autoselecting • Line frequency: 50-60 Hz • A dedicated circuit is required. LAN connection Locate the library near a LAN connection for connecting the remote management card.
Library Installation Choosing a Location Table 1-2 Location Criteria Clearance Stand-alone configuration — located on or below a table: Back: 56 cm (22 inches) for cooling and service. Front: 86 cm (34 inches) for operator access. Sides: 56 cm (22 inches) for removal of the external cover. Rackmounted configuration: 1-6 Back: Allow adequate room for service access, at least 61 cm (24 inches). Front: 86 cm (34 inches) for operator access.
Installing a Stand-Alone Library in a Rack NOTE For stand-alone installations, see “Connecting and Powering on the Library” on page 1-24. To install a stand-alone library in a rack, remove the cover and feet by following these steps: 1. Remove the following six screws (Figure 1-1): a. Four screws, one located at each of the four feet b. Two screws near the bottom of the library and in the back 2. Lift the cover off the library. NOTE The cover may fit tightly.
Library Installation Installing a Stand-Alone Library in a Rack 3. Remove the feet as follows: a. Remove the 10-24 torx T20 machine screws from the side of each foot assembly. b. Slide the feet off the library. Figure 1-2 Removing the Feet 4. Follow the rackmounting procedures in “Installing the Library into a Rack” on page 1-9.
Installing the Library into a Rack The instructions in this section apply to library 20-slot, 40-slot, and 60-slot models mounted in a standard 19-inch rack with a depth between 24 and 34 inches. CAUTION Make sure that the rack and all equipment mounted in the rack have a reliable ground connection. Verify that the total current of the rack components does not exceed the current rating of the power distribution unit or outlet receptacles.
Library Installation Installing the Library into a Rack Table 1-3 Rack Kit Parts ID No.
Rackmounting the Library (for HP Authorized Personnel) WARNING Before you begin, lower the rack’s leveler feet, and extend the rack’s anti-tip foot. Failure to extend the anti-tip foot could result in personal injury or damage to the tape library if the rack tips over. TIP To use the display panel and access the tape doors, mount the top of the library in the middle of the rack or 120 cm (48 in) above the floor. 1.
Library Installation Installing the Library into a Rack NOTE Use the EIA markers as a reference point to ensure that the holes on the rack correspond to the holes on the template. The EIA markers on the template are represented by #>. Your rack might look different from the illustration. If the holes in the rack do not align with the template, move the template up one or two holes to create proper alignment.
Figure 1-4 Clip Nuts (40-Slot Library) Front Chapter 1 Back 1-13 Getting Started Library Installation Installing the Library into a Rack
Library Installation Installing the Library into a Rack Figure 1-5 Clip Nuts (60-Slot Library) Front Back 2. Align the upper (black) rail with the top two clip nuts and loosely install a screw into each clip nut. Slide the rail out so that it equals the rack depth, and attach to the back clip nuts. To allow for enough clearance, do not tighten these screws until you have installed the library.
3. Align the lower (black/silver) rail with the lower two clip nuts, and loosely install a screw into each clip nut. (See Figure 1-6, “Upper and Lower Rails.”) a. Slide the rail so that it equals the rack depth, and loosely install the screws. b. Tighten all screws to secure the rails. c. Tighten the two pre-installed screws inside each mounting rail to secure the rail in position.
Library Installation Installing the Library into a Rack 4. Install the library. CAUTION The majority of the weight is near the back of the library. Use appropriate force when lifting the library. TIP To reduce the weight of the library, you can remove all the drives. See “Removing and Replacing Drive Modules (for HP Authorized Personnel)” on page 4-54 for more information.
• 40-Slot Library and 60-Slot Library: Use a mechanical lift that is rated to the weight of the library, and follow the steps below to install the library. a. Break away the edges of the packing material at the bottom of the library. b. Use the straps to ease the library onto an appropriately rated mechanical lift. Use the lift to raise the library so that it aligns with the bottom rails. c. Slide the library onto the lower rails.
Library Installation Installing the Library into a Rack WARNING Do not move the library without additional help and/or an appropriately rated lift device. The 20-slot weighs 40.9 kilograms (90 pounds). The 40-slot weighs 76.4 kilograms (165 pounds). The 60-slot weighs 104.1 kilograms (229 pounds). 5. Tighten the screws on the top mounting rail to secure the library. 6.
• 40-Slot Library and 60-Slot Library a. Ensure access to the top of the library. If necessary, push the library to the service position to access the top cover. Do not push the library past the latch stop tabs. b. Remove the left back screw from the top cover. c. Install the stop bracket by inserting the tab into the latch stop. d. Re-install the screw into the top cover.
Library Installation Installing the Library into a Rack 7. Insert trim brackets into the slots on each side of the library (Figure 1-11, Figure 1-12, Figure 1-13). Figure 1-11 Trim Brackets (20-Slot) NOTE The illustration on the left shows the trim brackets for a rack bezel depth of 55-mm. The illustration on the right shows the trim bracket for a flushmount rack.
Figure 1-12 Trim Brackets (40-Slot) Figure 1-13 Trim Brackets (60-Slot) Chapter 1 1-21 Getting Started Library Installation Installing the Library into a Rack
Library Installation Installing the Library into a Rack 8. Open the tape doors and tighten the screws to secure the library into place (Figure 1-14). NOTE The doors may be key locked. The keys are attached to the power supply handle on the back of the library.
Preparing the Host for Installation NOTE Ensure that you have a host bus adapter card that is compatible with the library. Install the SCSI host bus adapter card(s) and compatible driver(s). Refer to the host computer user manual and host bus adapter card instructions, and follow these general steps: 1. When the host is powered on, install software and/or driver(s) into the host that are compatible with the library. 2.
Library Installation Connecting and Powering on the Library Connecting and Powering on the Library This section includes information and illustrations for the following: • Library back panel • SCSI cabling connections • Fibre Channel cabling connections NOTE The figures in this section depict a fully loaded library. The number of drives and cards will vary depending on your model.
Figure 1-16 40-Slot Back Panel Features 1 Vacant slot 5 Slave controller card 2 Remote management card 6 Power supply 3 Library controller card 7 Product information labels 4 Fibre Channel interface Chapter 1 1-25 Getting Started Library Installation Connecting and Powering on the Library
Library Installation Connecting and Powering on the Library Figure 1-17 60-Slot Back Panel Features 1 Vacant slot 5 Slave controller card 2 Remote management card 6 Power supply 3 Library controller card 7 Product information labels 4 Fibre Channel interface 1-26 Chapter 1
SCSI Cable Connections NOTE Refer to “Fibre Channel Cable Connections” on page 1-33 if the library is configured with Fibre Channel. This section illustrates a standard SCSI configuration that produces a high level of data storage performance (one SCSI host bus adapter card for each drive in the library with the library controller daisy-chained to the first drive). HP supports up to two drives per SCSI host bus adapter but recommends only one drive per bus.
Library Installation Connecting and Powering on the Library NOTE The AC power cord is the library’s main AC disconnect device and must be easily accessible at all times. 7. Connect a power cord to each power supply module on all levels. 8. Power on the library by pressing the recessed power (standby) switch, located on the front of the library in the bottom right corner. After the power-up test is complete (after several minutes), you will see the Home Screen on the library's front panel.
Figure 1-18 20-Slot SCSI Cable Connections 1 Host (user configured) 2 Remote management card LAN connection 3 Appropriate 68-pin SCSI terminator 4 Jumper cable with SCSI 68-pin connectors 5 SCSI cable from drive 1 to host 6 SCSI cable from drive 2 to host Chapter 1 1-29 Getting Started Library Installation Connecting and Powering on the Library
Library Installation Connecting and Powering on the Library Figure 1-19 40-Slot SCSI Cable Connections 1 Host (user configured) 2 Remote management card LAN connection 3 Appropriate 68-pin SCSI terminator 4 Jumper cable with SCSI 68-pin connectors 5 SCSI cable from drive 1 to host 6 SCSI cable from drive 2 to host 7 SCSI cable from drive 3 to host 8 SCSI cable from drive 4 to host 1-30 Chapter 1
Figure 1-20 60-Slot SCSI Cable Connections 1 Host (user configured) 6 SCSI cable from drive 2 to host 2 Remote management card LAN connection 7 SCSI cable from drive 3 to host 3 Appropriate 68-pin SCSI terminator 8 SCSI cable from drive 4 to host 4 Jumper cable with SCSI 68-pin connectors 9 SCSI cable from drive 5 to host 5 SCSI cable from drive 1 to host 10 SCSI cable from drive 6 to host Chapter 1 1-31 Getting Started Library Installation Connecting and Powering on the Library
Library Installation Connecting and Powering on the Library SCSI Cabling Considerations Some SCSI cabling variations, such as daisy-chaining drives, will degrade library performance. For more information, visit the HP Customer Care website at www.hp.com/go/support. TIP Dual port cards are available and will reduce slot usage in the host system.
Fibre Channel Cable Connections NOTE If you are not familiar with Fibre Channel technology, refer to Appendix C for an overview. There are several Fibre Channel cabling options. Figure 1-21 provides an overview. NOTE When using hubs or switches, consult the user documentation for those products. For detailed information on HP supported topologies, refer to the SAN Solution Installation Guide available from www.hp.com/go/ support.
Library Installation Connecting and Powering on the Library The following steps illustrate a Fibre Channel connection between the host, hub or switch, and library. Refer to Figure 1-23, Figure 1-24, or Figure 1-25, and connect the library as follows: 1. Ensure that the library and host are inactive, and the library is disconnected from the host. 2. Ensure that the required host software has been installed. 3. Power off the host, hub, or switch.
f. Connect the Fibre Channel cable(s) to the host, hub, or switch. — For the standard performance Fibre Channel interface, a GBIC is required. (See Figure 1-22.) Figure 1-22 Fibre Channel Connections (Standard Performance Interface) NOTE Your Fibre Channel interface type (standard or high performance) is dependent on the drive technology in your library. To identify whether you have the high performance or standard performance Fibre Channel interface, see page 4-23 and page 4-24.
Library Installation Connecting and Powering on the Library 6. Power on the hub or switch (if present). NOTE The AC power cord is the library’s main AC disconnect device and must be easily accessbile at all times. 7. Connect the power cord(s) from the library to a grounded power receptacle. Power on the library by pressing the recessed power (standby) switch located on the front of the library in the bottom right corner.
Figure 1-23 20-Slot Fibre Channel Connections 1 Hosts (user configured) 5 SCSI cable from the library controller card to drive 1 2 Hub or switch 6 SCSI cable from bus 1 on the Fibre Channel interface to drive 1 3 Remote management card LAN connection 7 SCSI cable from bus 2 on the Fibre Channel interface to drive 2 4 Appropriate SCSI terminator 8 Fibre Channel cable to hub or switch Chapter 1 1-37 Getting Started Library Installation Connecting and Powering on the Library
Library Installation Connecting and Powering on the Library Figure 1-24 40-Slot Fibre Channel Connections 1 Hosts (user configured) 6 SCSI cable from bus 1 on the Fibre Channel interface to drive 1 2 Hub or switch 7 SCSI cable from bus 2 on the Fibre Channel interface to drive 2 3 Remote management card LAN connection 8 SCSI cable from bus 2 on the Fibre Channel interface to drive 4 4 Appropriate SCSI terminator 9 SCSI cable from bus 1 on the Fibre Channel interface to drive 3 5 SCSI cabl
Figure 1-25 60-Slot Fibre Channel Connections 1 Hosts (user configured) 7 SCSI cable from bus 2 on the Fibre Channel interface to drive 2 2 Hub or switch 8 SCSI cable from bus 2 on the Fibre Channel interface to drive 4 3 Remote management card LAN connection 9 SCSI cable from bus 1 on the Fibre Channel interface to drive 3 4 Appropriate SCSI terminator 10 SCSI cable from bus 2 on the Fibre Channel interface to drive 6 5 SCSI cable from the library controller card to drive 1 11 SCSI cab
Library Installation Configuring the Host System Configuring the Host System Once the library is connected to a host, the Windows NT, Sun Solaris, HP-UX, and MPE/iX operating systems must be configured to recognize it. The procedures are different, depending on the host system.
2. Type “init 0” at any prompt. This will shut down all processes, and take you to the OpenBoot PROM. 3. Type “reset”. 4. At the OK prompt, type “probe-scsi-all”. Run a test backup to ensure that all components are properly configured. HP-UX Hosts To enable communication between the host and tape library, appropriate drivers must be configured into the HP-UX kernel. Table 1-4 shows which drivers are necessary for each device.
Library Installation Configuring the Host System If these drivers are already installed into the kernel, upon system boot they will automatically be associated with the hardware that they control. However, if drivers are missing, they must be installed. For more information on installing Fibre Channel drivers, refer to the HP Fibre Channel Mass Storage Adapter Service and User Manual (A3636-90002). A pass-through driver is used to manage the robotics controller.
NOTE HP C7200-8000 is used only as an example. The actual ioscan output will reflect the product number of the library you are configuring. HSC or PCI Pass-Through Driver Installation The following procedure assumes the use of a SAM terminal mode. In Xwindows (GUI) mode, use the mouse button to select an option. 1. Run SAM. 2. Select Kernel Config, and press Return. 3. Select Drivers, and press Return. 4. Select sctl.
Library Installation Configuring the Host System 2. Determine the value for by executing the following command for robotics attached to an HSC or PCI adapter: lsdev -d sctl The output resembles the following: HSC or PCI Character Block Driver Class 203 -1 sctl ctl Determine the value for using the ioscan command.
Verifying the Installation Confirm that the communications path to the robotics controller is functional: 1. Compile the SCSI I/O test program: cc /usr/contrib/src/scsi_io.c. -o/usr/contrib/bin/ scsi_io 2. Run the SCSI I/O test program, using the device file created during installation.
Library Installation Configuring the Host System MPE/iX Hosts Requirements Libraries require additional Legato NetWorker Server software that runs on either an HP Intelligent Server or an NT Server. The HP 3000 must be a Legato Networker Storage Node. Configuring the Host The example below illustrates the steps needed to configure the library on MPE/iX. NOTE This example illustrates the driver binding, but is not optimized for performance since it shows the entire library on a single differential bus.
3. Boot the system. At the MPE prompt, run sysgen and start the io section: sysgen SYSGEN version E . . . sysgen> io ** IO configurator commands ** 4. If not already configured, configure the differential card and the pseudo/target level of the SCSI path: io> io> io> io> io> io> apath apath apath apath apath apath 10/4/4 id=HP28696A 10/4/4.0 id=pseudo 10/4/4.1 id=pseudo 10/4/4.2 id=pseudo 10/4/4.3 id=pseudo 10/4/4.4 id=pseudo 5.
Library Installation Configuring the Host System b. Verify the binding for the targets (the transparent dm): io> lpath 10/4/4.0 PATH: 10/4/4.0 LDEV: ID: PSEUDO TYPE: DA PMGR: TRANSPARENT_MGR PMGRPRI: 6 LMGR: MAXIOS: 0 Repeat this step for lpath 10/4/4.1, 4.2, 4.3, and 4.4. c. Verify the binding for the robotics controller (the pass-thru driver): io> lpath 10/4/4.0.0 PATH: 10/4/4.0.
e. To configure the Storage Node on the NetWorker server, verify the ldev specifications: io> Idev 30/34 LDEV: 30 DEVNAME: OUTDEV: 0 MODE: ID: HPA4669A RSIZE: 128 DEVTYPE: MOSAR_AC PATH: 10/4/4.0.0 MPETYPE: 24 MPESUBTYPE: 4 CLASS: LDEV: 31 DEVNAME: OUTDEV: 0 MODE: ID: DLT8000 RSIZE: 128 DEVTYPE: TAPE PATH: 10/4/4.1.0 MPETYPE: 24 MPESUBTYPE: 8 CLASS: TAPE ... LDEV: 34 DEVNAME: OUTDEV: 0 MODE: ID: DLT8000 RSIZE: 128 DEVTYPE: TAPE PATH: 10/4/4.4.0 MPETYPE: 24 MPESUBTYPE: 8 CLASS: TAPE 7.
Library Installation Configuring the Host System Verifying the Connection Additional information regarding the configuration and verification of libraries is provided in the Legato NetWorker Installation Guide (MPE/iX version) for the Networker Storage Node product.
Identifying the Post-Installation Tasks After you install and configure the library, you must complete the following setup tasks from the library’s front panel: • Setting the date and time: When you first set up the library or if it has been disconnected for an extended period of time (around 8 days), set the library’s real-time clock. See “Setting the Date and Time” on page 3-21 for more information. • Setting the mailslot configuration: The default setting is for a one-slot mailslot.
Library Installation Moving or Shipping the Library Moving or Shipping the Library WARNING Do not move the library without additional help or an appropriately rated lift device. The 20-slot weighs 40.9 kilograms (90 pounds). The 40-slot weighs 76.4 kilograms (165 pounds). The 60-slot weighs 104.1 kilograms (229 pounds). NOTE During normal operation, changes to configurations are stored in NonVolatile (NV) RAM for eight days.
3. If shipping the library, remove tape cartridges from the magazines: a. From the Magazine Access menu, select one of the following options: — Unlock Door — Unlock All Doors Use the [-] or [+] keys to change the door selection. b. Pull the unlocked door(s) out to access magazines and tapes. The door may also be key locked. Unlock the door if needed. c. Remove the magazine by lifting it straight up with the handle. d.
Library Installation Moving or Shipping the Library NOTE You do not need to remove the SCSI cables that connect the controller or the Fibre Channel interface to the drive modules, unless the library is being shipped. 7. To move a stand-alone library, move it to its new location and reconnect it using the procedures in “Connecting and Powering on the Library” on page 1-24. • For shipping, place the library in the original packing materials.
• For the 20-slot library: If the library does not have enough clearance above for a tool to be inserted, unscrew the four screws (two on each side) from the top (black) mounting rail on the front of the library. Pull the library partially out, then lower the front half of the library to ease it under the latch stops. Figure 1-26 Latch Stops 14. Remove the library from the rack.
Library Installation Moving or Shipping the Library • 40-Slot and 60-Slot Libraries: a. Position the original shipping pallet in front of the rack. b. With at least one person on each side, slide the library out of the rack and onto an appropriately rated mechanical lift. Lower the library onto the shipping pallet. NOTE If you no longer have the original packaging, contact your service representative to obtain packaging materials, or order direct from Hewlett-Packard.
Library Operations 2 Library Operations Chapter 2 2-1
Library Operations Chapter Overview Chapter Overview This chapter describes the following: • Front Panel Overview • Understanding the Menu Structure • Using Tapes • Accessing Tapes in the Library • Drive and Tape Operations 2-2 Chapter 2
Library Operations Front Panel Overview The front panel is the local control device for the library, and is located on the front of the library. LED bar beneath the front panel display indicates library activity.
Library Operations Front Panel Overview Figure 2-2 40-Slot Library Front Panel 1 Door 1 with lock (slots 1-10 with slot 1 at the front) 6 Viewing windows 2 Door 2 with lock (slots 20-11 with slot 20 at the front) 7 Soft keys 3 Door 3 with lock (slots 21-30 with slot 21 at the front) 8 Front panel LED 4 Door 4 with lock (slots 40-31 with slot 40 at the front) 9 Power (standby) switch 5 Front panel display 2-4 Chapter 2
Library Operations Front Panel Overview Figure 2-3 60-Slot Library Front Panel Library Operations 1 Door 1 with lock (slots 1-10 with slot 1 at the front) 7 Front panel display 2 Door 2 with lock (slots 20-11 with slot 20 at the front) 8 Viewing windows 3 Door 3 with lock (slots 21-30 with slot 21 at the front) 9 Soft keys 4 Door 4 with lock (slots 40-31 with slot 40 at the front) 10 Front panel LED 5 Door 5 with lock (slots 41-50 with slot 41 at the front) 11 Power (standby) switch 6
Library Operations Front Panel Overview Nesting Each level of password-protected menus (Administration and Service) includes all options available in the subordinate menu. For example, all options available in the Administration Menu are also included in the Service Menu. This functionality reduces the need to return to the Main Menu or re-enter a password. Figure 2-4 illustrates the “nesting” concept of increasing levels of library control.
Library Operations Front Panel Overview Front Panel Display Conventions Front Panel Status Information (Home Screen) Figure 2-5 shows a typical Home screen view, using the 40-slot library as an example.
Library Operations Front Panel Overview Status Bar All screens, except the Home and Map screens, show a status bar that summarizes library and drive status (Figure 2-6). The status bar shows a reverse video reminder (icon background reverses to black) for drive or library errors that have been entered in the media log or hard error log. You may clear this reminder by viewing either the Drive Log or Library Hard Error Log screens.
Library Operations Front Panel Overview The status bar can display the icons listed in Table 2-1 and Table 2-2. Library Operations Table 2-1 Drive Icons Power is off Online Failed, offline Full and idle Needs to be cleaned Unloading a tape Offline Seeking data on a tape Failed, online Writing data to a tape Tape is cleaning a drive Rewinding a tape Tape is write-protected Reading a tape Empty Erasing a tape Loading a tape Table 2-2 Library Icons Failed Partially availablea Healthy a.
Library Operations Understanding the Menu Structure Understanding the Menu Structure Figure 2-7 Front Panel Menu Structure 2-10 Chapter 2
Library Operations Using Tapes CAUTION It is critical to ensure that the media you use matches the format of your tape drive. Cleaning cartridges and formatted data cartridges are unique for each drive technology. Damage may occur if inappropriate media is used in tape drives. The library has a mixed media feature that allows the use of two drive technologies in the same library. For more information, refer to Appendix D. NOTE This section includes general information on using tape cartridges.
Library Operations Using Tapes NOTE Bar code labeling requirements vary and are dependent on the type of tape drive used with your library. For more information on these requirements, refer to Appendix D. Maintaining Tape Cartridges DO NOT: • Expose tape cartridges to magnetic fields. • Leave cartridges in the drive when library power is off. • Expose cartridges to extreme temperatures or humidity. For acceptable operating and storage temperatures, refer to the documentation provided with your media.
Library Operations Accessing Tapes in the Library Tapes in the library may be accessed using the following features: • Magazine access • Mailslot access (if configured, see “Configuring the Mailslot” on page 3-6 for configuration information) Magazine Access Main Menu -> Operations -> Magazine Access 1. From the Magazine Access menu, select one of the following options: • Unlock Door • Unlock All Doors Use the [-] or [+] key to change the door selection.
Library Operations Accessing Tapes in the Library Figure 2-8 Removing/Replacing a Magazine 3. Remove the magazine by lifting it straight up with the handle (Figure 2-8). 4. To remove a tape, set the magazine on its back and grasp the top and bottom corners of a tape. Pull the tape straight out of the magazine. 5. If desired, insert tapes into the magazine. Ensure that you use the appropriate tape type for the magazine. Push the tape into the slot until it “clicks” into place.
Library Operations Accessing Tapes in the Library Mailslot Access The mailslot is located in the upper right-hand door of the library. The mailslot can be accessed from the Operations sub-menu or from the Home screen. Main Menu -> Operations -> Home Screen -> Mail Mailslot Access 1. The Mailslot Access screen displays a message indicating the number of tapes in the mailslot and how to open the appropriate door. Open the door.
Library Operations Drive and Tape Operations Drive and Tape Operations Main Menu -> Operations -> Drive and Tape Operations Look at the product information labels on the back of the library and the labels inside each tape door for more information about drive and slot numbering. The numbering scheme is also illustrated in “Front Panel Overview” on page 2-3 and “Library Back Panel” on page 1-24. NOTE The “Home” and “Map” front panel screens illustrate the drive, slot, and mailslot numbering schemes.
Library Operations Drive and Tape Operations Unloading a Tape from the Drive 2. Use the [-] or [+] keys to select the drive you want to unload. 3. Select [Unload] to move the tape from the drive to the tape’s original location (the location it occupied before being loaded into the drive). If that slot is occupied, you will be asked to select another slot location. 4. The tape automatically rewinds before it is unloaded. A status screen displays the library’s progress as the tape is relocated. 5.
Library Operations Drive and Tape Operations 1. From the Drive and Tape Operations menu, select Clean Drive. 2. From Choose Cleaning Slot, use the [-] or [+] key to select the slot location of the cleaning tape. Refer to the label inside the library door, the front panel display, or “Front Panel Overview” on page 2-3 for a list of the slot numbers. Select [OK]. 3. Using the [-] or [+] keys, select the number of the drive to be cleaned. Select [Clean].
Library Administration 3 Library Administration Chapter 3 3-1
Library Administration Chapter Overview Chapter Overview This chapter describes the following: • Configuring the Library • Enabling and Changing the Password • Configuring the Mailslot • Using the Remote Management Card • Configuring the Library for Fibre Channel • Setting SCSI IDs • Setting the Date and Time • Retrieving Library Information • Running Library Diagnostic Tests 3-2 Chapter 3
Library Administration Configuring the Library Configuring the Library Main Menu -> Library Administration Administration -> Change Configuration You can change the following configuration options for the library: Table 3-1 Configuration Options Menu Item Description Default Options Password See “Enabling and Changing the Password” on page 3-5. Off On or Off Network Access See “Using the Remote Management Card” on page 3-9.
Library Administration Configuring the Library Table 3-1 Configuration Options Menu Item Description Default Options Other Configuration Options (see • Report Recovered (Soft) Errors: Reports recovered errors over SCSI. On On or Off • Restore Factory Defaults: Restores the default configuration settings (see Table 3-2). N/A N/A • Prevent Media Access: Locks the library doors and prevents front panel access.
Library Administration Configuring the Library Enabling and Changing the Password NOTE Main Menu -> Administration -> Change Configuration -> Password When the library is first installed, the password is inactive. To protect the system from unauthorized access, use the following procedure to set a password. 1. Enter the Password menu. A status screen will indicate if a password is enabled. • If the password is turned off, select Set New Password to enable the password.
Library Administration Configuring the Library Configuring the Mailslot The mailslot is comprised of magazine locations in the upper right-hand door. When a tape is being changed, the door opens only to the number of slots that have been configured. Figure 3-1 Mailslot Door By default, the library is configured for a one-slot mailslot.
Library Administration Configuring the Library Table 3-3 Mailslot Configuration Advantages and Disadvantages 0 Magazine access must be used to exchange tapes (see “Magazine Access” on page 2-13). Library Administration Number of Mailslots • Advantage: Allows all slots to be used for data storage. • Disadvantage: Cannot easily remove or add tapes without a full inventory check. 1 A mailslot setting of 1 (one) allows one slot to be designated as the mailslot.
Library Administration Configuring the Library Main Menu -> Administration -> Change Configuration -> Mailslot Before changing the mailslot configuration, verify the slots that will become the mailslot are empty and not the original location of a tape in a drive. Use the following steps to configure the mailslot option. 1. In the Configure Mailslot menu, a message will remind you to check the storage slot and mailslot configurations in the backup software. Select [OK]. 2.
Library Administration Configuring the Library Using the Remote Management Card Overview Online instructions are included on the web interface to describe how to use the tool. Simply select the [?] key in the upper right-hand corner to access the online help. Figure 3-2 RMC Web Interface The web-based remote management features allow you to obtain status reports and diagnostic information, as well as manage library functions from a remote location.
Library Administration Configuring the Library For remote management, you need a network connection and a browser to: • View the current status of the library, drives, and tapes • Manage multiple devices from any workstation within the intranet • Manage and configure the library on your network in a secure environment to: — Clean the drives — Load and unload tapes — Run diagnostics — Restart the library — Dynamically assign the library’s IP address, gateway address, and subnet mask using DHCP or BOOTP mode
Library Administration Configuring the Library BOOTP Management Programs In addition to using your browser directly to manage your library, you can also use popular management programs, such as HP OpenView, HP Top Tools, and CA Unicenter TNG. In order to best use HP OpenView and CA Unicenter TNG, you must download a plug-in from the HP Customer Care website at www.hp.com/go/support. This plug-in can be easily installed in your environment.
Library Administration Configuring the Library NOTE To correctly set caching for Internet Explorer™, go to the Windows Control Panel and select [Internet]. Click on the [General] tab. In the Temporary Internet Files section, click on the [Settings] button. Select [Every Visit to the Page], and click on the [OK] buttons to exit. (Netscape Communicator™ and Netscape Navigator™ set caching automatically.
Library Administration Configuring the Library 4. If you would like to use DHCP/BOOTP to configure your remote management card, select [Yes]. (See “Dynamic Host Configuration Protocol (DHCP)” or “BOOTP” on page 3-11.) • If successful, note the IP address, and skip to step 9. • If DHCP/BOOTP was not successful, or if you do not want to use DHCP/BOOTP, contact your system administrator to obtain an IP address, subnet mask, and gateway address. Continue with step 5.
Library Administration Configuring the Library NOTE To use a device name, your system administrator must add the device name you select to the domain name server (DNS). NOTE Instructions and online help screens describing remote management are available from the Web-Based Library Administrator pages by selecting the [?] button in the top right-hand corner of any page.
Library Administration Configuring the Library for Fibre Channel Configuring the Library for Fibre Channel NOTE The optional Fibre Channel interfaces in 20-slot, 40-slot, and 60-slot libraries serve as a bridge between SCSI and Fibre Channel. NOTE It is not necessary to connect the library to its Fibre Channel topology (arbitrated loop or fabric) before configuration.
Library Administration Configuring the Library for Fibre Channel 3. A message displays the following information: • Fibre Channel interface type (LVD or HVD SCSI) • SCSI bus status Select [MORE]. 4. A message displays information for the CURRENT STATUS, including: • Link status • Connection type (loop or fabric) • AL_PA (Arbitrated Loop Physical Address) for loop connections, or a hex address for fabric connections Select [MORE]. 5.
Library Administration Configuring the Library for Fibre Channel • If you selected hard addressing for a loop connection, select the AL_PA (fixed address) or choose auto-select. Auto-select is an option under hard addressing that selects an available address and then uses it as a hard address from then on. If you select [OK], a message will display indicating that the settings are being stored onto the Fibre Channel interface.
Library Administration Configuring the Library for Fibre Channel Retrieving Information about Fibre Channel Enter the Information menu to view information such as: • Fibre Channel interface SCSI interface type (LVD or HVD) • SCSI bus status • Current status (link status, connection type, address) • Current settings (addressing assignment method, AL_PA) • Future settings (addressing assignment method, AL_PA) • World wide node name • World wide port name 3-18 Chapter 3
Library Administration Setting SCSI IDs Setting SCSI IDs Main Menu -> Change Configuration -> SCSI IDs NOTE This menu is unavailable for libraries using Fibre Channel because the SCSI IDs are configured automatically. Table 3-5 Default SCSI IDs Devicea SCSI ID Library controller 0 Drive position 1 1 Drive position 2 2 Drive position 3 3 Drive position 4 4 Drive position 5 5 Drive position 6 6 a. The number of drives depends on the library model.
Library Administration Setting SCSI IDs The SCSI ID for a drive position can be configured, even when no drive is present. When a drive is later added, it will use the ID already assigned to that location. 1. Enter the SCSI IDs menu. A message warns you that devices with the same SCSI IDs must be connected to different SCSI buses. Select [OK]. 2. The Configure SCSI ID screen displays a message that indicates the drive position selected.
Library Administration Setting the Date and Time Setting the Date and Time Main Menu -> Set Date and Time When the library is initially set up, or if it has been disconnected for more than eight days, you need to set the date and time. If the date and time are not set, error logs will not include date and time stamps. To set the date and time, enter the Administration menu. If you want to only view the date and time, enter the Information menu. To set the date and time: 1. Enter the Set Date & Time menu.
Library Administration Setting the Date and Time Table 3-6 UTC -12 UTC -11 UTC -10 UTC -9 UTC -8 UTC -7 UTC -6 UTC -5 UTC -4 UTC -3 UTC -2 UTC -1 UTC UTC +1 UTC +2 UTC +3 UTC +3:30 UTC +4 UTC +4:30 UTC +5 UTC +5:30 UTC +6 UTC +7 UTC +8 UTC +9 UTC +9:30 UTC +10 UTC +11 UTC +12 World Time Zones Eniwetok, Kwajalein Midway Island, Samoa Hawaii Alaska Pacific Time (US and Canada), Tijuana Mountain Time (US and Canada), Arizona Central Time (US and Canada), Saskatchewan, Mexico City, Tegucigalpa Eastern Time (U
Library Administration Retrieving Library Information Retrieving Library Information Library Administration The following information is available from the Information and Administration menus: • Library information • Drive information • Configuration information • Date and Time • Firmware revisions • Power supplies NOTE This information is also available from remote access. See “Using the Remote Management Card” on page 3-9.
Library Administration Retrieving Library Information Table 3-7 Library Information Menu option Information Library Status Displays information about the overall status of the library and any partial availability flags. (See page 4-8 for more information on partial availability.) Hard Error Log Displays a history of unrecovered errors. Returns a message indicating that there are no hard errors, or provides an error entry. Use the [Older] or [Newer] keys to select an entry.
Library Administration Retrieving Library Information Drive Information Main Menu -> Information -> 1. From the Drive Information menu, use the [-] or [+] keys to select the desired drive module. 2. Select [OK] to display and select one of the following options: • Event Log: Displays significant events for the selected drive position, including drive errors, online/offline transitions, and drive cleaning. This log is still available while a drive is being removed.
Library Administration Retrieving Library Information Configuration Information Main Menu -> Information -> View Configuration From the View Configuration menu, select the desired library function to view current information about the following. (See page 3-3 for factory defaults.
Library Administration Retrieving Library Information Firmware Revisions Main Menu -> Information -> From the Firmware Revisions menu, you can view information about the following (See page 4-60 for information on upgrading firmware): • Library • Tape drives Power Supplies Main Menu -> Information -> Power Supplies From the Power Supplies menu, you can view information about the status of your power supply and whether or not your library contains a redundant power supply.
Library Administration Running Library Diagnostic Tests Running Library Diagnostic Tests Main Menu -> Administration -> Run Test Use the following procedure to run internal tests of library functions. Table 3-8 on page 3-28 describes these tests. 1. From Administration, select [More] to display additional administrative options. Select [Run Test]. 2. From Run Test, use the [-] or [+] key to view available tests. 3. Select [OK] to select the test. 4. Select the number of times this test will run. 5.
Library Administration Running Library Diagnostic Tests Table 3-8 Front Panel Diagnostic Tests Description Test Vertical Motion Moves the vertical assembly to the bottom of the library, then to the top, while the transport moves around its lateral range. Upon completion of these moves, the transport assembly then stops. NOTE: This test is functional in all library models, but only moves upward in multi-level libraries. Test Lateral Motion Moves the transport assembly to a random slot.
Library Administration Running Library Diagnostic Tests Table 3-8 Front Panel Diagnostic Tests Test Description Unlock Transport Unlocks the transport assembly without power cycling the library. The transport must have already been locked to use this test. NOTE: The transport assembly automatically unlocks when library is powered on. Test Transport Comm Exercises the infrared communications path between the library controller and the transport controller. Reports the health of this link.
Troubleshooting 4 Troubleshooting, Removal, and Replacement Chapter 4 4-1
Troubleshooting, Removal, and Replacement Chapter Overview Chapter Overview This chapter includes information on the following: • Troubleshooting Overview • Understanding Error States • Interpreting Library LEDs • Troubleshooting Common Problems • Removing and Replacing Cards (for HP Authorized Personnel) • Removing and Replacing Drive Modules (for HP Authorized Personnel) • Upgrading Firmware 4-2 Chapter 4
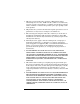
Troubleshooting, Removal, and Replacement Troubleshooting Overview Troubleshooting Overview Identify the type of error. No, solid amber Troubleshooting Is the front panel LED flashing amber? The library is partially available. See the Partial Availability section of this chapter. Yes. Follow the recommendations on the front panel and in this manual. If the error cannot be resolved, call service for remote resolution.
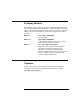
Troubleshooting, Removal, and Replacement Troubleshooting Overview Understanding Error Types There are several categories of errors that might occur when you are using your library. Each error category has a different troubleshooting process, which is described in more detail later in this chapter. Soft (Recovered) Errors Partial Availability Errors Hard (Unrecovered) Errors Host, Software, and Media Errors Host Bus Adapter Front Panel LED is FLASHING GREEN · Library had error, but recovered.
Troubleshooting, Removal, and Replacement Understanding Error States Understanding Error States This section describes the difference between the following types of errors: • Soft (recovered) errors: page 4-6 • Partial availability: page 4-8 • Hard (unrecovered) errors: page 4-13 • Host software and media errors: page 4-15 Troubleshooting Chapter 4 4-5
Troubleshooting, Removal, and Replacement Understanding Error States Soft (Recovered) Errors Soft errors are hardware errors that the library recovered from by retrying the operation. Though soft errors are often transparent to a user, they are logged in the soft error log. Main Menu -> Information -> Library Information -> Soft (Recovered) Error Log Periodically review the soft error log to detect and track errors before they become serious.
Troubleshooting, Removal, and Replacement Understanding Error States Figure 4-1 Using the Soft Error Log Monitor and track components that might fail. Troubleshooting Review the soft error log to: See error history to determine why other errors have occurred. Identify the reason for backup software timeouts.
Troubleshooting, Removal, and Replacement Understanding Error States Partial Availability State When the library is in a partial availability state, it is still functional, but is not in an optimum or supported configuration, as described in Table 4-1 on page 4-9. When this occurs, the front panel will display Partly Available, and the illuminated bar beneath the front panel display will be solid amber until the condition is resolved.
Troubleshooting, Removal, and Replacement Understanding Error States Table 4-1 Partial Availability Conditions Library Status Cause Solution Date and time not set The date and time is not set on the front panel • Set the date and time. (See “Setting the Date and Time” on page 3-21.) Drive(s) not present The library could not detect all the expected drive modules.
Troubleshooting, Removal, and Replacement Understanding Error States Table 4-1 Partial Availability Conditions Library Status Cause Solution Drive(s) critical error A critical error has occurred on a drive. • Check the Drive Event Log from the front panel or RMC WebBased Library Administrator pages for possible causes. • Contact your service representative. Drive(s) not on Fibre Channel Drive(s) are detected by library controller, but are not detected by any of the Fibre Channel interfaces.
Troubleshooting, Removal, and Replacement Understanding Error States Table 4-1 Partial Availability Conditions Cause Solution Incompatible magazine(s) The magazine is incompatible with the drive type. • Ensure that you use the correct magazine for your drive type. Refer to Appendix D for more information. Mailslot open Mailslot door is open. The library robotics will not move until the mailslot is closed. • Ensure that the mailslot door is closed.
Troubleshooting, Removal, and Replacement Understanding Error States Table 4-1 Partial Availability Conditions Library Status Cause Solution Fibre Channel interface failed Fibre Channel interface failed power-up test. (Usually due to problems on the SCSI bus, such as an LVDS drive or terminator on an HVDS bus, etc.) • Verify that proper SCSI terminators and/or tape drives are attached to the Fibre Channel interface, and then reboot the library. • Power cycle the library.
Troubleshooting, Removal, and Replacement Understanding Error States Hard (Unrecovered) Errors When a hard error occurs, the front panel will display an error message that indicates the problem, and the LED bar will be flashing amber. You cannot operate the library until this error is resolved. TIP This information can also be found in the latest entry of the hard error log. View the hard error log to see the sequence of error events and more information on resolving the error condition.
Troubleshooting, Removal, and Replacement Understanding Error States 2. Record all information from this screen for later reference. 3. Select [More]. Record the list of recommendations on this and any subsequent screens. To retrieve this information after you exit, view the latest entry in the hard error log. 4. Perform the recommendations in the order presented. Continue with each successive recommendation until the problem is isolated. 5.
Troubleshooting, Removal, and Replacement Understanding Error States Host Software and Media Errors The library depends on several other components to operate correctly. Errors that you believe are caused by the library often are a result of errors on the host, the network, or with the backup software. When troubleshooting the library, begin ruling out these components. Use the following troubleshooting procedures to help determine if an error is caused by the library hardware, host, or backup software.
Troubleshooting, Removal, and Replacement Understanding Error States Backup Software Errors While the library product itself is supported by Hewlett-Packard, all software products are supported by individual software vendors. (See “Backup Software Support” on page B-4.) Your software applications may need to be reconfigured or, in some cases, reinstalled after you have installed additional drives or slots into the library.
Troubleshooting, Removal, and Replacement Interpreting Library LEDs Interpreting Library LEDs LEDs communicate status and errors as they are occurring. Use the library LEDs to determine the state of the library. All library cards and drive modules contain LEDs. In general, a yellow LED comes on during power up and changes to green when power up is successful. This may take a few minutes on some library cards. The LED bar underneath the front panel display indicates library activity.
Troubleshooting, Removal, and Replacement Interpreting Library LEDs NOTE Figure 4-3 shows the back view of the library. Detailed LED illustrations follow.
Troubleshooting, Removal, and Replacement Interpreting Library LEDs Table 4-2 Slave Controller LED Ready LED Color Description Yellow Default boot mode on power-up. Will remain in this state until board completes initilization. Green Slave controller board is ready.
Troubleshooting, Removal, and Replacement Interpreting Library LEDs Table 4-3 Remote Management Card LEDs 1) Ready LED Color Description Yellow Powering up, failed poweron test, or fatal error was detected during operation. Green Card passed power-on test. Card ready. 2) Link LED Color Description Green Indicates valid network connection. 3) Activity LED Color Description Flashing Green Indicates transmission activity by the card’s ethernet port.
Troubleshooting, Removal, and Replacement Interpreting Library LEDs Table 4-4 HVDS Library Controller Card LEDs 1) Controller LED Color Description Flashing Green Controller needs firmware. Yellow In the process of powering up. Yellow flash Controller failed power-on test. Green Ready. 2) SCSI LED Description Yellow Error; single-ended SCSI device attached.
Troubleshooting, Removal, and Replacement Interpreting Library LEDs Table 4-5 LVDS Library Controller Card LEDs 1) Controller LED Color Description Flashing Green Controller needs firmware. Yellow In the process of powering up. Yellow flash Controller failed power-on test. Green Controller passed power-on test. 2) SCSI LED Color Description Green No bus connected or low-voltage differential SCSI bus connected. Flashing Green Single-ended SCSI bus attached. SCSI performance reduced.
Troubleshooting, Removal, and Replacement Interpreting Library LEDs NOTE Your Fibre Channel interface type (standard or high performance) is dependent on the drive technology in your library. Table 4-6 Standard Performance Fibre Channel Interface LEDs 1) Activity LED Color Description Flashing Green Indicates transmission activity by the Fibre Channel interface. 2) Link LED Description Green Indicates valid Fibre Channel connection. Yellow Fibre Channel interface is being reset.
Troubleshooting, Removal, and Replacement Interpreting Library LEDs NOTE Your Fibre Channel interface type (standard or high performance) is dependent on the drive technology in your library. Table 4-7 High Performance Fibre Channel Interface LEDs 1) Activity LED Color Description Flashing Green Indicates transmission activity by the Fibre Channel interface. 2) Link LED Color Description Green Indicates valid Fibre Channel connection. Yellow Fibre Channel interface is being reset.
Troubleshooting, Removal, and Replacement Interpreting Library LEDs Table 4-8 Drive Module LEDs 2) Green Description Off On Drive is online and available. Flashing Off Drive is offline and may be replaced. On Flashing Drive is being brought online. Flashing On Drive is offline. Internal communication has been lost. On On Drive module controller is in reset. On Off Power-on test in progress. Flashes Off Drive module failed power-on test.
Troubleshooting, Removal, and Replacement Interpreting Library LEDs Table 4-9 Redundant Power Supply LEDs 1) AC Input LED Color Description Green AC input is within the specified limit. Off AC input is outside of specified limit. 2) DC Output LED Color Description Green DC output is within the specified limit. Off DC output is outside of specified limit. NOTE The redundant power supply is an option for your library. If you do not have this option, your power supply will not have LEDs.
Troubleshooting, Removal, and Replacement Troubleshooting Common Problems Troubleshooting Common Problems This section includes information on troubleshooting common library problems. For problems that may be related to the host or application software, refer to the host system documentation, the application software instructions, and page 4-15. If these procedures fail, contact your service representative for further assistance. Consult the system administrator before cycling power.
Troubleshooting, Removal, and Replacement Troubleshooting Common Problems Table 4-10 Troubleshooting Table Problem Solution The library’s power failed while a tape was in the drive and did not return to the ready state after the power came on. • Verify that the LEDs on the back of the library are on and the fans are turning (see page 4-17). No display messages appear. • Make sure the power cord is connected. • Power cycle the library • Contact your service representative.
Troubleshooting, Removal, and Replacement Troubleshooting Common Problems Table 4-10 Troubleshooting Table Problem Solution Tape stuck in storage slot. • Using the front panel display, open the appropriate door. Slide the door outward and remove the magazine. • Pull the tape out. • Reinsert the magazine. • If the magazine is damaged, contact your service representative. • Run the Recalibrate Library test (see page 3-28). Transport won’t get a tape. • Ensure that you are using the correct tape type.
Troubleshooting, Removal, and Replacement Troubleshooting Common Problems Table 4-10 Troubleshooting Table Problem Solution Host does not detect the library. • Ensure that the HBA type matches the library type (HVDS, LVDS, or single-ended SCSI). • Check that the library is terminated and properly cabled. • Ensure that the terminator is compatible with the library (HVDS, LVDS, or single-ended SCSI). • Check that the library is recognized on the operating system (see page 1-40).
Troubleshooting, Removal, and Replacement Troubleshooting Common Problems Table 4-10 Troubleshooting Table Problem Solution Cannot navigate through the RMC Web-Based Library Administrator interface. • Do not use the [Back] or [Forward] buttons on the browser to navigate. Instead, use the tabs and buttons on the actual interface page. Library Performance HP-UX host responds slowly or crashes after connecting to the library.
Troubleshooting, Removal, and Replacement Troubleshooting Common Problems Table 4-10 Troubleshooting Table Problem Solution Need to abort internal test cycle. • Press [STOP]. The current test loop completes, then the test stops. It may take a few minutes to stop the current test loop. Cannot write to the tape. • Check the write-protect tab on the tape to assure writeenabled status. • Ensure that the backup software does not have the writeprotect setting activated.
Troubleshooting, Removal, and Replacement Troubleshooting Common Problems Table 4-10 Troubleshooting Table Problem Solution Recurring cleaning message. • Ensure you are using an approved cleaning cartridge for your drive type. (Refer to Appendix D for more information.) • Replace the existing cleaning cartridge with a new one. • If the message reappears when a particular data cartridge is used, verify that the data cartridge is readable by: — Clearing the error message.
Troubleshooting, Removal, and Replacement Troubleshooting Common Problems Table 4-10 Troubleshooting Table Problem Solution The soft keys on the front panel display do not work. • Power cycle the library. • Attempt to access the library through the remote management card (see page 3-9). • Attempt to access the library from the host computer (either SCSI or Fibre Channel, depending on how the library is configured). • Contact your service representative.
Troubleshooting, Removal, and Replacement Diagnostic Support Tools Diagnostic Support Tools The following external support tools are available for the library: • HP Library & Tape Tools • Support Tools Manager • Sysdiag HP Library & Tape Tools • Identify all SCSI and Fibre Channel devices connected to your system • View detailed configuration, identification, inventory, and drive information for the library • Easily update library and drive firmware (see page 4-60) • Run advanced diagnostic tests, includ
Troubleshooting, Removal, and Replacement Diagnostic Support Tools Support Tools Manager (STM) STM is the primary HP-UX support tool. Though this document provides general information about STM, more information is available through the following website: • http://docs.hp.com/ Select Systems Hardware, Diagnostics & Monitoring. Select Online Diagnostics (STM).
Troubleshooting, Removal, and Replacement Diagnostic Support Tools Overview of STM Menu Structure Troubleshooting Chapter 4 4-37
Troubleshooting, Removal, and Replacement Diagnostic Support Tools Performing Operations There are three basic operations in STM: 1. To select a device or devices: • In xstm, click on the device icon. • In mstm, move the cursor over the device, and press . 2. To run a tool: Tools / / Run 3. To view logs after the tool completes: Tools / / Using the STM Tools • The Information tool creates an information log that contains firmware revisions and other useful device data.
Troubleshooting, Removal, and Replacement Diagnostic Support Tools • The Firmware Update tool allows the user to interactively download new firmware to the device. Tools / Firmware Update / Run • The Utilities tool is not tied to one device and includes: — Logtool Tools / Utility / Run... / logtool — Copyutil is used to copy disk data to another disk to replace a bad disk. Tools / Utility / Run... / copyutil Select the device(s).
Troubleshooting, Removal, and Replacement Diagnostic Support Tools • The System Activity Log contains error information that is logged by the diagmond daemon. Review this log if problems occur when initiating tools, viewing log files, connecting to a UUT, etc. System / System Activity Log NOTE If the UI cannot connect to the UUT, use File / Administration / Local / UUT Logs / System Activity Log. • The Map Log contains information and errors logged while scanning the system hardware.
Troubleshooting, Removal, and Replacement Diagnostic Support Tools Types of STM Tools for Tape Libraries Table 4-11 shows which types of STM tools are supported on the robotic and tape drive components of the library. Not all commands are supported on all libraries.
Troubleshooting, Removal, and Replacement Diagnostic Support Tools Expert Tools Within an expert tool, select a category and command for the tool to execute: • Drive tool (see below) • Robotics controller tool (see page 4-44) • Firmware update tool (see page 4-47) Drive Tool Table 4-12 lists expert tool categories and the specific commands that are applicable to tape drives. Table 4-12 Drive Expert Tool Command Category Command Effect File Save As Save contents of menu window to a file.
Troubleshooting, Removal, and Replacement Diagnostic Support Tools Table 4-12 Drive Expert Tool Command Command Effect Tests Test Unit Ready Performs “Test Unit Ready” command on drive. Selftest Executes the drive’s built-in diagnostic tests. Tape Validate Reads a suspect tape until data ends or an error is detected. Write Test Writes data to a tape, reads it back, and compares. Tape Copy Performs a tape-to-tape copy. Load Tape Performs a load sequence.
Troubleshooting, Removal, and Replacement Diagnostic Support Tools Robotics Controller Tool Table 4-13 lists expert tool categories and the specific commands applicable to the library robotics. Table 4-13 Robotic Controller Expert Tool Command Category Command Effect File Save As Saves contents of menu window to a file. Print Print contents of menu window. Exit Exits the robotics expert tool. Logs View Logs Displays various robotics log pages.
Troubleshooting, Removal, and Replacement Diagnostic Support Tools Table 4-13 Robotic Controller Expert Tool Command Command Effect Tests Selftest Performs power-on self test of robotics and reports results. Test Unit Ready Performs “test unit ready” command on robotics. Wellness Performs a wellness test of robotics and reports results. Exercise Mech Performs an “exercise mech” diagnostic test and reports results. Empty Drives Performs an “empty drives” diagnostic test and reports results.
Troubleshooting, Removal, and Replacement Diagnostic Support Tools Table 4-13 Robotic Controller Expert Tool Command Category Command Effect Utility Rezero Performs “rezero” command on robotics. Position to Element Performs “position to element” command on robotics. Move Medium Moves 1 tape cartridge in library. Exchange Medium Moves 2 tape cartridges in library. Init Element Status Performs “initialize element status” command on robotics.
Troubleshooting, Removal, and Replacement Diagnostic Support Tools Firmware Update Tool When started, the firmware update tool will examine the firmware revision of the current SCSI device, and then search the directory /var/tmp for firmware files that are compatible with the device. The internal headers of any firmware files present in this directory will be checked.
Troubleshooting, Removal, and Replacement Diagnostic Support Tools Sysdiag NOTE Version 5.5 and 6.0 are supported for the libraries, but use the STM tool for version 6.5 (see “Support Tools Manager (STM)” on page 4-36). Sysdiag is the MPE/iX support tool, and provides a consistent user interface for support of tape libraries, as well as many other types of peripheral devices. Sysdiag is a licensed-use tool, so a user must first know and enter a diagnostics password.
Troubleshooting, Removal, and Replacement Diagnostic Support Tools SCSITAC Sections SCSITAC contains three sections: • Section 1: Verification Trouble Tree • Section 2: Hardware Trouble Tree • Section 4: Interactive Sections 1 and 2 perform tests on the library, report results, and return to the DUI prompt. Section 4 provides users with a SCSITAC prompt, which accepts the following commands (Table 4-14). Table 4-14 SCSITAC Interactive Commands Function devreset Performs a SCSI device reset.
Troubleshooting, Removal, and Replacement Diagnostic Support Tools Section 4 provides the user with a SCSIDLT prompt, which will accept the following commands (Table 4-15). Table 4-15 SCSIDLT Interactive Commands Command Function blocklimit Displays the maximum and minimum record lengths. cartridge Identifies tape type of loaded cartridge. clearlogs Clears error logs. compression Enables or disables compression. devreset Performs a SCSI device reset. download Downloads firmware.
Troubleshooting, Removal, and Replacement Removing and Replacing Cards (for HP Authorized Personnel) Removing and Replacing Cards (for HP Authorized Personnel) CAUTION This library contains very sensitive electrical components. It is important to follow the proper procedures to prevent electrostatic discharge (ESD). Use wrist-grounding straps and anti-static mats when removing and replacing cards and major assemblies.
Troubleshooting, Removal, and Replacement Removing and Replacing Cards (for HP Authorized Personnel) Replacing a Card 1. Align the edges of the replacement card with the card slot. 2. Gently push the replacement card into the library until the card is flush with the library. 3. Tighten the thumbscrews (finger tight). 4. Reconnect external cables. 5. Power on the library. 6. Download new firmware (see “Upgrading Firmware” on page 4-60). 7.
Troubleshooting, Removal, and Replacement Removing and Replacing Cards (for HP Authorized Personnel) Figure 4-4 Library Card Positions Troubleshooting 1 Vacant slot 2 Remote management card 3 Library controller card 4 Fibre Channel interfaces 5 Slave controller card Chapter 4 4-53
Troubleshooting, Removal, and Replacement Removing and Replacing Drive Modules (for HP Authorized Personnel) Removing and Replacing Drive Modules (for HP Authorized Personnel) This section explains how to replace a drive module in the following situations: • The library is not connected to the host. The host cannot access the library. The library can be powered on or off during drive replacement. • The library is connected to the host.
Troubleshooting, Removal, and Replacement Removing and Replacing Drive Modules (for HP Authorized Personnel) Unloading a Tape from a Drive If a drive has failed or had an error, the following can happen: • The icons on the library front panel indicate a drive error. • The library attempts to take the drive offline. • The host indicates an error and recommends taking the drive offline. • The host automatically takes the drive offline (if supported).
Troubleshooting, Removal, and Replacement Removing and Replacing Drive Modules (for HP Authorized Personnel) Removing a Drive Module NOTE To preserve SCSI communications, do not loosen or remove the SCSI cable(s) connected to the outside of the drive module. The connection to be removed is located inside the drive module. When the drive module has been successfully taken offline, one of the LEDs on the back of the drive will be flashing yellow. Remove the drive module using the steps below: 1.
Troubleshooting, Removal, and Replacement Removing and Replacing Drive Modules (for HP Authorized Personnel) 5. Lay the connector assembly to the side, allowing the external cables to hang from the connection(s). Do not disconnect external cables from the connector plate. 6. Loosen the top and bottom thumbscrews on the drive module (Figure 4-6). 7.
Troubleshooting, Removal, and Replacement Removing and Replacing Drive Modules (for HP Authorized Personnel) Installing a Drive Module WARNING It is not necessary to power off the library when inserting a replacement drive module. However, to avoid injury, do not insert your hand or foreign objects through the empty drive bay and into the vertical lift assembly area. 1. Hold the drive module with one hand on the drive module handle while the other hand supports the bottom (Figure 4-7). 2.
Troubleshooting, Removal, and Replacement Removing and Replacing Drive Modules (for HP Authorized Personnel) 3. Tighten the top and bottom thumbscrews, securing the drive module into the library. 4. Plug the ribbon connector into the back of the drive module (Figure 4-5 on page 4-56). 5. Gently fold the ribbon cable (attached to the plate and SCSI cable), into the back of the drive module. 6. Holding the connector plate in place, tighten the thumbscrews on each side of the connector. 7.
Troubleshooting, Removal, and Replacement Upgrading Firmware Upgrading Firmware This section details the processes for upgrading library and drive firmware. Some of the processes used for upgrading library firmware are different from those used to upgrade drive firmware.
Troubleshooting, Removal, and Replacement Upgrading Firmware Checking the Firmware Revision Before downloading new firmware, check your current firmware revisions, and compare them to the latest available revisions at www.hp.com/go/support. NOTE If the library is in a partial availability state due to a firmware mismatch, new firmware must be downloaded to resolve the condition. (See “Partial Availability State” on page 4-8.) 1. Ensure the library is powered on. 2.
Troubleshooting, Removal, and Replacement Upgrading Firmware Using the Remote Management Card (library firmware only) All library components, except drives, can be easily downloaded from the remote management card (“Using the Remote Management Card” on page 3-9). NOTE The firmware file is available from HP Support at www.hp.com/go/ support. These files must be loaded onto the local host computer before downloading firmware.
Troubleshooting, Removal, and Replacement Upgrading Firmware Using the Remote Management Card (library firmware only) All library components, except drives, can be easily downloaded from the remote management card (“Using the Remote Management Card” on page 3-9). NOTE The firmware file is available from HP Support at www.hp.com/go/ support. These files must be loaded onto the local host computer before downloading firmware.
Troubleshooting, Removal, and Replacement Upgrading Firmware Using the Remote Management Card (library firmware only) All library components, except drives, can be easily downloaded from the remote management card (“Using the Remote Management Card” on page 3-9). NOTE The firmware file is available from HP Support at www.hp.com/go/ support. These files must be loaded onto the local host computer before downloading firmware.
Troubleshooting, Removal, and Replacement Upgrading Firmware Using the Remote Management Card (library firmware only) All library components, except drives, can be easily downloaded from the remote management card (“Using the Remote Management Card” on page 3-9). NOTE The firmware file is available from HP Support at www.hp.com/go/ support. These files must be loaded onto the local host computer before downloading firmware.
Troubleshooting, Removal, and Replacement Upgrading Firmware Using the Remote Management Card (library firmware only) All library components, except drives, can be easily downloaded from the remote management card (“Using the Remote Management Card” on page 3-9). NOTE The firmware file is available from HP Support at www.hp.com/go/ support. These files must be loaded onto the local host computer before downloading firmware.
Troubleshooting, Removal, and Replacement Upgrading Firmware Using the Remote Management Card (library firmware only) All library components, except drives, can be easily downloaded from the remote management card (“Using the Remote Management Card” on page 3-9). NOTE The firmware file is available from HP Support at www.hp.com/go/ support. These files must be loaded onto the local host computer before downloading firmware.
Troubleshooting, Removal, and Replacement Upgrading Firmware Using the Remote Management Card (library firmware only) All library components, except drives, can be easily downloaded from the remote management card (“Using the Remote Management Card” on page 3-9). NOTE The firmware file is available from HP Support at www.hp.com/go/ support. These files must be loaded onto the local host computer before downloading firmware.
Troubleshooting, Removal, and Replacement Upgrading Firmware Using the Remote Management Card (library firmware only) All library components, except drives, can be easily downloaded from the remote management card (“Using the Remote Management Card” on page 3-9). NOTE The firmware file is available from HP Support at www.hp.com/go/ support. These files must be loaded onto the local host computer before downloading firmware.
Troubleshooting, Removal, and Replacement Upgrading Firmware Using the Remote Management Card (library firmware only) All library components, except drives, can be easily downloaded from the remote management card (“Using the Remote Management Card” on page 3-9). NOTE The firmware file is available from HP Support at www.hp.com/go/ support. These files must be loaded onto the local host computer before downloading firmware.
Troubleshooting, Removal, and Replacement Upgrading Firmware Using the Remote Management Card (library firmware only) All library components, except drives, can be easily downloaded from the remote management card (“Using the Remote Management Card” on page 3-9). NOTE The firmware file is available from HP Support at www.hp.com/go/ support. These files must be loaded onto the local host computer before downloading firmware.
Troubleshooting, Removal, and Replacement Upgrading Firmware Using the Remote Management Card (library firmware only) All library components, except drives, can be easily downloaded from the remote management card (“Using the Remote Management Card” on page 3-9). NOTE The firmware file is available from HP Support at www.hp.com/go/ support. These files must be loaded onto the local host computer before downloading firmware.
Troubleshooting, Removal, and Replacement Upgrading Firmware Using the Remote Management Card (library firmware only) All library components, except drives, can be easily downloaded from the remote management card (“Using the Remote Management Card” on page 3-9). NOTE The firmware file is available from HP Support at www.hp.com/go/ support. These files must be loaded onto the local host computer before downloading firmware.
Troubleshooting, Removal, and Replacement Upgrading Firmware Using the Remote Management Card (library firmware only) All library components, except drives, can be easily downloaded from the remote management card (“Using the Remote Management Card” on page 3-9). NOTE The firmware file is available from HP Support at www.hp.com/go/ support. These files must be loaded onto the local host computer before downloading firmware.
Troubleshooting, Removal, and Replacement Upgrading Firmware Using the Remote Management Card (library firmware only) All library components, except drives, can be easily downloaded from the remote management card (“Using the Remote Management Card” on page 3-9). NOTE The firmware file is available from HP Support at www.hp.com/go/ support. These files must be loaded onto the local host computer before downloading firmware.
Troubleshooting, Removal, and Replacement Upgrading Firmware Using the Remote Management Card (library firmware only) All library components, except drives, can be easily downloaded from the remote management card (“Using the Remote Management Card” on page 3-9). NOTE The firmware file is available from HP Support at www.hp.com/go/ support. These files must be loaded onto the local host computer before downloading firmware.
Troubleshooting, Removal, and Replacement Upgrading Firmware Using the Remote Management Card (library firmware only) All library components, except drives, can be easily downloaded from the remote management card (“Using the Remote Management Card” on page 3-9). NOTE The firmware file is available from HP Support at www.hp.com/go/ support. These files must be loaded onto the local host computer before downloading firmware.
Troubleshooting, Removal, and Replacement Upgrading Firmware Using the Remote Management Card (library firmware only) All library components, except drives, can be easily downloaded from the remote management card (“Using the Remote Management Card” on page 3-9). NOTE The firmware file is available from HP Support at www.hp.com/go/ support. These files must be loaded onto the local host computer before downloading firmware.
Troubleshooting, Removal, and Replacement Upgrading Firmware Using the Remote Management Card (library firmware only) All library components, except drives, can be easily downloaded from the remote management card (“Using the Remote Management Card” on page 3-9). NOTE The firmware file is available from HP Support at www.hp.com/go/ support. These files must be loaded onto the local host computer before downloading firmware.
Troubleshooting, Removal, and Replacement Upgrading Firmware Using the Remote Management Card (library firmware only) All library components, except drives, can be easily downloaded from the remote management card (“Using the Remote Management Card” on page 3-9). NOTE The firmware file is available from HP Support at www.hp.com/go/ support. These files must be loaded onto the local host computer before downloading firmware.
Troubleshooting, Removal, and Replacement Upgrading Firmware Using the Remote Management Card (library firmware only) All library components, except drives, can be easily downloaded from the remote management card (“Using the Remote Management Card” on page 3-9). NOTE The firmware file is available from HP Support at www.hp.com/go/ support. These files must be loaded onto the local host computer before downloading firmware.
Troubleshooting, Removal, and Replacement Upgrading Firmware Using the Remote Management Card (library firmware only) All library components, except drives, can be easily downloaded from the remote management card (“Using the Remote Management Card” on page 3-9). NOTE The firmware file is available from HP Support at www.hp.com/go/ support. These files must be loaded onto the local host computer before downloading firmware.
Troubleshooting, Removal, and Replacement Upgrading Firmware Using the Remote Management Card (library firmware only) All library components, except drives, can be easily downloaded from the remote management card (“Using the Remote Management Card” on page 3-9). NOTE The firmware file is available from HP Support at www.hp.com/go/ support. These files must be loaded onto the local host computer before downloading firmware.
Troubleshooting, Removal, and Replacement Upgrading Firmware Using the Remote Management Card (library firmware only) All library components, except drives, can be easily downloaded from the remote management card (“Using the Remote Management Card” on page 3-9). NOTE The firmware file is available from HP Support at www.hp.com/go/ support. These files must be loaded onto the local host computer before downloading firmware.
Troubleshooting, Removal, and Replacement Upgrading Firmware Using the Remote Management Card (library firmware only) All library components, except drives, can be easily downloaded from the remote management card (“Using the Remote Management Card” on page 3-9). NOTE The firmware file is available from HP Support at www.hp.com/go/ support. These files must be loaded onto the local host computer before downloading firmware.
Troubleshooting, Removal, and Replacement Upgrading Firmware Using the Remote Management Card (library firmware only) All library components, except drives, can be easily downloaded from the remote management card (“Using the Remote Management Card” on page 3-9). NOTE The firmware file is available from HP Support at www.hp.com/go/ support. These files must be loaded onto the local host computer before downloading firmware.
Troubleshooting, Removal, and Replacement Upgrading Firmware Using the Remote Management Card (library firmware only) All library components, except drives, can be easily downloaded from the remote management card (“Using the Remote Management Card” on page 3-9). NOTE The firmware file is available from HP Support at www.hp.com/go/ support. These files must be loaded onto the local host computer before downloading firmware.
Troubleshooting, Removal, and Replacement Upgrading Firmware Using the Remote Management Card (library firmware only) All library components, except drives, can be easily downloaded from the remote management card (“Using the Remote Management Card” on page 3-9). NOTE The firmware file is available from HP Support at www.hp.com/go/ support. These files must be loaded onto the local host computer before downloading firmware.
Troubleshooting, Removal, and Replacement Upgrading Firmware Using the Remote Management Card (library firmware only) All library components, except drives, can be easily downloaded from the remote management card (“Using the Remote Management Card” on page 3-9). NOTE The firmware file is available from HP Support at www.hp.com/go/ support. These files must be loaded onto the local host computer before downloading firmware.
Troubleshooting, Removal, and Replacement Upgrading Firmware Using the Remote Management Card (library firmware only) All library components, except drives, can be easily downloaded from the remote management card (“Using the Remote Management Card” on page 3-9). NOTE The firmware file is available from HP Support at www.hp.com/go/ support. These files must be loaded onto the local host computer before downloading firmware.
Troubleshooting, Removal, and Replacement Upgrading Firmware Using the Remote Management Card (library firmware only) All library components, except drives, can be easily downloaded from the remote management card (“Using the Remote Management Card” on page 3-9). NOTE The firmware file is available from HP Support at www.hp.com/go/ support. These files must be loaded onto the local host computer before downloading firmware.
Troubleshooting, Removal, and Replacement Upgrading Firmware Using the Remote Management Card (library firmware only) All library components, except drives, can be easily downloaded from the remote management card (“Using the Remote Management Card” on page 3-9). NOTE The firmware file is available from HP Support at www.hp.com/go/ support. These files must be loaded onto the local host computer before downloading firmware.
Troubleshooting, Removal, and Replacement Upgrading Firmware Using the Remote Management Card (library firmware only) All library components, except drives, can be easily downloaded from the remote management card (“Using the Remote Management Card” on page 3-9). NOTE The firmware file is available from HP Support at www.hp.com/go/ support. These files must be loaded onto the local host computer before downloading firmware.
Troubleshooting, Removal, and Replacement Upgrading Firmware Using the Remote Management Card (library firmware only) All library components, except drives, can be easily downloaded from the remote management card (“Using the Remote Management Card” on page 3-9). NOTE The firmware file is available from HP Support at www.hp.com/go/ support. These files must be loaded onto the local host computer before downloading firmware.
Troubleshooting, Removal, and Replacement Upgrading Firmware Using the Remote Management Card (library firmware only) All library components, except drives, can be easily downloaded from the remote management card (“Using the Remote Management Card” on page 3-9). NOTE The firmware file is available from HP Support at www.hp.com/go/ support. These files must be loaded onto the local host computer before downloading firmware.
Troubleshooting, Removal, and Replacement Upgrading Firmware Using the Remote Management Card (library firmware only) All library components, except drives, can be easily downloaded from the remote management card (“Using the Remote Management Card” on page 3-9). NOTE The firmware file is available from HP Support at www.hp.com/go/ support. These files must be loaded onto the local host computer before downloading firmware.
Troubleshooting, Removal, and Replacement Upgrading Firmware Using the Remote Management Card (library firmware only) All library components, except drives, can be easily downloaded from the remote management card (“Using the Remote Management Card” on page 3-9). NOTE The firmware file is available from HP Support at www.hp.com/go/ support. These files must be loaded onto the local host computer before downloading firmware.
Troubleshooting, Removal, and Replacement Upgrading Firmware Using the Remote Management Card (library firmware only) All library components, except drives, can be easily downloaded from the remote management card (“Using the Remote Management Card” on page 3-9). NOTE The firmware file is available from HP Support at www.hp.com/go/ support. These files must be loaded onto the local host computer before downloading firmware.
Troubleshooting, Removal, and Replacement Upgrading Firmware Using the Remote Management Card (library firmware only) All library components, except drives, can be easily downloaded from the remote management card (“Using the Remote Management Card” on page 3-9). NOTE The firmware file is available from HP Support at www.hp.com/go/ support. These files must be loaded onto the local host computer before downloading firmware.
Troubleshooting, Removal, and Replacement Upgrading Firmware Using the Remote Management Card (library firmware only) All library components, except drives, can be easily downloaded from the remote management card (“Using the Remote Management Card” on page 3-9). NOTE The firmware file is available from HP Support at www.hp.com/go/ support. These files must be loaded onto the local host computer before downloading firmware.
Troubleshooting, Removal, and Replacement Upgrading Firmware Using the Remote Management Card (library firmware only) All library components, except drives, can be easily downloaded from the remote management card (“Using the Remote Management Card” on page 3-9). NOTE The firmware file is available from HP Support at www.hp.com/go/ support. These files must be loaded onto the local host computer before downloading firmware.
Troubleshooting, Removal, and Replacement Upgrading Firmware Using the Remote Management Card (library firmware only) All library components, except drives, can be easily downloaded from the remote management card (“Using the Remote Management Card” on page 3-9). NOTE The firmware file is available from HP Support at www.hp.com/go/ support. These files must be loaded onto the local host computer before downloading firmware.
Troubleshooting, Removal, and Replacement Upgrading Firmware Using the Remote Management Card (library firmware only) All library components, except drives, can be easily downloaded from the remote management card (“Using the Remote Management Card” on page 3-9). NOTE The firmware file is available from HP Support at www.hp.com/go/ support. These files must be loaded onto the local host computer before downloading firmware.
Troubleshooting, Removal, and Replacement Upgrading Firmware Using the Remote Management Card (library firmware only) All library components, except drives, can be easily downloaded from the remote management card (“Using the Remote Management Card” on page 3-9). NOTE The firmware file is available from HP Support at www.hp.com/go/ support. These files must be loaded onto the local host computer before downloading firmware.
Troubleshooting, Removal, and Replacement Upgrading Firmware Using the Remote Management Card (library firmware only) All library components, except drives, can be easily downloaded from the remote management card (“Using the Remote Management Card” on page 3-9). NOTE The firmware file is available from HP Support at www.hp.com/go/ support. These files must be loaded onto the local host computer before downloading firmware.
Troubleshooting, Removal, and Replacement Upgrading Firmware Using the Remote Management Card (library firmware only) All library components, except drives, can be easily downloaded from the remote management card (“Using the Remote Management Card” on page 3-9). NOTE The firmware file is available from HP Support at www.hp.com/go/ support. These files must be loaded onto the local host computer before downloading firmware.
Troubleshooting, Removal, and Replacement Upgrading Firmware Using the Remote Management Card (library firmware only) All library components, except drives, can be easily downloaded from the remote management card (“Using the Remote Management Card” on page 3-9). NOTE The firmware file is available from HP Support at www.hp.com/go/ support. These files must be loaded onto the local host computer before downloading firmware.
Troubleshooting, Removal, and Replacement Upgrading Firmware Using the Remote Management Card (library firmware only) All library components, except drives, can be easily downloaded from the remote management card (“Using the Remote Management Card” on page 3-9). NOTE The firmware file is available from HP Support at www.hp.com/go/ support. These files must be loaded onto the local host computer before downloading firmware.
Troubleshooting, Removal, and Replacement Upgrading Firmware Using the Remote Management Card (library firmware only) All library components, except drives, can be easily downloaded from the remote management card (“Using the Remote Management Card” on page 3-9). NOTE The firmware file is available from HP Support at www.hp.com/go/ support. These files must be loaded onto the local host computer before downloading firmware.
Troubleshooting, Removal, and Replacement Upgrading Firmware Using the Remote Management Card (library firmware only) All library components, except drives, can be easily downloaded from the remote management card (“Using the Remote Management Card” on page 3-9). NOTE The firmware file is available from HP Support at www.hp.com/go/ support. These files must be loaded onto the local host computer before downloading firmware.
Troubleshooting, Removal, and Replacement Upgrading Firmware Using the Remote Management Card (library firmware only) All library components, except drives, can be easily downloaded from the remote management card (“Using the Remote Management Card” on page 3-9). NOTE The firmware file is available from HP Support at www.hp.com/go/ support. These files must be loaded onto the local host computer before downloading firmware.
Troubleshooting, Removal, and Replacement Upgrading Firmware Using the Remote Management Card (library firmware only) All library components, except drives, can be easily downloaded from the remote management card (“Using the Remote Management Card” on page 3-9). NOTE The firmware file is available from HP Support at www.hp.com/go/ support. These files must be loaded onto the local host computer before downloading firmware.
Troubleshooting, Removal, and Replacement Upgrading Firmware Using the Remote Management Card (library firmware only) All library components, except drives, can be easily downloaded from the remote management card (“Using the Remote Management Card” on page 3-9). NOTE The firmware file is available from HP Support at www.hp.com/go/ support. These files must be loaded onto the local host computer before downloading firmware.
Troubleshooting, Removal, and Replacement Upgrading Firmware Using the Remote Management Card (library firmware only) All library components, except drives, can be easily downloaded from the remote management card (“Using the Remote Management Card” on page 3-9). NOTE The firmware file is available from HP Support at www.hp.com/go/ support. These files must be loaded onto the local host computer before downloading firmware.
Troubleshooting, Removal, and Replacement Upgrading Firmware Using the Remote Management Card (library firmware only) All library components, except drives, can be easily downloaded from the remote management card (“Using the Remote Management Card” on page 3-9). NOTE The firmware file is available from HP Support at www.hp.com/go/ support. These files must be loaded onto the local host computer before downloading firmware.
Troubleshooting, Removal, and Replacement Upgrading Firmware Using the Remote Management Card (library firmware only) All library components, except drives, can be easily downloaded from the remote management card (“Using the Remote Management Card” on page 3-9). NOTE The firmware file is available from HP Support at www.hp.com/go/ support. These files must be loaded onto the local host computer before downloading firmware.
Troubleshooting, Removal, and Replacement Upgrading Firmware Using the Remote Management Card (library firmware only) All library components, except drives, can be easily downloaded from the remote management card (“Using the Remote Management Card” on page 3-9). NOTE The firmware file is available from HP Support at www.hp.com/go/ support. These files must be loaded onto the local host computer before downloading firmware.
Troubleshooting, Removal, and Replacement Upgrading Firmware Using the Remote Management Card (library firmware only) All library components, except drives, can be easily downloaded from the remote management card (“Using the Remote Management Card” on page 3-9). NOTE The firmware file is available from HP Support at www.hp.com/go/ support. These files must be loaded onto the local host computer before downloading firmware.
Troubleshooting, Removal, and Replacement Upgrading Firmware Using the Remote Management Card (library firmware only) All library components, except drives, can be easily downloaded from the remote management card (“Using the Remote Management Card” on page 3-9). NOTE The firmware file is available from HP Support at www.hp.com/go/ support. These files must be loaded onto the local host computer before downloading firmware.
Troubleshooting, Removal, and Replacement Upgrading Firmware Using the Remote Management Card (library firmware only) All library components, except drives, can be easily downloaded from the remote management card (“Using the Remote Management Card” on page 3-9). NOTE The firmware file is available from HP Support at www.hp.com/go/ support. These files must be loaded onto the local host computer before downloading firmware.
Troubleshooting, Removal, and Replacement Upgrading Firmware Using the Remote Management Card (library firmware only) All library components, except drives, can be easily downloaded from the remote management card (“Using the Remote Management Card” on page 3-9). NOTE The firmware file is available from HP Support at www.hp.com/go/ support. These files must be loaded onto the local host computer before downloading firmware.
Troubleshooting, Removal, and Replacement Upgrading Firmware Using the Remote Management Card (library firmware only) All library components, except drives, can be easily downloaded from the remote management card (“Using the Remote Management Card” on page 3-9). NOTE The firmware file is available from HP Support at www.hp.com/go/ support. These files must be loaded onto the local host computer before downloading firmware.
Troubleshooting, Removal, and Replacement Upgrading Firmware Using the Remote Management Card (library firmware only) All library components, except drives, can be easily downloaded from the remote management card (“Using the Remote Management Card” on page 3-9). NOTE The firmware file is available from HP Support at www.hp.com/go/ support. These files must be loaded onto the local host computer before downloading firmware.
Troubleshooting, Removal, and Replacement Upgrading Firmware Using the Remote Management Card (library firmware only) All library components, except drives, can be easily downloaded from the remote management card (“Using the Remote Management Card” on page 3-9). NOTE The firmware file is available from HP Support at www.hp.com/go/ support. These files must be loaded onto the local host computer before downloading firmware.
Troubleshooting, Removal, and Replacement Upgrading Firmware Using the Remote Management Card (library firmware only) All library components, except drives, can be easily downloaded from the remote management card (“Using the Remote Management Card” on page 3-9). NOTE The firmware file is available from HP Support at www.hp.com/go/ support. These files must be loaded onto the local host computer before downloading firmware.
Troubleshooting, Removal, and Replacement Upgrading Firmware Using the Remote Management Card (library firmware only) All library components, except drives, can be easily downloaded from the remote management card (“Using the Remote Management Card” on page 3-9). NOTE The firmware file is available from HP Support at www.hp.com/go/ support. These files must be loaded onto the local host computer before downloading firmware.
Troubleshooting, Removal, and Replacement Upgrading Firmware Using the Remote Management Card (library firmware only) All library components, except drives, can be easily downloaded from the remote management card (“Using the Remote Management Card” on page 3-9). NOTE The firmware file is available from HP Support at www.hp.com/go/ support. These files must be loaded onto the local host computer before downloading firmware.
Troubleshooting, Removal, and Replacement Upgrading Firmware Using the Remote Management Card (library firmware only) All library components, except drives, can be easily downloaded from the remote management card (“Using the Remote Management Card” on page 3-9). NOTE The firmware file is available from HP Support at www.hp.com/go/ support. These files must be loaded onto the local host computer before downloading firmware.
Troubleshooting, Removal, and Replacement Upgrading Firmware Using the Remote Management Card (library firmware only) All library components, except drives, can be easily downloaded from the remote management card (“Using the Remote Management Card” on page 3-9). NOTE The firmware file is available from HP Support at www.hp.com/go/ support. These files must be loaded onto the local host computer before downloading firmware.
Troubleshooting, Removal, and Replacement Upgrading Firmware Using the Remote Management Card (library firmware only) All library components, except drives, can be easily downloaded from the remote management card (“Using the Remote Management Card” on page 3-9). NOTE The firmware file is available from HP Support at www.hp.com/go/ support. These files must be loaded onto the local host computer before downloading firmware.
Troubleshooting, Removal, and Replacement Upgrading Firmware Using the Remote Management Card (library firmware only) All library components, except drives, can be easily downloaded from the remote management card (“Using the Remote Management Card” on page 3-9). NOTE The firmware file is available from HP Support at www.hp.com/go/ support. These files must be loaded onto the local host computer before downloading firmware.
Troubleshooting, Removal, and Replacement Upgrading Firmware Using the Remote Management Card (library firmware only) All library components, except drives, can be easily downloaded from the remote management card (“Using the Remote Management Card” on page 3-9). NOTE The firmware file is available from HP Support at www.hp.com/go/ support. These files must be loaded onto the local host computer before downloading firmware.
Troubleshooting, Removal, and Replacement Upgrading Firmware Using the Remote Management Card (library firmware only) All library components, except drives, can be easily downloaded from the remote management card (“Using the Remote Management Card” on page 3-9). NOTE The firmware file is available from HP Support at www.hp.com/go/ support. These files must be loaded onto the local host computer before downloading firmware.
Troubleshooting, Removal, and Replacement Upgrading Firmware Using the Remote Management Card (library firmware only) All library components, except drives, can be easily downloaded from the remote management card (“Using the Remote Management Card” on page 3-9). NOTE The firmware file is available from HP Support at www.hp.com/go/ support. These files must be loaded onto the local host computer before downloading firmware.
Troubleshooting, Removal, and Replacement Upgrading Firmware Using the Remote Management Card (library firmware only) All library components, except drives, can be easily downloaded from the remote management card (“Using the Remote Management Card” on page 3-9). NOTE The firmware file is available from HP Support at www.hp.com/go/ support. These files must be loaded onto the local host computer before downloading firmware.
Troubleshooting, Removal, and Replacement Upgrading Firmware Using the Remote Management Card (library firmware only) All library components, except drives, can be easily downloaded from the remote management card (“Using the Remote Management Card” on page 3-9). NOTE The firmware file is available from HP Support at www.hp.com/go/ support. These files must be loaded onto the local host computer before downloading firmware.