
HP SureStore E Disk Array FC60 Service Manual (A5635A)


Internal Disk Enclosure Assemblies 319
Removal and
Replacement
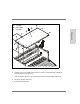
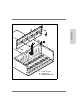
Figure 104
Disk Carrier Assembly Removal and Replacement
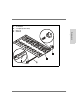
3. Remove the four screws holding the insertion guides (B) and carrier (A) to the disk.
Note
Working near the edge of the table improves the angle of the screwdriver.
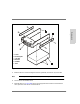
4. Lift the carrier off the disk drive.
5. With the latch (C in Figure 104) facing up and opposite the connector end of the disk
drive, place the new carrier on the disk drive.
A carrier
B insertion guide
Ccam latch
D disk drive
E standoffs
F bezel