
HP SureStore E Disk Array FC60 Service Manual (A5635A)


Internal Disk Enclosure Assemblies 307
Removal and
Replacement
Installing the Disk Enclosure SC10
This procedure provides installation steps to reinstall a disk enclosure into a rack. This
procedure is a shortened version of the installation procedure provided in Chapter 3,
Installation. To replace the disk enclosure into the rack, complete the steps below.
1. Using two people, lift the enclosure into the rack. Slide the enclosure as far forward as
it will go.
2. Unlock and open the front cover door.
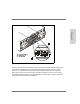
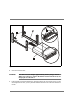
3. Insert and tighten the front mounting screws (A in Figure 99) to secure the front of the
enclosure to the rack columns.
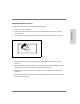
4. Reinstall the rail clamps. Install two screws into each of the two rail clamps (D in Figure
98) at the rear of the disk enclosure
5. Reconnect the SCSI cable(s), terminators, and power cords.
6. Verify that the configuration switches are set to the correct setting for the new
installation. If a new enclosure is being installed, ensure that the DIP switch is set for
either full-bus or split-bus mode and that the Enclosure (Tray) ID is unique for the
installation. See "Configuration Switches" on page 142 for more information.
7. Power on all disk enclosures.
Note
It can take several minutes for all the disk modules to spin up and the enclosure
to become completely functional. Use the Array Manager 60 commands to
check the status of the disks. Some disks may remain unavailable for several
minutes.
8. Power on the controller enclosure. Set both power switches at the back of the enclosure
to on (|).
9. Check that the LEDs are green.
10. Close and lock the door
11. Perform necessary system administration to return file systems to service.