
User's Manual
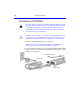

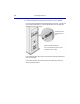
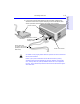
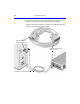
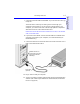
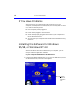
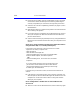
Table Of Contents
- Hewlett-Packard Limited Warranty Statement
- HP Software License Agreement
- Chapter 1: Connecting CD-Writer Plus and Installing Software
- Chapter 2: Using Your CD-Writer Plus
- Chapter 3: Problem Solving
- Chapter 4: Sharing Your CDs
- Chapter 5: Making Data CDs
- Chapter 6: Making Music CDs
- Chapter 7: making Inserts and Labels
- Chapter 8: Copying CDs
- Chapter 9: Find Files Fast with HP Simple Trax
- What Simple Trax Can Do for You
- Copying Files to CD
- Automatically Copying Files to CD
- Preparing a CD for Automatic Operations
- To Verify Your Schedule Settings
- To Change a Schedule
- Browsing Your Simple Trax CDs
- Finding Files On Your CD
- Copying Files and Folders Back to Your Hard Drive
- Retrieving an Earlier Version of a File
- Importing CDs into HP Simple Trax
- Event Logs
- Changing the Index Display
- Chapter 10: HP Disaster Recovery
- Appendix A: Technical Specifications
- Appendix B: Customer Support
- Index

1-8 If You Have Problems
If You Have Problems
After connecting your CD-Writer Plus drive and turning on your
computer, the computer should start (boot) as it normally does. If it does
not, check the following items:
■ Is the computer power plugged in?
■ Is each device plugged in and turned on?
■ Are all cables properly plugged into the back of your computer and
the CD-Writer Plus drive?
■ Try turning off your computer. Wait at least 20 seconds before turning
it back on.
Installing the Software for Windows
95/98, or Windows NT 4.0
After the CD-Writer Plus drive is attached to your computer, you are
ready to install the application software.
If your computer DOES have a CD-ROM drive:
1. Insert the CD labeled “Software Disc 1” into your CD-ROM drive (not the
CD-Writer Plus drive). The main menu appears:
Click the
Install CD-
Writer Plus
icon