
HP StoreEver MSL6480 Tape Library User and Service Guide

4 Upgrading and servicing the library
CAUTION: Slide/rail mounted equipment is not to be used as a shelf or a work space.
Possible tools needed
• #1 Phillips screwdriver — removing drive bay covers
• #2 Phillips screwdriver — securing or removing the round-hole rack adapter bracket
• T10 Torx driver — securing retention inserts in square-hole racks
• Small flat head or Torx screwdriver — retracting the locking screen when moving a library
cover, using the magazine manual release
• Small flat head screwdriver — removing a magazine access door
• Clip nut installation tool — inserting or removing clip nuts in square-hole racks while installing
or removing rack rails
Identifying a failed component
Using the OCP or RMI:
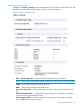
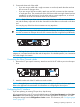
1. Activate the UID (Unit Identification) LEDs from the Maintenance > UID LED Control screen. This
will illuminate the blue LED on the front and rear of the base module to identify the library
containing the failed component.
2. Identify the module within the library that contains the failed component:
a. In the upper left corner of the Home screen, locate the module that indicates an error.
b. Click or tap the module for information on the failed component.
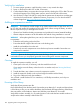
NOTE: If dealing with a failed drive power board, there are two drive power boards
in each module; the screen will indicate whether the left or right drive power board (as
seen from the rear of the library) has failed. On the failed board itself, the amber LED
might be illuminated and visible through the fan grating.
Installing or replacing a tape drive
WARNING! Only individuals who are informed about the procedures and risks should replace
or upgrade this tape drive assembly. Read all troubleshooting documentation and procedures
before proceeding with repair or upgrade procedures. Hazardous moving parts exist inside this
product. Do not insert tools nor any portion of your body into the drive bay openings.
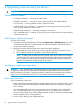
Removing a tape drive
If you are replacing a tape drive:
• Make sure the tape cartridge has been removed from the tape drive. Use the operator control
panel (OCP) or the remote management interface (RMI) to move the cartridge to a storage
slot or mailslot.
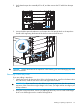
• If you are replacing the tape drive in a single drive unit or the master drive in a multi-drive
unit, verify that backups are not occurring on the drive you are replacing. If backups are
occurring on the master drive, verify that the autoloader or library will not be accessed through
this drive while the drive is being replaced.
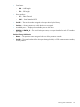
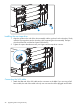
1. Use the OCP or RMI to power off the tape drive.
96 Upgrading and servicing the library