
HP StoreEver MSL6480 Tape Library User and Service Guide
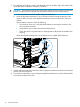
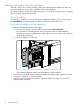


4. Repeat steps 1 through 3 for each of the other magazines.
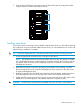
Verifying the installation
Verify that the library has the current firmware revision. The library firmware revision is displayed
in the top left corner of the OCP and RMI screen.
If necessary, update the library firmware from the OCP or RMI Maintenance > Software Upgrades
> System Firmware screen.
After configuring the library, you can save the configuration settings to a USB flash drive from the
OCP or to a file on your computer from the RMI Configuration > Save/Restore screen. Having a
backup of the library configuration is helpful when recovering from a configuration error or if the
library needs service.
Set the security user password from the OCP or RMI Configuration > User Accounts screen. See
“Configuring user accounts” (page 65).
IMPORTANT: HP highly recommends changing the security user password during product
installation. Leaving the password with the default value can cause a security risk to the library
and data.
Configuring additional features
The library has many features to customize it for your organization.
• Enabling the mailslot. See “Enabling or disabling mailslots” (page 54).
• Configuring partitioning and additional library parameters using one of the partitioning
wizards. See “Configuring library partitions” (page 54).
◦ Basic Partition Wizard — Use the Basic Partition Wizard to configure partitions that will
have similar resources or to configure the number of barcode characters to report to the
host application and whether to report them from the left or right end of the label for a
library with a single partition.
◦ Expert Partition Wizard — Use the Expert Partition Wizard to configure partitions that
will have different resources or to adjust resource assignments for existing partitions or
those created with the Basic Partition Wizard.
• Modifying the default tape drive settings. See “Configuring tape drives” (page 52).
• Enabling and configuring SNMP network management. See “Configuring SNMP” (page 49).
Verifying the installation 37