
HP StoreEver MSL6480 Tape Library User and Service Guide
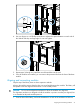
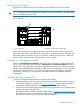


5. From the back of the library connect the lower module of each pair to its adjacent module
using the expansion interconnect cable as shown.
Installing tape drives
If your library does not have tape drives installed, install the tape drives now. If the library already
has a tape drive and you purchased additional tape drives, you can install them now or wait until
after the library installation is complete.
TIP: To assist in aligning the drive, only remove the drive bay covers for one drive at a time.
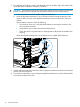
1. Locate an appropriate vacant drive bay on the back of the library.
NOTE: Full height tape drives can only be installed in the very top, very bottom, or middle
pair of half-height drive bays. A full-height drive cannot be seated in other locations and will
not operate. If the drive will not seat completely, verify that it is located in one of the three
full-height drive locations.
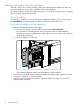
2. Remove the face plate covering the drive bay by removing the screws holding it in place.
Remove one drive bay cover to install a half-height tape drive; remove two drive bay covers
to install a full-height tape drive.
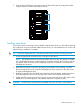
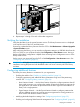
3. Holding the tape drive by the handle and supporting it from the bottom, slide the tape drive
along the alignment rails into the drive bay until it is flush with the back of the library.
4. Tighten the blue captive screws with your fingers to secure the tape drive to the chassis. If the
thumbscrews cannot be tightened, verify that the tape drive is aligned properly.
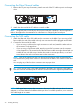
CAUTION: All drive bays without tape drives installed must have drive bay covers installed.
Installing tape drives 33