
HP StoreEver MSL6480 Tape Library User and Service Guide

7. Install the new robotic assembly and spooling mechanism; see “Installing the robotic assembly
and spooling mechanism into the base module” (page 128).
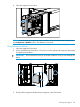
8. Slide the base module back into the rack; see “After the robotic assembly and spooling
mechanism installation” (page 130).
The robotic assembly is stopped in an expansion module that is not near the base
module or it cannot move vertically
1. Remove the left magazine of the base module; see “Removing the magazine” (page 116). The
library should already be powered off. Therefore, you must unlock the magazine using the
manual release.
2. Disconnect the power supply cables from all of the modules.
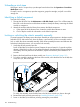
3. Using plastic-handled scissors, reach through the left magazine opening of the base module
and carefully cut the spooling cable.
NOTE: Use extreme caution to prevent damaging other parts of the module.
A new spooling cable is provided with the replacement robotic assembly.
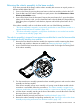
4. Extend the expansion module containing the robotic assembly while carefully guiding the free
spooling cable; see “Preparing to remove the robotic assembly and spooling mechanism from
the base module” (page 125). While there may be minor differences, these instructions for a
base module will also apply to an expansion module.
5. Remove the robotic assembly from the expansion module using Step 1 through Step 7 in
“Removing the robotic assembly and spooling mechanism from the base module” (page 126).
6. Slide the expansion module back into the rack; see “After the robotic assembly and spooling
mechanism installation” (page 130). While there may be minor differences, these instructions
for a base module will also apply to an expansion module.
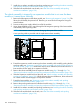
7. Extend the base module; see “Preparing to remove the robotic assembly and spooling
mechanism from the base module” (page 125).
8. Remove the spooling mechanism from the base module using Step 8 through Step 10 in
“Removing the robotic assembly and spooling mechanism from the base module” (page 126).
9. Install the new robotic assembly and spooling mechanism; see “Installing the robotic assembly
and spooling mechanism into the base module” (page 128).
10. Slide the base module back into the rack; see “After the robotic assembly and spooling
mechanism installation” (page 130).
148 Troubleshooting