
HP StoreEver MSL6480 Tape Library User and Service Guide

Unloading a stuck tape
If the tape is stuck in a tape drive, eject the tape from the drive from the Operation > Force Drive
Media Eject screen.
If a tape is stuck in a magazine, open the magazine, grasp the cartridge, and pull it out of the
storage slot.
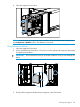
Identifying a failed component
Using the OCP or RMI:
1. Activate the UID LEDs from the Maintenance > UID LED Control screen. This will illuminate the
blue LED on the front and rear of the base module to identify the library containing the failed
module or component.
2. Identify the module within the library that contains the failed component:
a. In the upper left of the Home screen, locate the module that indicates an error.
b. Click or tap the module for information on the failed component.
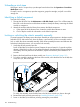
Locking or unlocking the robotic assembly manually
In normal operation, the library returns the robotic assembly to its home position in the base module,
behind the OCP, and sets the lock when the library is powered off. You do not normally need to
lock or unlock the robotic assembly manually. If the robotic assembly becomes stuck between the
locked and unlocked positions, you can set the lock manually.
1. Verify that all host processes are idle.
Power off the library from the front panel. Depress the power button for 5 seconds and then
release it. If the library is idle, you can release the button when the Ready LED begins flashing.
If the library does not perform a soft shutdown, depress and hold the power button for 10
seconds.
2. Remove the front bezel from the base module; see “Removing the bezel” (page 131).
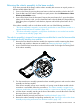
3. To lock the assembly, standing at the front of the module, move the blue lever to the left, then
away from you, then to the right.
To unlock the assembly, move the blue lever to the left, then towards you, then to the right.
4. Reinstall the bezel previously removed; see “Installing the bezel” (page 132).
5. Power on the library from the front panel by pressing the power button.
146 Troubleshooting