
HP StoreEver MSL6480 Tape Library User and Service Guide

Powering on the library
Power on the library by pressing the power button on the base module just below the OCP; the
green light will illuminate. When the library is powered on, it inventories the tape cartridges in the
magazines, checks the firmware version on all modules, configures the tape drives, confirms the
presence of the existing modules, and searches for any new modules.
Verifying the installation
Verify that the library powers on and initializes correctly, and that the status is Ready.
If the UID LEDs are still illuminated, deactivate them using the OCP or RMI.
Replacing the front bezel or OCP
CAUTION: Parts can be damaged by electrostatic discharge. Keep parts in electrostatic containers
until needed. Ensure you are properly grounded when touching static sensitive components.
Powering off the library
Verify that all host processes are idle.
Power off the library from the front panel. Depress the power button for 5 seconds and then release
it. If the library is idle, you can release the button when the Ready LED begins flashing. If the library
does not perform a soft shutdown, depress and hold the power button for 10 seconds.
Verify that the robotic assembly is in its parked position. Look inside the base module window to
verify that the robotic assembly is behind the OCP.
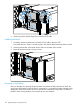
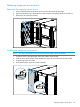
Removing the bezel
1. Open the magazine access doors.
2. On one side of the bezel near the top, insert a small flat head or Torx screwdriver into the
bezel release hole.
3. Push the screwdriver gently toward the middle of the bezel until that corner of the bezel is
released.
4. Release the other top corner in the same manner.
5. Pull the bezel up until clear of the bottom brackets.
NOTE: If removing a base module bezel, pull gently to avoid damaging the OCP cable.
Note where the OCP cable is located, routed, and attached.
Replacing the front bezel or OCP 131