
HP StoreEver MSL6480 Tape Library User and Service Guide
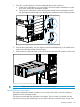
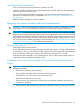

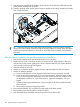

5. Each corner of the robotic assembly has a gear with two protruding pins. Rotate one of the
gears on the robotic assembly so that the two pins are aligned horizontally.
6. Place the gears of the robotic assembly into the grooves on the inside corners of the module.
Confirm that all of the pins are touching the outside of the grooves.
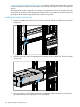
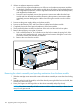
7. Push the robotic assembly down slowly until the platform of the robotic assembly is
approximately 7.5 cm (3 inch) lower than the top of the module.
1
2
2
CAUTION: Lower the robotic assembly no faster than 12 mm (0.5 inch) per second. If the
robotic assembly is not aligned properly or you push too hard or too quickly, damage to the
robotic assembly and the module may occur.
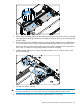
NOTE: The robotic assembly should drop smoothly when applying gentle force. If it does
not, check the alignment of the gears.
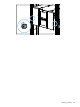
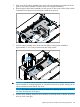
8. Lock the robot; standing at the front of the module, move the blue lever to the left, then away
from you, then to the right.
Replacing the robotic assembly and spooling mechanism 129