
HP StoreEver MSL6480 Tape Library User and Service Guide
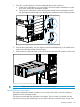


2. If there are adjacent expansion modules:
a. Loosen the front captive thumbscrews two full turns on the adjacent expansion modules.
b. On the back of the base module and the module above (if present), loosen the thumbscrews
on the alignment mechanisms, move the alignment mechanisms into the unlocked position,
and retighten the thumbscrews.
c. Disconnect and completely remove the expansion interconnect cables from the base
module and from the adjacent modules. Removing the expansion interconnect cables
completely prevents damaging the cables when moving the module in and out of the
rack.
3. Disconnect the power supply cables on the base module.
4. Disconnect the Ethernet, SAS, and Fibre Channel cables from the base module.
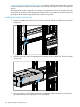
5. Completely loosen the front captive thumbscrews of the base module.
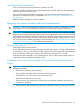
6. Slowly extend the base module from the front of the rack until the rails lock into place.
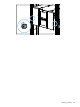
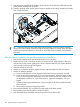
7. Remove the top library cover plate, if present:
a. Push a small flat head or Torx screwdriver into the hole to retract the spring lock, slide
the cover until it reaches the tool, remove the tool and continue sliding the cover to the
front of the module until the tabs are released.
b. Remove the cover from the module.
2
2
1
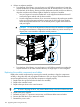
Removing the robotic assembly and spooling mechanism from the base module
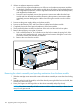
1. Slide the cartridge carrier toward the center of the robotic assembly to access the robot locking
lever.
2. Standing at the front of the module, unlock the robot by moving the blue lever to the left, then
toward you, then to the right.
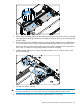
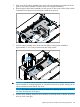
3. Place your fingers into the large holes on the robotic assembly and pull up slowly.
NOTE: The robotic assembly will offer resistance. Lift the robotic assembly no faster than 12
mm (0.5 inch) per second.
126 Upgrading and servicing the library