
HP StoreEver MSL6480 Tape Library User and Service Guide


4. If there are adjacent modules:
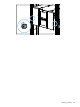
a. From the front of the library, use your fingers or a #2 Phillips screwdriver to loosen the
captive thumbscrews on the replacement module and all modules above it two full turns.
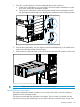
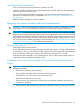
b. From the back of the library, starting with the replacement module and the one below it,
align the modules and lock them together. Repeat for each pair of modules.
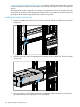
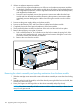
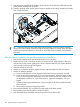
i. Use your fingers to loosen the thumbscrew on the alignment mechanism that will
connect the upper module with the lower module.
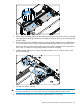
ii. Lower the alignment mechanism. If you encounter resistance, adjust the upper module
so the pin in the alignment mechanism moves into the hole in the lower module.
When the alignment mechanism is in the locked position, tighten the thumbscrew
with your fingers.
CAUTION: Do not use the alignment mechanism to force the modules into alignment.
The alignment mechanism is designed to hold the modules in position once they are
aligned, but is not intended to adjust the module positions.
1
2
3
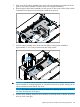
c. From the front of the library, use your fingers or a #2 Phillips screwdriver to tighten the
captive fasteners on all of the modules until they are finger tight. Do not over tighten.
Replacing the module components and cables
Replace the module components by reversing the removal procedures. Align the components
carefully in the guide slots and only tighten thumbscrews with your fingers. If the thumbscrews
cannot be tightened easily, verify that the component is aligned properly.
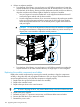
1. Replace the drive power boards and chassis fan assembly.
2. Replace the controller board.
3. Replace the tape drives in the same locations .
TIP: To assist in aligning the drive, only remove the drive bay covers for one drive at a time.
4. Replace the power supplies.
5. Reattach any SAS, FC, expansion interconnect, and Ethernet cables removed earlier.
6. Reinsert the USB device if you removed it earlier.
7. Reattach the power cords.
124 Upgrading and servicing the library