
HP StoreEver MSL6480 Tape Library User and Service Guide
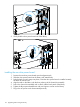

2. Remove the expansion interconnect cables from the module being replaced and from the
modules connected to it.
NOTE: Completely removing the cables from both ends prevents damaging the expansion
interconnect cables during module removal and replacement.
3. Remove any SAS, FC, or Ethernet cables from the module being replaced.
4. Remove the USB device, if present.
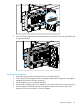
Removing the tape drives
Remove any tape drives from the module being replaced. The library tracks the drive locations
and will issue events if the drives aren’t in the expected locations. Note the drive locations so they
can be replaced in the same order and drive bays.
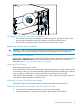
1. Use your fingers to loosen the blue captive thumbscrews on the tape drive.
2. Pull straight back on the tape drive handle while supporting the bottom of the drive to remove
it from the module.
CAUTION: Support the bottom of the tape drive when removing it to avoid damaging any of the
internal connections.
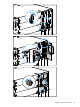
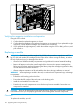
Removing the power supplies
While removing the power supplies, be sure to support the bottom. For detailed instructions, see
“Removing the power supplies” (page 104).
Removing the base or expansion module controller
For detailed instructions, see “Removing the base or expansion module controller” (page 107).
Removing the chassis fan assembly and drive power boards
For detailed instructions, see “Removing the chassis fan assembly and drive power boards”
(page 111).
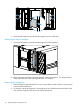
Removing the module from the rack
Obtain assistance to lift and stabilize the module during removal and replacement.
120 Upgrading and servicing the library