
HP StoreEver MSL6480 Tape Library User and Service Guide

2
1
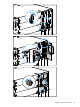
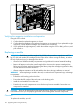
Verifying the chassis fan assembly installation
1. Verify that the new chassis fan assembly is installed properly by checking the OCP or RMI;
the event that indicated the chassis fan assembly was faulty should be cleared.
2. If the UID LEDs are still illuminated, deactivate them using the OCP or RMI.
Replacing a drive power board
CAUTION: Parts can be damaged by electrostatic discharge. Keep parts in electrostatic containers
until needed. Ensure you are properly grounded when touching static sensitive components.
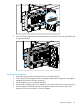
Identifying the failed component
See the OCP or RMI Home screen to identify the failed component. Activate the UID LEDs from the
Maintenance > UID LED Control screen to locate the library in the data center. For detailed
instructions, see “Identifying a failed component” (page 96).
Powering off the library
Verify that all host processes are idle.
Power off the library from the front panel. Depress the power button for 5 seconds and then release
it. If the library is idle, you can release the button when the Ready LED begins flashing. If the library
does not perform a soft shutdown, depress and hold the power button for 10 seconds.
Verify that the robotic assembly is in its parked position. Look inside the base module window to
verify that the robotic assembly is behind the OCP.
Preparing to remove the drive power board
Unplug the AC power cords from the module containing the failed drive power board.
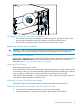
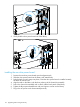
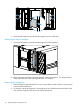
Removing the chassis fan assembly and drive power boards
1. Loosen the two blue captive thumbscrews on the chassis fan assembly.
2. Using the thumbscrews, slowly remove the chassis fan assembly from the library.
Replacing a drive power board 111