
HP StoreEver MSL6480 Tape Library User and Service Guide
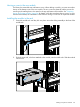


9. Replace the cables and lock the alignment mechanisms.
10. Connect the power cords, power on the library, and verify the operation.
11. Replace the tape cartridges.
For instructions for these steps, see “Replacing a module” (page 118) and “Installing the library”
(page 19).
When moving a library to a different physical location:
• Always remove all tapes from the drives and magazines before moving the library.
• If the library is in a round-hole rack, the modules must be removed from the rack before moving.
• If the library is in a square-hole rack, verify that the retention inserts are properly installed or
remove the modules from the rack.
Replacing a power supply
CAUTION: Parts can be damaged by electrostatic discharge. Keep parts in electrostatic containers
until needed. Ensure you are properly grounded when touching static sensitive components.
Identifying the failed component
See the OCP or RMI Home screen to identify the failed component. Activate the UID LEDs from the
Maintenance > UID LED Control screen to locate the library in the data center. For detailed
instructions, see “Identifying a failed component” (page 96).
Preparing to remove the power supply
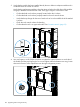
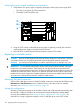
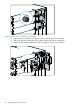
1. Locate the failed power supply on the rear of the library by the LEDs; either the amber LED
(2) will be lit or all three LEDs will be unlit.
1
2
3
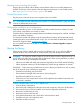
2. Unplug the AC power cord from the power supply you are replacing.
Removing the power supplies
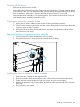
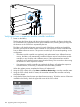
1. Loosen the three blue captive thumbscrews with your fingers on the power supply.
2. Using the thumbscrews (one on each side), slowly pull the power supply approximately 10
cm (4 inches) from the back of the library.
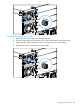
3. Use one hand to completely remove the power supply from the module while using the other
hand to support the bottom.
104 Upgrading and servicing the library