
HP StoreEver MSL6480 Tape Library User and Service Guide
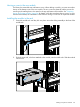

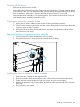

Aligning and connecting the module
Aligning the new module with the library ensures that the robot can move freely between the
modules. The library will not operate unless the alignment mechanism is in the locked position.
See “Aligning and connecting modules” (page 31) for details.
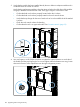
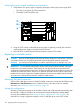
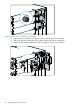
Connect the power cords
Plug the power cords into the two power supplies in the new module.
TIP: The module has dual redundant power supplies. To increase redundancy, plug each power
cord into a different AC power circuit.
Verifying the installation and configuration
Verify that the library powers on and initializes correctly, and that the status is Ready. From the
OCP or RMI, verify that the new module is visible.
Check the library configuration settings related to the additional storage slots, mailslots, and tape
drives, and update if necessary.
The expansion module will operate using the existing library firmware. HP recommends always
updating the library to the latest firmware version. You can download the latest library firmware
from the HP Support website: www.hp.com/support.
You can update firmware from the RMI or OCP Maintenance > Software Upgrades > System
Firmware screen.
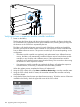
Moving the library
When moving a library module within the rack, to a different rack, or in a rack to a different
physical location, care must be taken to avoid personal injury and damage to the module.
WARNING! The expansion module weighs 41 kg (90 lb) without media or tape drives and 71.4
kg (157.4 lb) with media (80 cartridges) and six tape drives. When moving the library, to reduce
the risk of personal injury or damage to the module:
• Observe local health and safety requirements and guidelines for manual material handling.
• Obtain adequate assistance to lift and stabilize the module during installation or removal.
WARNING! When removing a module from the rack or placing a module into a rack, to reduce
the risk of personal injury or damage to equipment:
• Extend the rack leveling jacks to the floor.
• Ensure that the full weight of the rack rests on the leveling jacks.
• Install the rack stabilizer kit on the rack.
• Extend only one rack component at a time. Racks might become unstable if more than one
component is extended.
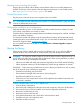
To move a module within a rack or into a different rack:
1. Save the library configuration.
2. Remove the tape cartridges from the tape drives and magazines, and power off the library.
3. Disconnect the power cords and cables, and unlock the alignment mechanisms.
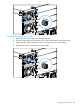
4. Remove the modules from the rack.
5. Remove the rack rails from the rack.
6. Verify that the destination rack is level side to side and front to back.
7. Install the rack rails in the destination rack.
8. Install the modules in the rack.
Moving the library 103