
HP StoreEver MSL6480 Tape Library User and Service Guide

Verifying the installation
1. To ensure proper operation, install drive bay covers on any unused drive bays.
2. Power on the drive from the OCP or RMI, if necessary.
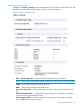
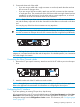
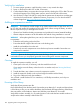
3. Confirm that the library recognizes the new tape drive by checking the OCP or RMI. The new
drive should appear in the module status overview area on the left side of the screen.
4. Use HP Library & Tape Tools (L&TT) to verify that the system sees the tape drive and that tape
drive has the current firmware. Update the firmware, if necessary. You can download L&TT
without charge from http://www.hp.com/support/TapeTools.
Adding an expansion module
WARNING! The expansion module weighs 41 kg (90 lb) without media or tape drives and 71.4
kg (157.4 lb) with media (80 cartridges) and six tape drives. When moving the library, to reduce
the risk of personal injury or damage to the module:
• Observe local health and safety requirements and guidelines for manual material handling.
• Obtain adequate assistance to lift and stabilize the module during installation or removal.
WARNING! When placing the library into a rack, to reduce the risk of personal injury or damage
to equipment:
• Extend the rack leveling jacks to the floor.
• Ensure that the full weight of the rack rests on the leveling jacks.
• Install the rack stabilizer kit on the rack.
• Extend only one rack component at a time. Racks may become unstable if more than one
component is extended.
CAUTION: Parts can be damaged by electrostatic discharge. Keep parts in electrostatic containers
until needed. Ensure you are properly grounded when touching static sensitive components.
Overview
To install this expansion module, you will:
1. Clear space in the rack, if necessary, and then install the rack rails.
If you need to move the library within the rack or to another rack, see “Moving the library”
(page 103).
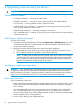
2. Transfer the library top or bottom cover to the expansion module.
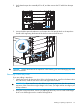
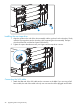
3. Install the expansion module in the rack and align the module with the library.
4. Plug in the cables and verify the installation.
You will need a small flat head or Torx screwdriver, a #2 Phillips screwdriver, and a clip nut
installation tool.
Powering off the library
Verify that all host processes are idle.
Power off the library from the front panel. Depress the power button for 5 seconds and then release
it. If the library is idle, you can release the button when the Ready LED begins flashing. If the library
does not perform a soft shutdown, depress and hold the power button for 10 seconds.
Verify that the robotic assembly is in its parked position. Look inside the base module window to
verify that the robotic assembly is behind the OCP.
100 Upgrading and servicing the library