
HP StoreEver MSL6480 Tape Library Module Replacement (QU625-96304, June 2013)


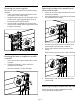
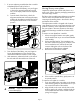

Table Of Contents
- Overview
- Saving the configuration settings
- Unlocking the magazine
- Using the OCP
- Using the manual release
- Removing the tape cartridges
- Powering off the library
- Removing the module cables
- Removing the tape drives
- Removing the power supplies
- Removing the base or expansion module controller
- Removing the chassis fan assembly and drive power boards
- Removing the empty module from the rack
- Moving library cover plates
- Installing the replacement module into the rack
- Replacing the module components and cables
- Verifying the library configuration
- Getting help
- Documentation feedback
2. Insert a small flat head screwdriver or Torx driver
into the appropriate magazine release hole.
IMPORTANT: Do not exert force once you
encounter resistance. Doing so can damage
the device.
3. Slowly pull the magazine handle until the
magazine is free of the latch.
Removing the tape cartridges
1. Slowly pull the magazine handle until the
magazine is fully extended.
2. Remove the tape cartridges noting their locations
within the magazine. You will place them in the
same locations in the replacement module.
Powering off the library
1. Press the power button just below the OCP and
hold for three seconds; the green light will go off.
The library will perform a soft shutdown, returning
the robotic assembly to its home position in the
base module and then setting the shipping lock.
2. If the library did not power off, press the power
button and hold for ten seconds. When the library
powers off, locate the robotic assembly.
3. Look inside the base module window to verify that
the robotic assembly is completely behind the
OCP. If you do not see the robotic assembly in
the base module, see the HP StoreEver MSL6480
Tape Library User and Service Guide for
additional troubleshooting information and
procedures before proceeding with the module
replacement.
NOTE: Under normal circumstances, when the
library is powered off using the front power
button the robot automatically parks and locks
into the base module behind the OCP.
Removing the module cables
1. Remove the power cords from the module being
replaced.
2. Remove the expansion interconnect cables from
the module being replaced and from the modules
connected to it.
NOTE: Completely removing the cables
from both ends prevents damaging the
expansion interconnect cables during
module removal and replacement.
3. Remove any SAS, FC, or Ethernet cables from the
module being replaced.
4. Remove the USB device, if present.
Removing the tape drives
Remove any tape drives from the module being
replaced. Note their locations so they can be replaced
in the same order and drive bays.
1. Use your fingers to loosen the blue captive
thumbscrews on the tape drive.
2. Pull straight back on the tape drive handle while
supporting the bottom of the drive to remove it
from the module.
CAUTION: Support the bottom of the tape
drive when removing it to avoid damaging any
of the internal connections.
Page 3