
HP StoreEver MSL6480 Tape Library Module Replacement (QU625-96304, June 2013)


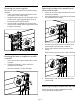
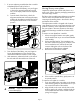

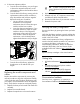
Table Of Contents
- Overview
- Saving the configuration settings
- Unlocking the magazine
- Using the OCP
- Using the manual release
- Removing the tape cartridges
- Powering off the library
- Removing the module cables
- Removing the tape drives
- Removing the power supplies
- Removing the base or expansion module controller
- Removing the chassis fan assembly and drive power boards
- Removing the empty module from the rack
- Moving library cover plates
- Installing the replacement module into the rack
- Replacing the module components and cables
- Verifying the library configuration
- Getting help
- Documentation feedback

HP StoreEver MSL6480 Tape
Library Module Replacement
Abstract
The module chassis is a mandatory customer self repair
part. HP customer self repair (CSR) programs allow you to
repair your StoreEver product. If a CSR part needs
replacing, HP ships the part directly to you so that you can
install it at your convenience. For more information about
CSR, contact your local service provider. For North America,
see the CSR website: www.hp.com/go/selfrepair
© Copyright 2013 Hewlett-Packard Development Company, L.P.
*QU625-96304*
HP Part Number: QU625-96304
Published: June 2013
Edition: 1
WARNING! Each library module weighs 41
kg (90 lb) without media or tape drives and
71.4 kg (157.4 lb) with media (80 cartridges)
and six tape drives. When moving the library,
to reduce the risk of personal injury or damage
to the device:
• Observe local health and safety
requirements and guidelines for manual
material handling.
• Remove all tapes to reduce the overall
weight of the device and to prevent
cartridges from falling into the robotic path
and damaging the library. Keep the
cartridges organized so they can be
returned to the same locations.
• Obtain adequate assistance to lift and
stabilize the device during installation or
removal.
WARNING! When replacing a module in the
rack, to reduce the risk of personal injury or
damage to equipment:
• Extend the rack leveling jacks to the floor.
• Ensure that the full weight of the rack rests
on the leveling jacks.
• Install the rack stabilizer kit on the rack.
• Extend only one rack component at a time.
Racks may become unstable if more than
one component is extended.
CAUTION: Parts can be damaged by
electrostatic discharge. Keep parts in
electrostatic containers until needed. Ensure you
are properly grounded when touching static
sensitive components.
Overview
To replace the module, you will:
1. Save the library configuration.
2. Remove tape cartridges and power off the library.
3. Remove all the components from the module and
disconnect the power cords and cables.
4. Remove the module from the rack.
5. Install the replacement module into the rack.
6. Replace the components and cables.
7. Connect the power cords, power on the library,
and verify the operation.
8. Replace the tape cartridges.
Page 1