
HP StoreEver 1/8 G2 Tape Autoloader User and Service Guide (AK377-96024, December 2012)


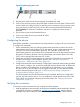


Figure 20 Attaching the power cord
3. Plug the power cable into the nearest properly grounded power outlet.
4. Power on the device by pressing the power button located on the front panel. Check the LCD
screen to make sure it has power. If not, check the power connections and your power source.
During the Power On Self Test (POST), all four LEDs are illuminated briefly, followed by a
flashing Ready LED. When the initialization sequence is complete, the Home screen is
displayed.
5. Plug in the host server and all attached devices.
6. Power on any other devices you powered off earlier.
7. Power on the server.
Configuring the device
Now that the autoloader is connected to the host and powered on, configure it for your environment.
To configure the autoloader:
1. Set the administrator password. Setting an administrator password provides access to the
administrator functions with the RMI or OCP, and restricts access to administrator functions to
only those who know the administrator password. The autoloader comes with a null
administrator password, which until set allows unrestricted access to all administrative functions
through the OCP but not the RMI. Once the administrator password has been set from the
OCP, it can be changed from either the OCP or RMI.
2. Set the date and time. The date and time are used by the autoloader to record events and
should be set during the initial installation process. (See “Setting the date and time
(Configuration > Autoloader Date/Time)” (page 76).)
3. Configure the autoloader network settings. Configuring the autoloader network settings enables
you to monitor, configure, and control most autoloader functions from the RMI. By default, the
device will obtain an IP address from an IPv4 DHCP server. Optionally, you can configure
the device to use a static IP address. Once logged into the RMI, you can administer further
network changes through the RMI. (See “Configuring network settings (Configuration >
Configure Network Settings)” (page 76).)
The device supports IPv4 and IPv6 Internet Protocols. By default, the device is configured to
use IPv4, the most common version. You can enable IPv6 or both Internet Protocols from the
OCP or RMI. You must finish configuring IPv6 from the RMI. (See “Changing the network
configuration” (page 51).)
Verifying the connection
To verify the connection between the host computer and the autoloader:
1. Install the application software and/or drivers that are compatible with the autoloader. Software
compatibility information is available at www.hp.com/go/automated. Backup software
packages may require additional software or licensing to communicate with the robotics.
Configuring the device 27